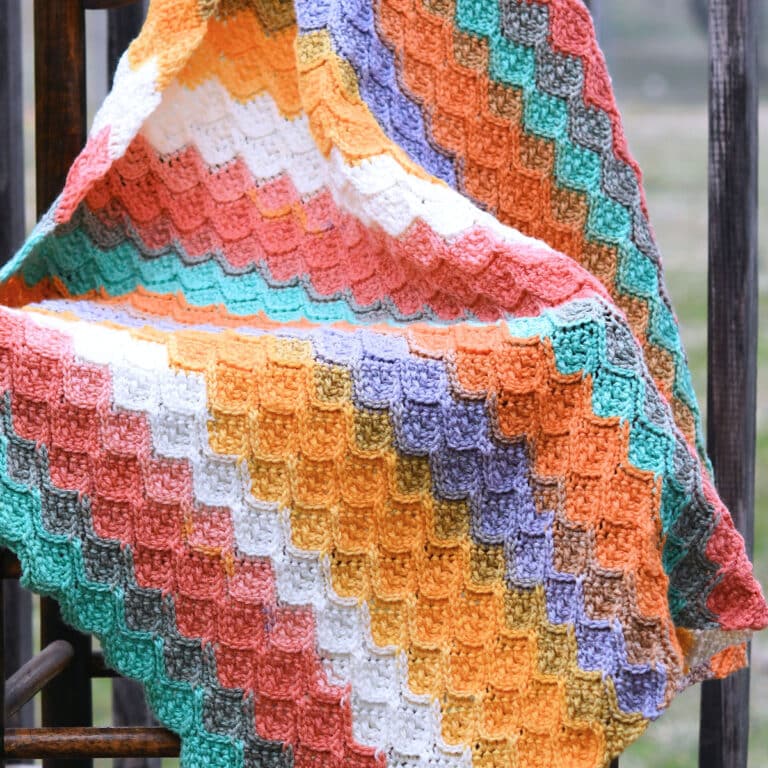
Delicate crochet baby blankets can be made in simple double crochets and chains too! You don’t need a lot of complex stitching to produce a treasured baby shower gift.
Never underestimate the power of embellishment. This crochet baby blanket is easily embellished with flowers and leaves to create your own, one-of-a-kind project.

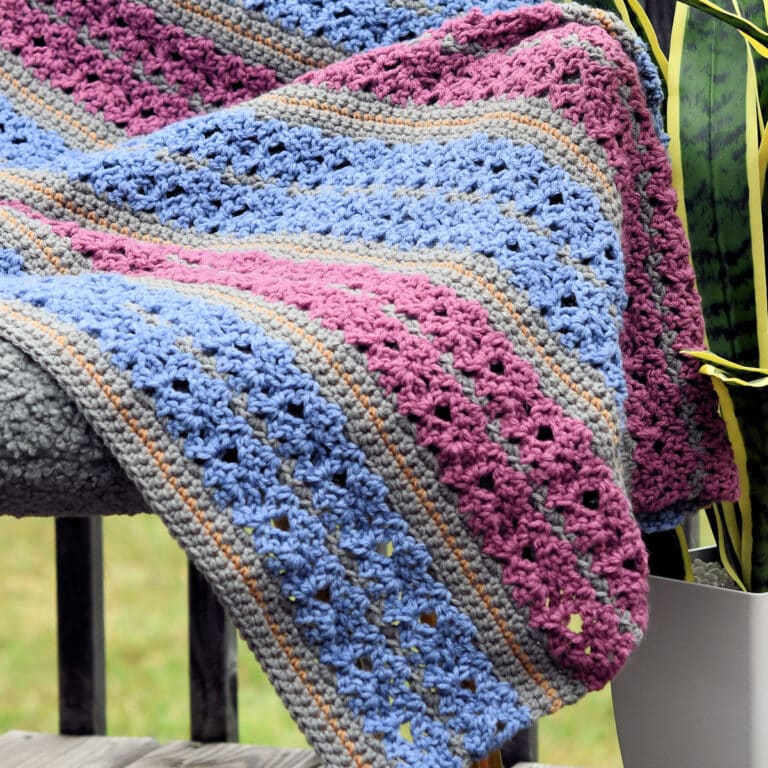
“Blue Roses Baby Blanket” free crochet pattern by Kim Guzman © Oct. 2023. All rights reserved.
Technique: Regular Crochet.
Skill Level: Intermediate.

Crochet Pattern At A Glance
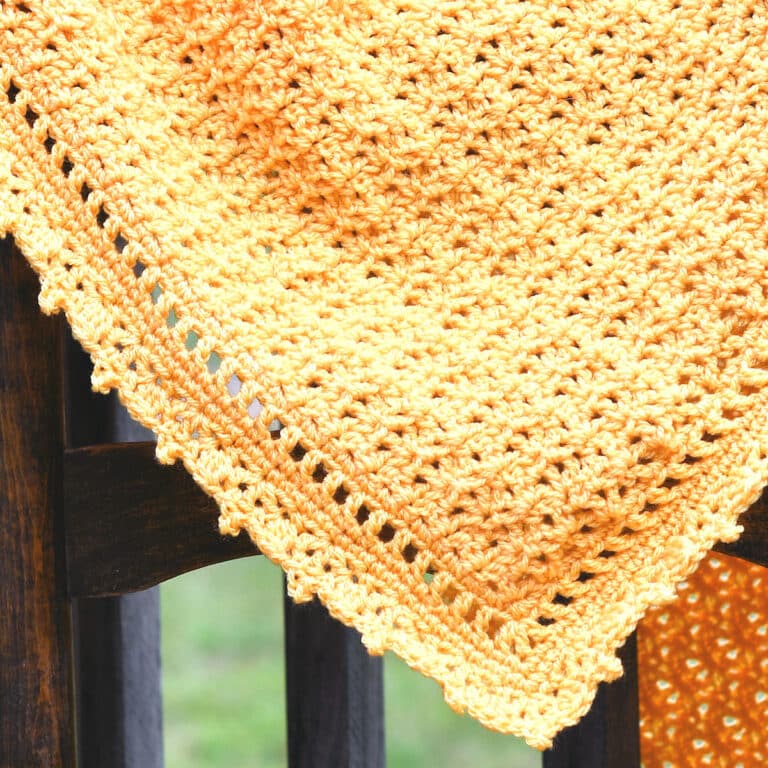
Blue Roses Baby Blanket Pattern
Designer: Kim Guzman © 2022-2026. All rights reserved.Rate the Pattern
Yarn
- Stylecraft “Special DK”, size 3 (DK weight) yarn, 100% acrylic, 322 yds/295m per 3.5 oz/100g per skein: 5 skeins of Sherbet
Other Materials
- Suggested Crochet Hook Size G-7 (4.5mm) or hook needed to meet gauge
- Yarn Needle for weaving ends and attaching flowers
Instructions
- Establish the lace "frame" in the first 9 rows with a 4-row repeat.
- Continue with the right and left sides, making the center a solid double crochet section.
- Mirror the bottom "frame" on the top.
- Make a 3-round border.
- Make the optional flowers and leaves. Attach them as desired. Weave in all ends securely.
Full Free Crochet Pattern Below

This is a free crochet pattern and the written instructions are below. If you prefer a printable download, a PDF is also available for purchase.
My Crochet Pattern Notes
Although this crochet baby blanket is made in the filet crochet technique, it doesn’t include a filet crochet chart which can be more difficult to learn. The pattern is written in standard crochet text.
This is an adaptation of the Color Block Filet Baby Afghan, if you want to try something more basic first.
This blanket crochet pattern is worked in one piece. There is a short border worked in the round.
Once the blanket is complete, you can embellish as you would like with the optional flowers and leaves.
Why Is My Crochet Blanket Border Wavy?
It’s important to get the correct number of stitches along the edge in order to keep your blanket from warping, or getting wavy. If you have too many stitches, you’ll end up with a wavy edge. Although not as common, too few stitches will cause buckling.
Although not so popular among crocheters, many crochet patterns will instruct you on the correct number of stitches to begin a border. There is always a reason and you should take the time to get the correct number. It could be to keep your blanket from getting wavy on the edges or it could be that your border requires a certain multiple of stitches to complete a complex design.
Note that simple one or two round borders don’t usually require a lot of planning. The crochet work usually adapts to avoid a wavy border. It’s when you start adding more rounds or more complex stitch patterns that it becomes necessary to plan the number of stitches.
How To Evenly Crochet Stitches For A Border
Many instructions will say to crochet evenly around and give you a number. The top and bottom are easy because they’re always fairly close to the desired number, maybe a few more or less. It’s the side edges that give you more of a problem.
This particular blanket is a square. Logically, there should be the same number of edges on all four sides, right?
Following my instinct, there were 147 single crochet at the top and bottom once I place the 3 single crochet in each corner. Actually, there were 148, but I needed an odd number for the filet round. So, 147, it is.
Now, using my normal crochet techniques, I would have made 2 single crochet at the side of each double crochet on the sides. This would have meant that I had 162 stitches on each side.
Why is it so much higher? It’s because crochet stitches are wider than they are tall. Since you’re now working sideways, you don’t need as many stitches to span the entire area.
Since this blanket is square, we know that all edges should have the same number. So, the plan is to make 147 single crochet in a place that thinks it wants 161 stitches.
As it turns out, this blanket makes it easy. There are 4-row sections, which are easily seen as little boxes. Usually, I would have tried to fit 8 single crochet in each section, but instead, I’m going to make 7 single crochet in each section.
Keeping in mind that there are 21 boxes, how convenient that 21 x 7 equals 147, the exact number I need.
What I’ve done here is separate the edge into sections, then place a smaller number of stitches into each section. If you don’t have cute little boxes to keep your place, you can use stitch markers or small pieces of scrap yarn.
For example, if you have 150 stitches to place, then make 15 sections. Place 10 stitches in each section. It’s a lot easier to evenly place 10 stitches than 150 at once.
Pin It For Later

Finished Size
38″ x 38″.
Yarn
Stylecraft “Special DK”, size 3 (DK weight) yarn, 100% acrylic, 322 yds/295m per 3.5 oz/100g per skein: 5 skeins of Sherbet.

“Special Double Knit” is classified as a DK weight (size 3) yarn and is currently available in over 120 shades.
Available at LoveCrafts (aff link).
See more projects in Stylecraft Special DK yarn.
Yarn Substitution
You can use any Size 3 DK weight or light worsted weight yarn. If you prefer to use a heavier weight yarn, you can adjust the stitch multiple and use a larger hook. There will be a difference in yardage, of course.
Other Materials
Suggested Crochet Hook Size G-7 (4.5mm) or hook needed to meet gauge.
Yarn Needle for weaving ends and attaching flowers.

Special Stitches
Shell (sh): [Dc, ch 1, dc, ch 1, dc] in st indicated.
Other Abbreviations
This baby blanket pattern is written in US crochet terminology.
ch=chain; dc=double crochet, hdc=half double crochet; rep=repeat; sk=skip; sl=slip; sp(s)=space(s); st(s)=stitch(es); tr=treble crochet.
All numbers after the colon at the end of an instruction are stitch counts. Use the stitch count to check your work.
Gauge
18 stitches (about 2 repeats) for 9 rows measures approximately 4×4″. Use the stitch multiple to change the width, if you like.
Stitch Multiple
To change the width, make your initial chain any multiple of 9, then add 7.
Free Crochet Pattern Instructions
Row 1: Ch 151, dc in 3rd ch from hook, *ch 2, sk 2 ch, dc in each of next 7 ch, rep from * to last 4 ch, ch 2, sk 2 ch, dc in each of last 2 ch, turn.
Row 2: Ch 2 (counts as first dc here and throughout), sk first dc, dc in next dc, *ch 2, sk ch-2 sp, dc in each of next 3 dc, ch 1, sk 1 dc, dc in each of next 3 dc, rep from * to last ch-2 sp, ch 2, sk ch-2 sp, dc in each of last 2 dc, turn.
Row 3: Ch 2, sk first dc, dc in next dc, *ch 2, sk ch-2 sp, dc in each of next 3 dc, dc in next ch-1 sp, dc in each of next 3 dc, rep from * to last ch-2 sp, ch 2, sk ch-2 sp, dc in each of last 2 dc, turn.
Row 4: Ch 2, sk first dc, dc in next dc, *ch 2, sk ch-2 sp, dc in next dc, [ch 1, sk 1 dc, dc in next dc] 3 times, rep from * to last ch-2 sp, ch 2, sk ch-2 sp, dc in each of last 2 dc, turn.
Row 5: Ch 2, sk first dc, dc in next dc, *ch 2, sk ch-2 sp, dc in next dc, [dc in next ch-1 sp, dc in next dc] 3 times, rep from * to last ch-2 sp, ch 2, sk ch-2 sp, dc in each of last 2 dc, turn.
Rows 6-8: Rep rows 2-4.
Note: This next part will carry the filet portion up the right and left sides with a large, solid double crochet section in the center. There are three sections in each row. I’ve separated the sections. The instructions get too long and make it difficult to understand if they’re not separated.
Row 9:
Section 1: Ch 2, sk first dc, dc in next dc, *ch 2, sk ch-2 sp, dc in next dc, [dc in next ch-1 sp, dc in next dc] 3 times, rep from * once more, ch 2, sk ch-2 sp,
Section 2: *dc in next dc, [dc in next ch-1 sp, dc in next dc] 3 times, 2 dc in next ch-2 sp, rep from * 10 times more, dc in next dc, [dc in ch-1 sp, dc in next dc] 3 times: 106 dc,
Section 3: *ch 2, sk ch-2 sp, dc in next dc, [dc in next ch-1 sp, dc in next dc] 3 times, rep from * once more, ch 2, sk ch-2 sp, dc in each of last 2 dc, turn.
Row 10:
Section 1: Ch 2, sk first dc, dc in next dc, *ch 2, sk ch-2 sp, dc in each of next 3 dc, ch 1, sk 1 dc, dc in each of next 3 dc, rep from * once more, ch 2, sk ch-2 sp,
Section 2: dc in each dc to next ch-2 sp: 106 dc,
Section 3: *ch 2, sk ch-2 sp, dc in each of next 3 dc, ch 1, sk 1 dc, dc in each of next 3 dc, rep from * once more, ch 2, sk ch-2 sp, dc in each of last 2 dc, turn.
Row 11:
Section 1: Ch 2, sk first dc, dc in next dc, *ch 2, sk ch-2 sp, dc in each of next 3 dc, dc in next ch-1 sp, dc in each of next 3 dc, rep from * once more, ch 2, sk ch-2 sp,
Section 2: dc in each dc to next ch-2 sp: 106 dc,
Section 3: *ch 2, sk ch-2 sp, dc in each of next 3 dc, dc in next ch-1 sp, dc in each of next 3 dc, rep from * once more, ch 2, sk ch-2 sp, dc in each of last 2 dc, turn.
Row 12:
Section 1: Ch 2, sk first dc, dc in next dc, *ch 2, sk ch-2 sp, dc in next dc, [ch 1, sk 1 dc, dc in next dc] 3 times, rep from * once more, ch 2, sk ch-2 sp,
Section 2: dc in each dc to next ch-2 sp: 106 dc,
Section 3: *ch 2, sk ch-2 sp, dc in next dc, [ch 1, sk 1 dc, dc in next dc] 3 times, rep from * once more, ch 2, sk ch-2 sp, dc in each of last 2 dc, turn.
Rows 13-72: Rep rows 9-12.
Rows 73-75: Rep rows 9-11.
Row 76:
Section 1: Ch 2, sk first dc, dc in next dc, *ch 2, sk ch-2 sp, dc in next dc, [ch 1, sk 1 dc, dc in next dc] 3 times, rep from * once more,
Section 2: *ch 2, sk ch-2 sp, dc in next dc, [ch 1, sk 1 dc, dc in next dc] 3 times, rep from * to next ch-2 sp,
Section 3: *ch 2, sk ch-2 sp, dc in next dc, [ch 1, sk 1 dc, dc in next dc] 3 times, rep from * once more, ch 2, sk ch-2 sp, dc in each of last 2 dc, turn.
Note: The solid double crochet center is now complete and you’ll go back to the beginning lace formation.
Row 77: Ch 2, sk first dc, dc in next dc, *ch 2, sk ch-2 sp, dc in next dc, [dc in next ch-1 sp, dc in next dc] 3 times, rep from * to last ch-2 sp, ch 2, sk ch-2 sp, dc in each of last 2 dc, turn.
Row 78: Ch 2, sk first dc, dc in next dc, *ch 2, sk ch-2 sp, dc in each of next 3 dc, ch 1, sk 1 dc, dc in each of next 3 dc, rep from * to last ch-2 sp, ch 2, sk ch-2 sp, dc in each of last 2 dc, turn.
Row 79: Ch 2, sk first dc, dc in next dc, *ch 2, sk ch-2 sp, dc in each of next 3 dc, dc in next ch-1 sp, dc in each of next 3 dc, rep from * to last ch-2 sp, ch 2, sk ch-2 sp, dc in each of last 2 dc, turn.
Row 80: Ch 2, sk first dc, dc in next dc, *ch 2, sk ch-2 sp, dc in next dc, [ch 1, sk 1 dc, dc in next dc] 3 times, rep from * to last ch-2 sp, ch 2, sk ch-2 sp, dc in each of last 2 dc, turn.
Rows 81-83: Rep rows 77-79. Do not fasten off, begin working in the round.
Border
Note: When working a border that’s more than one or two rounds, it’s easy to get warping along the sides because it’s all too easy to add too many stitche. Crochet stitches are wider than they are tall. It’s easy to place the stitches on the top and bottom, but the sides need a little extra care. To make this easier, I found that working 7 sc along the side edges of each 4-row section worked really well.
Round 1: Ch 1, *work 3 sc in corner, work 147 sc evenly along side, rep from * 3 times, sl st to first sc and sl st in next sc: 600 sc.
Round 2: Ch 4 (counts as dc plus ch-1 sp), [dc, ch 1, dc] in same sc, *[ch 1, sk next sc, dc in next sc] to 3-sc corner, ch 1, sk next sc, sh (see Special Stitches above) in center of corner (corner made), rep from * 2 times more, [ch 1, sk next sc, dc in next sc] to last sc, ch 1, sk last sc, sl st to 3rd ch of beg ch-4.
Round 3: Ch 1, sc in same st as joining, sc in ch-1 sp, *3 sc in next dc (corner made), [sc in next ch-1 sp, sc in next dc] to ch-1 sp before center dc of corner, sc in next ch-1 sp, rep from * 2 times more, 3 sc in next dc, [sc in next ch-1 sp, sc in next dc] to last ch-1 sp, sc in last ch-1 sp, sl st to first sc.
Flower Embellishments
The embellishments are optional. Make as many as you like for attaching or none at all. Your choice.

Large Flower (Make 1)
Round 1: Ch 4, sl st to first ch to form a ring, ch 1, 12 sc in in ring, sl st to first sc. (Push stitches around the ring, as needed, in order to add the entire 12. Tighten the beginning strand gently, as necessary.)
Round 2: Ch 1, sc in first sc, *3 dc in next sc, sc in next sc, rep from * to last sc, 3 dc in last sc, sl st to first sc. (Six petals formed.)
Round 3: Working behind sts throughout, sl st into one of the back bars of same sc, *ch 2, sl st into one of the back bars of next sc, rep from * around, ch 2, sl st to back of first sc and into first ch-2 sp: 6 ch-2 sps.
Round 4: In each ch-2 sp, work: [sc, 5 dc, sc]. Sl st to first sc.
Round 5: Working behind sts throughout, sl st into one of the back bars of same sc, *ch 3, sl st into one of the back bars of first sc of next petal, rep from * around, ch 3, sl st to back of first sc and into ch-3 sp: 6 ch-3 sps.
Round 6: In each ch-3 sp, work: [sc, 5 dc, sc]. Sl st to first sc.
Round 7: Working behind sts throughout, sl st into one of the back bars of same sc, *ch 4, sl st into one of the back bars of first sc of next petal, rep from * around, ch 4, sl st to back of first sc and into ch-4 sp: 6 ch-4 sps.
Round 8: In each ch-3 sp, work: [sc, 7 dc, sc]. Sl st to first sc, fasten off.
Medium Flower (Make 3)
Work rounds 1-6 of Large Flower. Fasten off.
Small Flower (Make 4)
Work rounds 1-2 of Large Flower. Fasten off.
Leaf (Make 3)
Ch 12, sc in second ch from hook, hdc in next 3 ch, dc in next 3 ch, tr in next 4 ch, ch 3, sl st in the same ch as last tr, ch 4, turn upside down so you can work in the unused lps on the other side of the beginning ch, tr in same ch as ch 4, tr in next 3 ch, dc in next 3 ch, hdc in next 3 ch, sc in last ch, sl st to first sc, fasten off.
Finishing
With yarn needle, attach flowers and leaves as desired or according to photograph. Weave in all ends securely.

Twitter | Facebook | Pinterest
All the patterns at Make It Crochet are free. Since many of you have asked how to help with the costs of running a site like this, I’ve made all the patterns into print-ready PDFs and the cost is about the same as a cup of coffee. Every little bit helps.
TERMS: To my fellow crafters, you have my permission to use my patterns to make and sell your projects* anywhere you like. You cannot use my images to sell your projects, though. You must take photos of your own work. All patterns have been tested but mistakes can happen. If you find a mistake, please let me know. Everything at MakeItCrochet.com is protected by copyright to Kim Guzman. Other than the permissions previously given, no one other than Kim Guzman has permission to: reproduce, copy, publish or distribute this pattern, its parts or photos in any way or form, including, but not limited to, translations into foreign languages & video production.
*Not intended to be blanket permission for mass production.
Thank you so much for this pattern, it’s so pretty! xx
Thanks so much! I hope you enjoy it. 🙂 Thank you for writing!
Gorgeous, plan to use this beauty as a prayer small blanket to cover with. I no longer have babies but love this thanks so much! Joan
That’s great! I hope you enjoy it. Thank you for writing! 🙂
Love this pattern but I’m really struggling with the flowers – I can’t wrap my mind around what you mean about working behind the stitches and back bars. I did opt for a magic ring instead of the chain beginning, did that throw me off? Please help, I love these flowers so much!
Don’t worry. It sounds more difficult than it actually is. With the front of the flower still facing you, tip the stitches toward you a little bit so you can see the backs of the stitches. Follow one of the single crochet so you can see the back of it. There are two vertical bars and one horizontal bar on the back of the single crochet. I tend to use the vertical bars. Just jab your hook under one of those vertical bars, yarn over, pull loop through and through the loop on hook, making a slip stitch. The slip stitch will be entirely on the back of the single crochet and you can’t see it from the front of the stitch.
What this does: it creates chain loops in the backs of the petals so they start off lower than the others, making all the petals layered instead of flat.
I don’t use magic ring and these flowers have a small hole in the center. Using a magic ring probably won’t alter the rounds in a layered flower, so I don’t think it will cause any problems. But, if you think it is altering the petals, making them bunch up, try the method I’ve used to see if it helps.
Oh thanks. I had just never heard posts called bars before.
Ah, gotcha! The post of a stitch is the entire lower portion of vertical strands under the two top horizontal bars (where you typically stitch). The vertical bars would be breaking it down even further.