
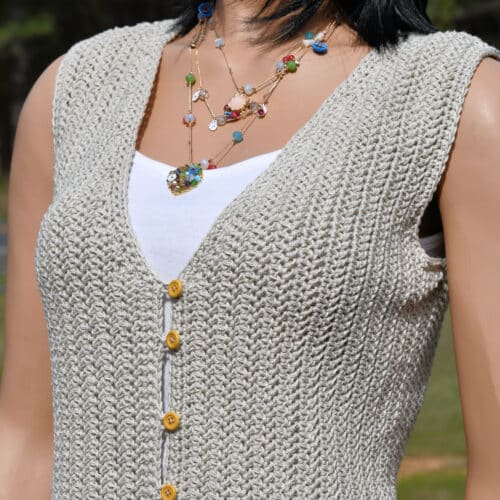
Welcome the summer with this Classic Halter Top Crochet Pattern in an easy stitch that can be made in a weekend. It’s made in a cooling linen cotton blend yarn in six sizes.

“Classic Halter Top” free crochet pattern by Kim Guzman © May 2024. All rights reserved.
Technique: Regular Crochet.

Crochet Pattern At A Glance

Classic Halter Top Free Crochet Pattern
Designer: Kim Guzman © 2022-24. All rights reserved.Rate the Pattern
Yarn
- King Cole “Linendale DK” yarn, size 3 weight, 57% cotton/30% viscose/13% linen, 131 yds/120m, 1.76 oz/50g ball, 5 (7, 8, 8, 9, 10) balls or 655 (815, 950, 1040, 1120, 1250) yards in color Mushroom
Other Materials
- Suggested Crochet Hook Size H-8 (5mm) or hook needed to meet gauge, referred to as “larger hook” AND Size G-7 (4.5mm) crochet hook, for trim only, referred to as “smaller hook”
- Yarn Needle for weaving ends
Instructions
- This project begins by making the back piece to set aside for later.
- The front piece is made to match the back then you make the two sides of the armhole and neckline.
- Seam the sides and back of the neck.
- Pick up stitches along the edges to make 2 rounds of single crochet.
- Weave in all ends securely and block as desired.
Full Free Crochet Pattern Below
This is a free crochet pattern and the written instructions are below. If you prefer a printable download, a PDF is also available for purchase.
My Crochet Pattern Notes
This easy halter top is made in two pieces, starting from the bottom hem and working up. The sides are seamed and the neck strap is joined at the back of the neck.
Crochet is a tricky beast and trying to get a halter top like this to stay up on its own requires negative ease, a full 3 1/2″ on this top. But, if you aren’t able to get something that stays up in the back the way you would like, it’s a simple matter to provide some support at the upper back, attaching it to the neck. You can add straps of some kind, whether chains or something more wide.
The negative ease is built into the back only, making the back width less than the front width. It’s the way very fitted garments are made and nothing unusual. Just think of it like this: It will take less crochet time. 🙂
Behind The Scenes

To ensure that what you’re seeing at Make It Crochet is an actual crochet pattern and actual crochet photography, I will be providing a new section for each post showing a Behind the Scenes photo. I know that you may be concerned about the recent influx of AI imagery and patterns in other places on the internet so I want you to have confidence in my site. All photographs at Make It Crochet are taken by my son, Christian Guzman.
Pin It For Later

Finished Sizes
The model size is intended to fit up to 34″ bust (size small) with 3 1/2″ negative ease. The pattern is written for sizes small (up to 34″), medium (up to 38″), large (up to 42″), 1X (up to 46″), 2X (up to 50″) and 3X (up to 54″). The first number in all instructions will be for the smallest size in that section and the rest of the sizes will be in parenthesis.
The sizes for garments are never intended to be perfect for every single body type. Review the schematic showing the measurements to determine whether you will need to make any adjustments.
Suggested adjustments you may consider are decreasing the armhole and v-neck height. For a more modest look, you can decrease the armhole by about 4-6 rows on each side, but be sure to check the torso length to see if you need to add back those same 4-6 rows to the bottom. Another adjustment is adding straps to the back to keep the back in position without sagging. If you like, use chains or something a little wider and attach as desired. Crossed straps look especially nice too.
If you want to lengthen the top, remember that it’s a tight fit at the bust so it would be a tight fit at the hips as well. You may want to add side vents but you still don’t want to add very much length because it could end up looking more like a tabard or apron at some point, depending on hip size. It could still be done, but you would want to add some width as well.
Yarn
King Cole “Linendale DK” yarn, size 3 weight, 57% cotton/30% viscose/13% linen, 131 yds/120m, 1.76 oz/50g ball, 5 (7, 8, 8, 9, 10) balls or 655 (815, 950, 1040, 1120, 1250) yards in color Mushroom.

At the time of writing this pattern, “Linendale DK”, a DK weight yarn, is available in 10 solid shades.
I was able to find it at Wool Warehouse.
More Summer Crochet Garments
Other Materials
Suggested Crochet Hook Size H-8 (5mm) or hook needed to meet gauge, referred to as “larger hook” AND Size G-7 (4.5mm) crochet hook, for trim only, referred to as “smaller hook”.
Yarn Needle for weaving ends.
Gauge
Using larger hook and working in stitch pattern, 18 sts for 23 rows measures approximately 4 x 4″.
Crunch Stitch vs. Even Moss Stitch
The entire halter top is made in Crunch Stitch. You may have seen it called Even Moss Stitch. This happens with crochet through different publishers, including internet publishers. It happens more often than you think.
Crunch stitch is a simple one row stitch repeat made up of slip stitch and half double crochet. Thereafter, half doubles are on top of slip and slip are on top of half doubles.
The fabric is fairly dense, making it the perfect choice for many crochet garments.
I’ve used Crunch stitch in another project on Make It Crochet, Ups and Downs Twisted Headband. It’s a quick and easy project that would be perfect for practicing the stitch pattern, if you like. The difference between the headband and the tank top here is that I’ve counted the beginning chain-2 as a stitch to help with the stitch count during the shaping of the neck and armholes.
Common Pitfalls
It takes some retraining of muscle memory to use slip stitch as an actual stitch. It doesn’t immediately come naturally. I kept trying to make a single crochet.
The other issue is that the last two stitches of each row are pretty tight. It’s easy to miss a stitch or two. You can either mark the last stitch (the beginning chain 2) or count every row. Always remember that your last stitch of each row is going to be a slip stitch and if you consciouly make your beginning chain 2 and first slip stitch a little loose, it will make things easier.
Abbreviations
This halter top crochet pattern is written in US crochet terminology.
ch=chain; hdc=half double crochet; prev=previous; rep=repeat; sc=single crochet; sk=skip; sl=slip; st(s)=stitch(es).
Since there are so many sizes, you may want to print out the pattern and circle only those numbers that apply to the size you are making.
Any numbers at the end of an instruction, after a colon, indicate the stitch count for that row.
New Pattern Free PDF Download Weekend

The PDF download for the Classic Halter Top pattern is available for free this weekend only. This promotion ends at 11:59pm CST, Monday, May 20.
This promotion is concluded. Please sign up for the email newsletter to make sure you don’t miss any weekly promotions. Scroll down for the free online pattern.
Free Crochet Pattern Instructions
Important: Read all the notes and tips provided before beginning any garment.
Halter Top Back
Row 1: With larger hook (see Materials above), ch 61 (69, 79, 87, 95, 103), sk 2 ch, [sl st in next ch, hdc in next ch] to last ch, sl st in last ch, turn.
Note: The last two stitches of each row are pretty tight. It’s easy to miss a stitch or two. You can either mark the last stitch (the beginning chain 2) or count every row. Always remember that your last stitch of each row is going to be a slip stitch. It helps if you make the beginning chain 2 and first slip stitch of the row a little loose.
Row 2: Ch 2 (counts as hdc here and throughout), sk first st, [sl st in next hdc, hdc in next sl st] to last st, sl st in last st, turn: 60 (68, 78, 86, 94, 102) sts.
Work even until 52 (56, 58, 60, 58, 60) rows completed from beginning. (To complete from beginning means the total rows from the beginning; i.e. from row 1.) Fasten off after final row. Set aside.
Halter Top Front
Row 1: With larger hook, ch 75 (83, 93, 101, 109, 117), sk 2 ch, [sl st in next ch, hdc in next ch] to last ch, sl st in last ch, turn.
Row 2: Ch 2 (counts as hdc here and throughout), sk first st, [sl st in next hdc, hdc in next sl st] to last st, sl st in last st, turn: 60 (68, 78, 86, 94, 102) sts.
Next Row: Sk first st, sl st in next st and sl st in next 4 (4, 6, 6, 8, 8) sts, ch 2, sk same st, [sl st in next hdc, hdc in next sl st] to last 7 (7, 9, 9, 11, 11) sts, sl st in next st, turn, leaving remaining sts unworked: 62 (70, 76, 84, 88, 96) sts.
Next Row: Work even: 62 (70, 76, 84, 88, 96) sts. (Note: “work even” means to work across the row in the established stitch pattern without increasing or decreasing.)
Begin Neck Shaping
Next Row: Sk first st, sl st in next st, ch 2, sk same st and next st, [sl st in next hdc, hdc in next sl st] 13 (15, 17, 19, 20, 22) times, sl st in next st, turn, leaving remaining sts unworked: 28 (32, 36, 40, 42, 46) sts.
Next Row: Work even: 28 (32, 36, 40, 42, 46) sts.
Next Row: Sk first st, sl st in next st, ch 2, sk same st and next st, [sl st in next hdc, hdc in next sl st] to last 3 sts, sk 2 sts, sl st in last st, turn: 24 (28, 32, 36, 38, 42) sts.
Rep prev 2 rows 2 (2, 2, 3, 3, 3) times more. 16 (20, 24, 24, 26, 30) sts on final row.
Work even 5 (4, 3, 3, 3, 2) more rows: 16 (20, 24, 24, 26, 30) sts.
Next Row: Working in established stitch pattern, decrease at neck edge only: 14 (18, 22, 22, 24, 28) sts.
Rep prev 6 (5, 4, 4, 4, 3) rows 4 (6, 8, 8, 8, 11) times more: 6 (6, 6, 6, 6, 6) sts.
Note: This is where crochet gets tricky. As you decrease the row width to just over 1″, the gauge is distorted making this area longer than it really should be. If you are making this for yourself, you can easily try it on and see if you need to increase or decrease rows. If you’re making it for someone else, you could consider buttonholes and buttons so the strap can be adjusted. If the straps are too long, the armhole and v-neck is going to be even longer than shown in the photo. Use your own judgment here because, always remember, each body is different and you will need to make adjustments, especially in something so tightly fitted.
Work even 22 (19, 20, 20, 18, 22) times more: 6 (6, 6, 6, 6, 6) sts. Fasten off after final row.
Other Side of Neck Shaping
Row 1: Return to last row completed before first half of front, count across 2 (2, 0, 0, 0, 0) more sts, join with sl st, ch 2, sk same st, [sl st in next hdc, hdc in next sl st] to last 3 sts, sk 2 sts, sl st in last st, turn: 28 (32, 36, 40, 42, 46) sts.
Row 2: Work even: 28 (32, 36, 40, 42, 46) sts.
Next Row: Sk first st, sl st in next st, ch 2, sk same st and next st, [sl st in next hdc, hdc in next sl st] to last 3 sts, sk 2 sts, sl st in last st, turn: 24 (28, 32, 36, 38, 42) sts.
Rep prev 2 rows 2 (2, 2, 3, 3, 3) times more. 16 (20, 24, 24, 26, 30) sts on final row.
Work even 5 (4, 3, 3, 3, 2) more rows: 16 (20, 24, 24, 26, 30) sts.
Next Row: Working in established stitch pattern, decrease at neck edge only: 14 (18, 22, 22, 24, 28) sts.
Rep prev 6 (5, 4, 4, 4, 3) rows 4 (6, 8, 8, 8, 11) times more: 6 (6, 6, 6, 6, 6) sts.
Work even 22 (19, 20, 20, 18, 22) times more: 6 (6, 6, 6, 6, 6) sts. Fasten off after final row.
Finishing
Note: When working the Finishing, skip stitches as necessary when going around a curve so you don’t have any puckering.
Armhole and Back Trim. (Round 1) Using smaller hook, join with sl st at bottom seam of armhole, ch 1, sc around, sl st to first sc. (Round 2) Ch 1, sc in each sc around, fasten off.
Neckline Trim. (Round 1) Using smaller hook, join with sl st at back of neck, ch 1, sc around, sl st to first sc. (Round 2) Ch 1, sc in each sc around, fasten off.
Weave in all ends. Block as desired.
Schematic


Twitter | Facebook | Pinterest
All the patterns at Make It Crochet are free. Since many of you have asked how to help with the costs of running a site like this, I’ve made all the patterns into print-ready PDFs and the cost is about the same as a cup of coffee. Every little bit helps.
TERMS: To my fellow crafters, you have my permission to use my patterns to make and sell your projects* anywhere you like. You cannot use my images to sell your projects, though. You must take photos of your own work. All patterns have been tested but mistakes can happen. If you find a mistake, please let me know. Everything at MakeItCrochet.com is protected by copyright to Kim Guzman. Other than the permissions previously given, no one other than Kim Guzman has permission to: reproduce, copy, publish or distribute this pattern, its parts or photos in any way or form, including, but not limited to, translations into foreign languages & video production.
*Not intended to be blanket permission for mass production.

Let Me Know What You Think!