
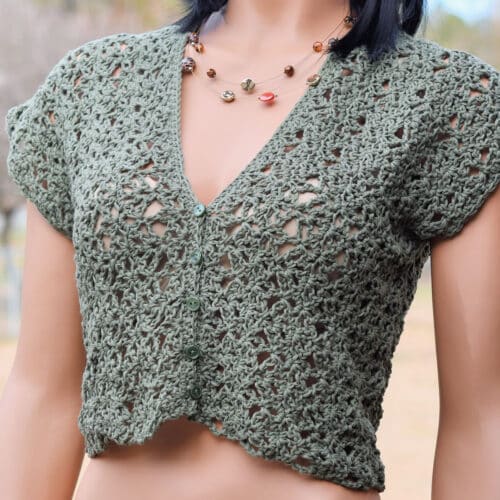
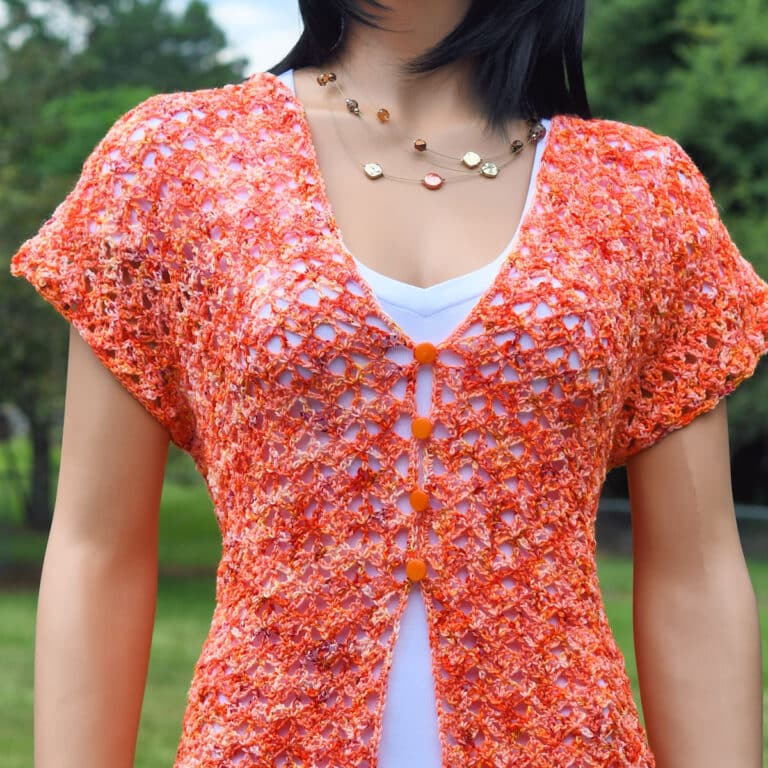
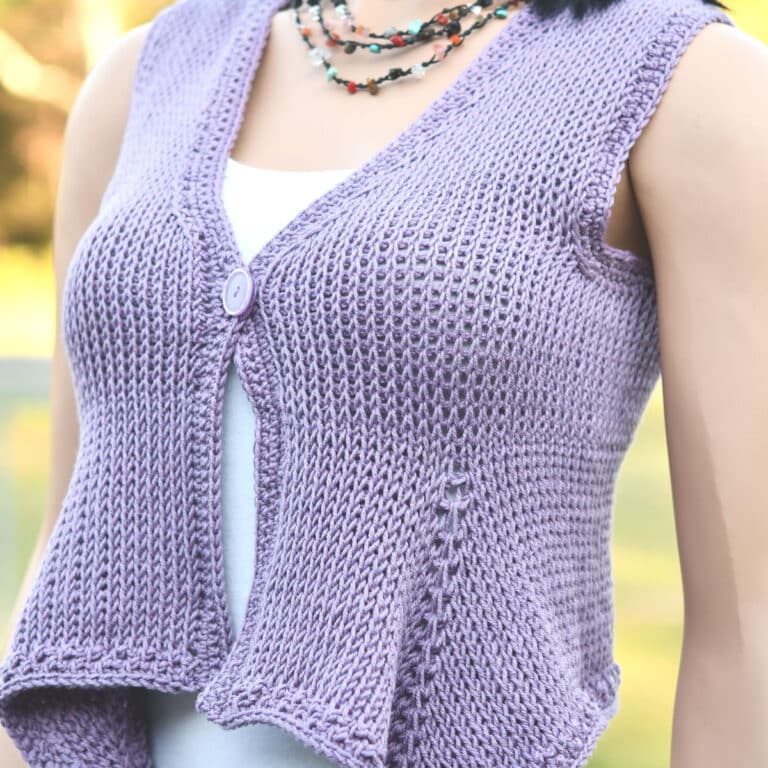
This lightweight sleeveless lace cardigan is the perfect layering piece for spring and summer. The easy two-row repeat adds texture and open stitches, making it especially quick and fun. The free crochet pattern is written in six sizes (S-3X).

“Lilac Lace Cardigan” free crochet sweater pattern by Kim Guzman © Mar. 2024. All rights reserved.
Technique: Regular Crochet.

Crochet Pattern At A Glance

Lilac Lace Cardigan
Designer: Kim Guzman © 2022-2026. All rights reserved.Rate the Pattern
Yarn
- King Cole “Linendale DK” yarn, size 3 weight, 57% cotton/30% viscose/13% linen, 131 yds/120m, 1.76 oz/50g ball, 5 (7, 8, 9, 11, 13) balls or 655 (800, 950, 1150, 1375, 1650) yards in color Mother of Pearl
Other Materials
- Suggested Crochet Hook Size H-8 (5mm) or hook needed to meet gauge, referred to as “larger hook” AND Size G-7 (4.5mm) crochet hook, for trim only, referred to as “smaller hook”
- Yarn Needle for weaving ends
- Buttons 6 (7, 7, 7, 7, 8) size 1/2″ round buttons
- Sewing thread and sewing needle optional, for sewing on buttons
Instructions
- This cardigan is made in one piece, starting at the hem. Start with the chain and row 1 of single crochet. If preferred, work in foundation single crochet.
- Work in 2-row repeat up to the bottom of the armhole.
- Begin the First Front working, over limited stitches up to the shoulder.
- Skip stitches for the bottom of the armhole, join yarn and work across limited stitches to complete the Back.
- Skip stitches on the other side for the bottom of the other Armhole and join yarn across the remaining stitches to work the Other Front.
- Seam the shoulders. Work trim around armholes and work button band trim. Sew on buttons. Weave in all ends and block as desired.
Full Free Crochet Pattern Below

This is a free crochet pattern and the written instructions are below. If you prefer a printable download, a PDF is also available for purchase.
My Crochet Pattern Notes
This sleeveless cardigan is made in one piece, starting at the hem and working toward the shoulders. The lower portion is worked first then stitches are picked up to make the fronts and back. The minimal seaming is only at the few stitches remaining at the shoulder.
The stitch pattern is a very easy two-row repeat with open space made by crossed double crochet, adding texture as well.

There is shaping at the armholes and neckline which moves this pattern into an intermediate level. It’s not super difficult but it adds some extra attention to detail.
Shaping For Front and Back Width
You may notice that there are more decreases at the armhole in the front than there are in the back. This is normal and should be done for all my garments, whenever possible. The clavicles at the shoulders are curved forward, making the front shoulder to shoulder measurement less than the back shoulder to shoulder measurement.
It may be common for you to see crochet patterns that don’t make a distinction between the front and back. This was always done in the past to save on printing space in books and magazines. Now that I can more easily provide more detailed instructions, I can add more tailored options to help with fit. No one wants a tank top strap that sits too close, or worse, falls off the shoulder. Reducing the front armhole just a little bit more is all it takes to correct the fit.
Pin It For Later

Finished Sizes
The model size is intended to fit up to 34″ bust (size small) with 1″ positive ease at the highest range. The pattern is written for sizes small (up to 34″), medium (up to 38″), large (up to 42″), 1X (up to 46″), 2X (up to 50″) and 3X (up to 54″). The first number in all instructions will be for the smallest size and the rest of the sizes will be in parenthesis.
Yarn
King Cole “Linendale DK” yarn, size 3 weight, 57% cotton/30% viscose/13% linen, 131 yds/120m, 1.76 oz/50g ball, 5 (7, 8, 9, 11, 13) balls or 655 (800, 950, 1150, 1375, 1650) yards in color Mother of Pearl.

At the time of writing this pattern, “Linendale DK”, a DK weight yarn, is available in 12 solid shades.
I was able to find it at LoveCrafts (aff link). If you are in the US, they now have a US warehouse (in addition to the original) for shipping.
Other Materials
Suggested Crochet Hook Size H-8 (5mm) or hook needed to meet gauge, referred to as “larger hook” AND Size G-7 (4.5mm) crochet hook, for trim only, referred to as “smaller hook”.
Yarn Needle for weaving ends.
Buttons 6 (7, 7, 7, 7, 8) size 1/2″ round buttons.
Sewing thread and sewing needle optional, for sewing on buttons.

Gauge
Using larger hook and working in stitch pattern, 19 sts for 12 rows measures approximately 4 x 4″.
Special Stitches
Double Crochet Crossed Stitch (Cross): Skip 2 single crochets, double crochet in next single crochet, chain 1, working in front of that double crochet, work a double crochet in the first skipped stitch of the 3 single crochet used for the cross. Do not work around the first double crochet, enclosing it. Push the first double crochet out of the way, if necessary. You want it to stand alone and the double crochets are literally crossed, one on top of the other. The center skipped stitch is left unworked.
Other Abbreviations
This lace cardigan crochet pattern is written in US crochet terminology.
ch=chain; dc=double crochet; dec=decrease; RS=right side; rep=repeat; sc=single crochet; sk=skip; sl=slip; sp(s)=space(s); st(s)=stitch(es).
Since there are so many sizes, you may want to print out the pattern and circle only those numbers that apply to the size you are making.
The numbers at the end of an instruction, after a colon, indicate the stitch count for that row.
The decrease rows seemed to sort of meld together, making them difficult for me and my testers to discern sometimes. I found it easier when I wrote whether it was a decrease at the beginning or a decrease at the end. I added little notes on each decrease row. I’ve left these instructions in there because I thought it might make it easier for you as well. I don’t normally do this but it really helped this time.
New Pattern Free PDF Download Weekend

This promotion is concluded. Please sign up for the email newsletter to make sure you don’t miss any weekly promotions. Scroll down for the free online pattern.
The PDF download for the Lilac Lace Cardigan pattern is available for free this weekend only. This promotion ends at 11:59pm CST, Monday, March 11.
Free Crochet Pattern Instructions
Skip to: First Front ◦ Back ◦ Other Front ◦ Seaming ◦ Trim
Note: I made the first row in the back horizontal bar of the chain for a cleaner edge since there is no additional trim added after finishing. It’s not absolutely necessary, but it looks nicer. If you prefer foundation single crochet, that will work as well. Just make the number of single crochet indicated in the stitch count at the end of the row. Or, you could go ahead and crochet the trim as done on the armholes and center front.
Row 1: With larger hook (see Materials above), ch 162 (180, 201, 219, 237, 261), sc in 2nd ch from hook and in each remaining ch, turn: 161 (179, 200, 218, 236, 260) sc.
Note: Even after several rows, it’s not unusual for the width to be slightly more than anticipated. For instance, I made the size 34″ but it started out as a 36″ at the hem. After the stitch pattern was well established, though, the width reduced to 34″. It’s a combination of skipping a stitch between the double crochets of the cross and the weight of the garment pulling it down, increasing the length and reducing the width. The first row may or may not remain at the wider amount but, that’s completely okay, right? It gives a little bit more ease at the high hip/lower waist. It’s a win-win.
Row 2 (RS): Ch 3 (counts as dc here and throughout), sk same sc, *cross (see Special Stitches above) worked across next 3 sc, rep from * to last sc, dc in last sc, turn: 53 (59, 66, 72, 78, 86) cross.
Row 3: Ch 1, sc in same dc, *sc in next dc, sc in ch-1 sp, sc in next dc, rep from * to last dc, sc in last dc, turn: 161 (179, 200, 218, 236, 260) sc.
Note: The numbers below are correct. The total length from shoulder to hem increases, but the armhole doesn’t increase at the same rate as the body height.
Rep rows 2-3 until 32 (34, 38, 34, 38, 40) total rows have been completed from beginning, ending with a cross row. Do not fasten off.

First Front
Row 1: Ch 1, sc in same dc, *sc in next dc, sc in ch-1 sp, sc in next dc, rep from * 9 (11, 12, 13, 15, 17) times more, sc in next dc, turn: 32 (38, 41, 44, 50, 56) sc.
Row 2: Ch 3, sk same sc, *cross worked across next 3 sc, rep from * to last sc, dc in last sc, turn: 10 (12, 13, 14, 16, 18) cross.
Row 3 (dec at end): Ch 1, sc in same dc, *sc in next dc, sc in ch-1 sp, sc in next dc, rep from * up to last cross, sc in next dc, sk ch-1 sp, sc in next dc, turn, leaving last dc unworked: 30 (36, 39, 42, 48, 54) sc.
Row 4 (dec at beg): Ch 3, sk same sc and sk next sc, *cross worked across next 3 sc, rep from * to last sc, dc in last sc, turn: 9 (11, 12, 13, 15, 17) cross.
Rep previous 2 rows 3 (3, 3, 3, 3, 4) times more: 6 (8, 9, 10, 12, 13) cross on final row.
Row 11 (11, 11, 11, 11, 13): Ch 1, sc in same dc, *sc in next dc, sc in ch-1 sp, sc in next dc, rep from * to last dc, sc in last dc, turn: 20 (26, 29, 32, 38, 41) sc.
For sizes M, 1X, and 2X ONLY: work the following 2 rows (no decreasing). For all other sizes, proceed to Neckline.
Next row: Ch 3, sk same sc, *cross (see Special Stitches above) worked across next 3 sc, rep from * to last sc, dc in last sc, turn: 8 (10, 12) cross.
Next row: Ch 1, sc in same dc, *sc in next dc, sc in ch-1 sp, sc in next dc, rep from * to last dc, sc in last dc, turn: 26 (32, 38) sc.
Neckline
Row 1: Ch 3, sk same sc, *cross worked across next 3 sc, rep from * until 3 (3, 4, 5, 5, 5) cross made in total, dc in next sc, turn, leaving remaining sc unworked: 3 (3, 4, 5, 5, 5) cross.
Row 2 (dec at beg): Ch 1, sk first dc, sc in next dc, sk ch-1 sp, sc in next dc, *sc in next dc, sc in ch-1 sp, sc in next dc, rep from * to last dc, sc in last dc, turn: 9 (9, 12, 15, 15, 15) sc.
Row 3 (dec at end): Ch 3, sk same sc, *cross worked across next 3 sc, rep from * to last 2 sc, sk 1 sc, dc in last sc, turn: 2 (2, 3, 4, 4, 4) cross.
Row 4: Ch 1, sc in same dc, *sc in next dc, sc in ch-1 sp, sc in next dc, rep from * to last dc, sc in last dc, turn: 8 (8, 11, 14, 14, 14) sc.
Row 5: Ch 3, sk same sc, *cross (see Special Stitches above) worked across next 3 sc, rep from * to last sc, dc in last sc, turn: 2 (2, 3, 4, 4, 4) cross.
Work previous 2 rows until 23 (25, 25, 27, 27, 27) total rows of Armhole have been completed, ending with a sc row. Fasten off.

Back
Row 1: Return to the last row before the Armhole began, sk 5 (5, 6, 7, 7, 7) ch-1 sps, join yarn with sl st in very next dc (the one immediately after the last ch-1 sp), ch 1, sc in same dc as joining, *sc in next dc, sc in ch-1 sp, sc in next dc, rep from * 22 (24, 26, 29, 31, 35) times more, sc in next dc, turn, leaving remaining sts unworked: 71 (77, 83, 92, 98, 110) sc.
Row 2: Ch 3, sk same sc, *cross worked across next 3 sc, rep from * to last sc, dc in last sc, turn: 23 (25, 27, 30, 32, 36) cross.
Row 3 (dec on both sides): Ch 1, sk first dc, sc in next dc, sk ch-1 sp, sc in next dc, *sc in next dc, sc in ch-1 sp, sc in next dc, rep from * to last cross, sc in next dc, sk ch-1 sp, sc in next dc, turn, leaving last dc unworked: 67 (73, 79, 88, 94, 106) sc.
Row 4 (dec on both sides): Ch 3, sk same sc and sk next sc, *cross worked across next 3 sc, rep from * to last 2 sc, sk 1 sc, dc in last sc, turn: 21 (23, 25, 28, 30, 34) cross.
Work previous 2 rows 2 (2, 2, 2, 2, 2, 3) times more: 17 (19, 21, 24, 26, 28) cross on final row.
Next row: Ch 1, sc in same dc, *sc in next dc, sc in ch-1 sp, sc in next dc, rep from * to last dc, sc in last dc, turn: 53 (59, 65, 74, 80, 86) sc.
Next row: Ch 3, sk same sc, *cross worked across next 3 sc, rep from * to last sc, dc in last sc, turn: 17 (19, 21, 24, 26, 28) cross.
Work previous 2 rows until 18 (20, 20, 22, 22, 22) total rows of Armhole have been completed, ending with a cross row. Do not fasten off.
First Shoulder
Row 1: Ch 1, sc in same dc, *sc in next dc, sc in ch-1 sp, sc in next dc, rep from * 2 (2, 3, 4, 4, 4) times more, sc in next dc, turn: 11 (11, 14, 17, 17, 17) sc.
Row 2: Ch 3, sk same sc, *cross worked across next 3 sc, rep from * until 3 (3, 4, 5, 5, 5) cross made in total, dc in next sc, turn: 3 (3, 4, 5, 5, 5) cross.
Row 3 (dec at end): Ch 1, sc in same dc, *sc in next dc, sc in ch-1 sp, sc in next dc, rep from * up to last cross, sc in next dc, sk ch-1 sp, sc in next dc, turn, leaving last dc unworked: 9 (9, 12, 15, 15, 15) sc.
Row 4 (dec at beg): Ch 3, sk same sc and sk next sc, *cross worked across next 3 sc, rep from * to last sc, dc in last sc, turn: 2 (2, 3, 4, 4, 4) cross.
Row 5: Ch 1, sc in same dc, *sc in next dc, sc in ch-1 sp, sc in next dc, rep from * to last dc, sc in last dc, turn: 8 (8, 11, 14, 14, 14) sc. Fasten off.
Other Shoulder
Row 1: Return to the last row before the First Shoulder began, sk 11 (13, 13, 14, 16, 18) ch-1 sps, join yarn with sl st in very next dc (the one immediately after the last ch-1 sp), ch 1, sc in same dc as joining, *sc in next dc, sc in ch-1 sp, sc in next dc, rep from * to last dc, sc in last dc, turn: 11 (11, 14, 17, 17, 17) sc.
Row 2: Ch 3, sk same sc, *cross worked across next 3 sc, rep from * to last sc, dc in last sc, turn: 3 (3, 4, 5, 5, 5) cross.
Row 3 (dec at beg): Ch 1, sk first dc, sc in next dc, sk ch-1 sp, sc in next dc, *sc in next dc, sc in ch-1 sp, sc in next dc, rep from * to last dc, sc in last dc, turn: 9 (9, 12, 15, 15, 15) sc.
Row 4 (dec at end): Ch 3, sk same sc, *cross worked across next 3 sc, rep from * to last 2 sc, sk 1 sc, dc in last sc, turn: 2 (2, 3, 4, 4, 4) cross.
Row 5: Ch 1, sc in same dc, *sc in next dc, sc in ch-1 sp, sc in next dc, rep from * to last dc, sc in last dc, turn: 8 (8, 11, 14, 14, 14) sc. Fasten off.
Other Front
Row 1: Return to the last row before the Back began, sk 5 (5, 6, 7, 7, 7) ch-1 sps, join with sl st in very next dc (the one immediately after the last ch-1 sp), ch 1, sc in same dc as joining, *sc in next dc, sc in ch-1 sp, sc in next dc, rep from * to last dc, sc in last dc, turn: 32 (38, 41, 44, 50, 56) sc.
Row 2: Ch 3, sk same sc, *cross (see Special Stitches above) worked across next 3 sc, rep from * to last sc, dc in last sc, turn: 10 (12, 13, 14, 16, 18) cross.
Row 3 (dec at beg): Ch 1, sk first dc, sc in next dc, sk ch-1 sp, sc in next dc, *sc in next dc, sc in ch-1 sp, sc in next dc, rep from * to last dc, sc in last dc, turn: 30 (36, 39, 42, 48, 54) sc.
Row 4 (dec at end): Ch 3, sk same sc, *cross worked across next 3 sc, rep from * to last 2 sc, sk 1 sc, dc in last sc, turn: 9 (11, 12, 13, 15, 17) cross.
Rep previous 2 rows 3 (3, 3, 3, 3, 4) times more: 6 (8, 9, 10, 12, 13) cross on final row.
Row 11 (11, 11, 11, 11, 13): Ch 1, sc in same dc, *sc in next dc, sc in ch-1 sp, sc in next dc, rep from * to last dc, sc in last dc, turn: 20 (26, 29, 32, 38, 41) sc, fasten off.
For sizes M, 1X, and 2X ONLY: work the following 2 rows (no decreasing). For all other sizes, proceed to Neckline.
Next row: Ch 3, sk same sc, *cross (see Special Stitches above) worked across next 3 sc, rep from * to last sc, dc in last sc, turn: 8 (10, 12) cross.
Next row: Ch 1, sc in same dc, *sc in next dc, sc in ch-1 sp, sc in next dc, rep from * to last dc, sc in last dc, turn: 26 (32, 38) sc.
Neckline
Row 1: Sk 9 (15, 15, 15, 21, 24) sc, join with sl st in next sc, ch 3, sk same sc, *cross worked across next 3 sc, rep from * to last sc, dc in last sc, turn: 3 (3, 4, 5, 5, 5) cross.
Row 2 (dec at end): Ch 1, sc in same dc, *sc in next dc, sc in ch-1 sp, sc in next dc, rep from * up to last cross, sc in next dc, sk ch-1 sp, sc in next dc, turn, leaving last dc unworked: 9 (9, 12, 15, 15, 15) sc.
Row 3 (dec at beg): Ch 3, sk same sc and sk next sc, *cross worked across next 3 sc, rep from * to last sc, dc in last sc, turn: 2 (2, 3, 4, 4, 4) cross.
Row 4: Ch 1, sc in same dc, *sc in next dc, sc in ch-1 sp, sc in next dc, rep from * to last dc, sc in last dc, turn: 8 (8, 11, 14, 14, 14) sc.
Row 5: Ch 3, sk same sc, *cross (see Special Stitches above) worked across next 3 sc, rep from * to last sc, dc in last sc, turn: 2 (2, 3, 4, 4, 4) cross.
Work previous 2 rows until 23 (25, 25, 27, 27, 27) total rows of Armhole have been completed, ending with a sc row. Fasten off.
Seaming
With RS facing each other, with yarn needle, seam the front and back shoulders together on both sides.
Armhole Trim
Round 1: With RS facing and smaller hook (see Materials above), join yarn with sl st at bottom center of armhole, ch 1, sc evenly around, sl st to first sc.
Round 2: Ch 1, sc in each sc around, sl st to first sc, fasten off.
Rep for other armhole.
Button Band Trim
Row 1: With RS facing and smaller hook, join yarn with sl st at the hem point of one of the fronts to begin working along the center edge, around the neck and down the other center edge (stitches aren’t worked along the hem). Ch 1, sc evenly up the center front, around the neck and along the other center front, adjusting your stitches where necessary by adding or removing stitches to conform to curves, turn.
Row 2: Starting at about 7.5 (8, 8, 8.5, 8.5, 9)” above the hem, mark 6 (7, 7, 7, 7, 8) evenly spaced buttonhole positions on the actual Right Front Side of the cardigan. Ch 1, sc around, adjusting stitches as necessary for curves, except at buttonhole positions, work: [ch 1, sk 2 sc], turn. Test your button to see if this works for you and adjust as necessary.
Row 3: Ch 1, sc around, adjusting stitches as necessary for curves, except at buttonholes, work [2 sc in ch-1 sp]. Test your buttons again to make certain the button hole matches. Fasten off.
Finishing
Tip: I try to separate the plies of the yarn in order to create the thread used for sewing on buttons whenever possible, unless the yarn is too weak when separated. At least you know that it will match your garment. If it’s not possible, you’ll need matching sewing thread.
Sew on the buttons adjacent to the button holes. Weave in all ends securely. Block as desired.
Schematic


Twitter | Facebook | Pinterest
All the patterns at Make It Crochet are free. Since many of you have asked how to help with the costs of running a site like this, I’ve made all the patterns into print-ready PDFs and the cost is about the same as a cup of coffee. Every little bit helps.
TERMS: To my fellow crafters, you have my permission to use my patterns to make and sell your projects* anywhere you like. You cannot use my images to sell your projects, though. You must take photos of your own work. All patterns have been tested but mistakes can happen. If you find a mistake, please let me know. Everything at MakeItCrochet.com is protected by copyright to Kim Guzman. Other than the permissions previously given, no one other than Kim Guzman has permission to: reproduce, copy, publish or distribute this pattern, its parts or photos in any way or form, including, but not limited to, translations into foreign languages & video production.
*Not intended to be blanket permission for mass production.


Beautiful
I would really love to purchase a few patterns unfortunately you link through Ravelry which for some reason only allows me to purchase through PayPal. My PayPal account is screwed up beyond their comprehension of fixing (verification phone number needs updating), so I am stuck. Do you have another place I can purchase these through.
Yes, that’s one of the limits of Ravelry since it only takes paypal. I am currently in the process of adding my patterns to Lovecraft here: https://www.lovecrafts.com/en-us/d/kim-guzman/40268. It’s taking me awhile with so many patterns (and this one isn’t available yet), but hang on to that link. I hope to get it finished soon. I’ve been apparently putting them up too quickly and it’s overloaded things so I’m waiting for their system to catch up before I add more. But, if you want me to add this particular one, just let me know and I can add it on the next one. Thank you for writing!
Thank you, please there are three I’d love to get. This one, crunch stitch tank, cross stitch button front cardigan. I will check out the link.