
This Beginner Beanie Hat crochet pattern will be the perfect transition project when you’re ready to grow your new skills.
I know that it’s hard sometimes to find a “next” project when you’re learning to crochet. Once you’re ready to move beyond a plain row-by-row scarf, this hat will have you working in the round in no time.
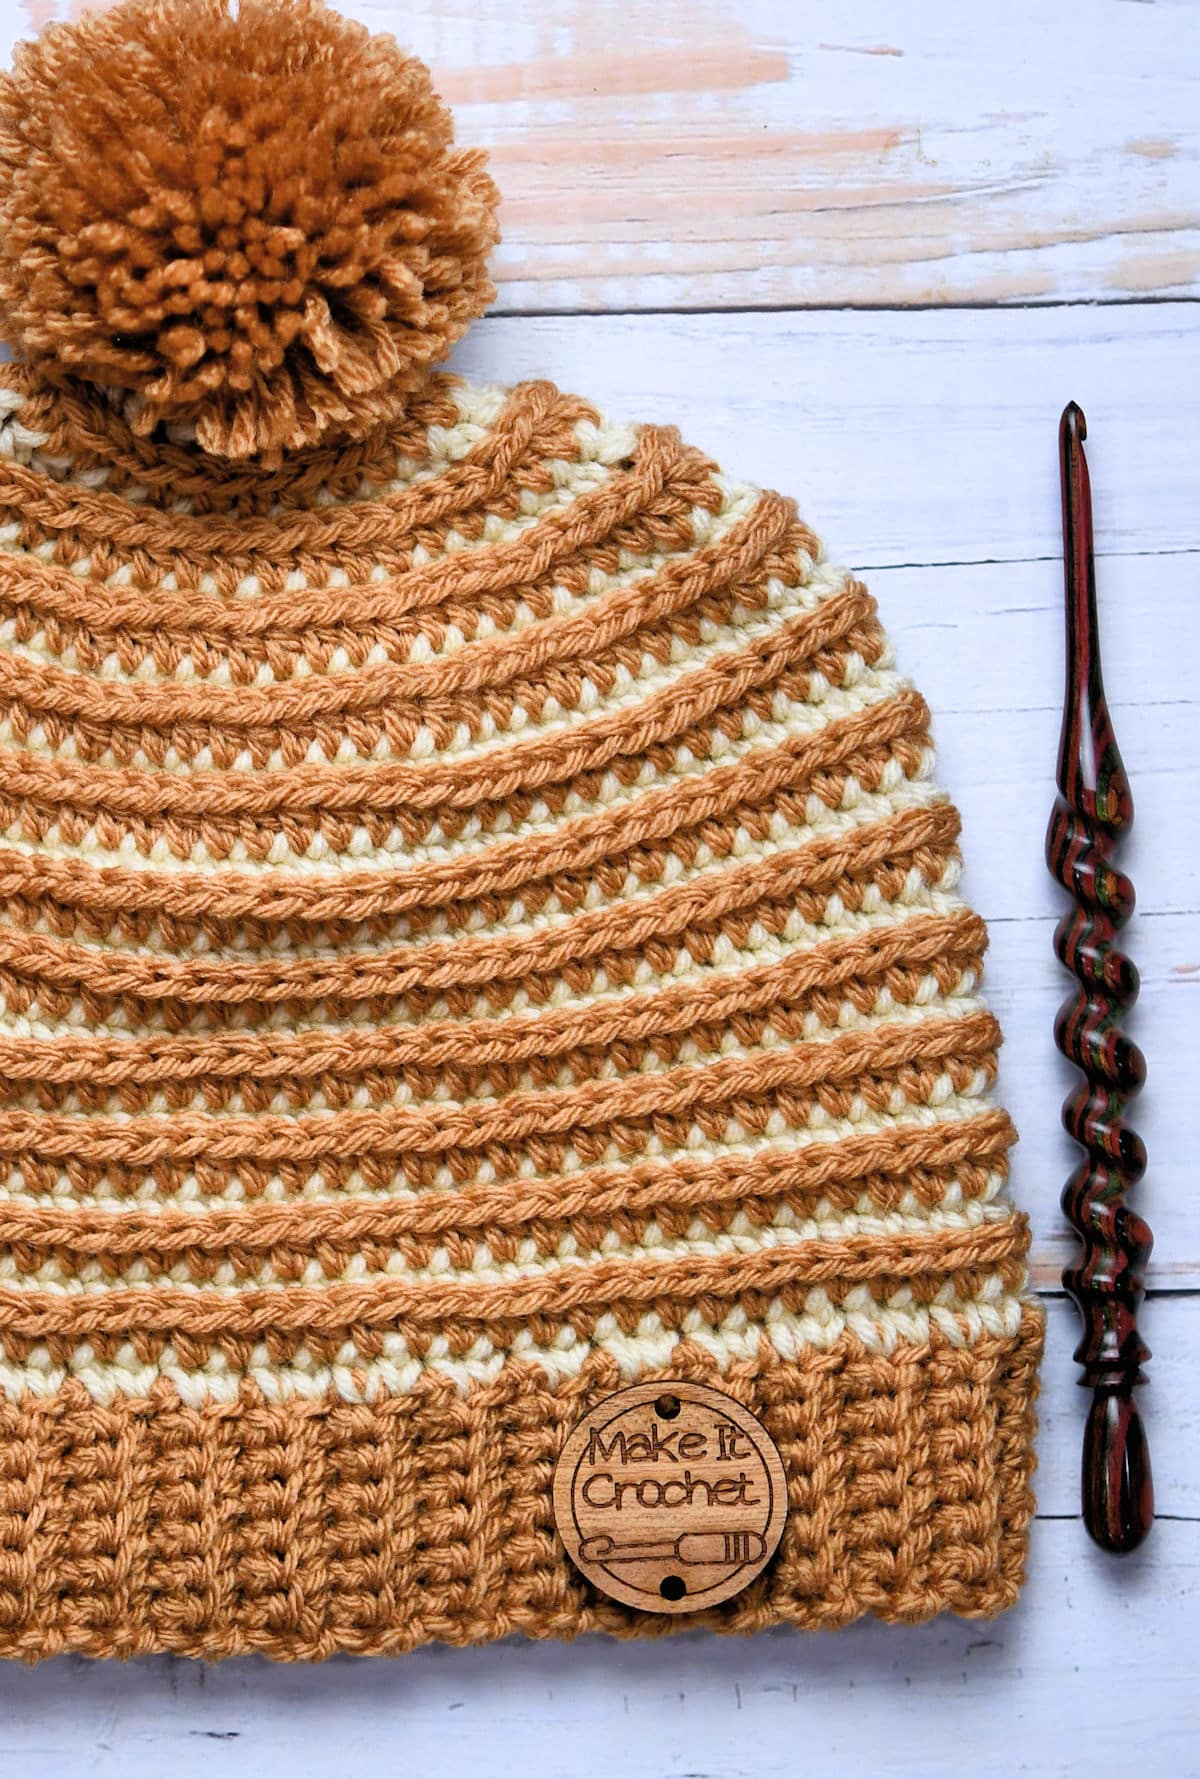
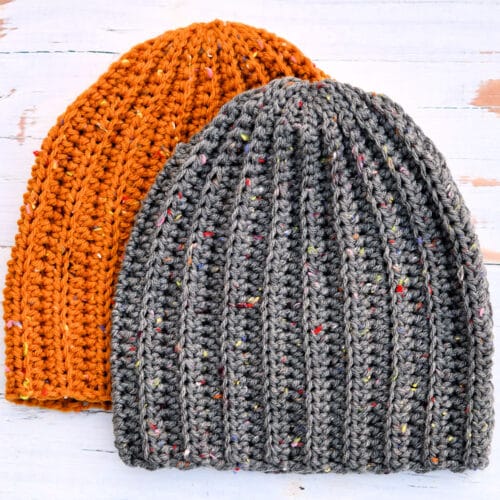
“Shadow Stripes Beanie” free crochet pattern by Kim Guzman © Dec. 2023. All rights reserved.
Technique: Regular Crochet.
Skill Level: Beginner.

Crochet Pattern At A Glance

Beginner Shadow Stripes Beanie
Designer: Kim Guzman © 2022-2026. All rights reserved.Rate the Pattern
Yarn
- JoAnn “Big Twist Value” yarn, size 4 weight, 100% acrylic, 380 yds/347m per 6 oz/170g skein: 1 skein color Camel, approx. 150 yards used, and 1 skein color Cream, approx. 70 yards used
Other Materials
- Suggested Crochet Hook Size I-9 (5.5mm), or size needed to meet gauge
- Yarn Needle for weaving ends and seaming ribbing/top
Instructions
- Ribbing is made in back loop only single crochet.
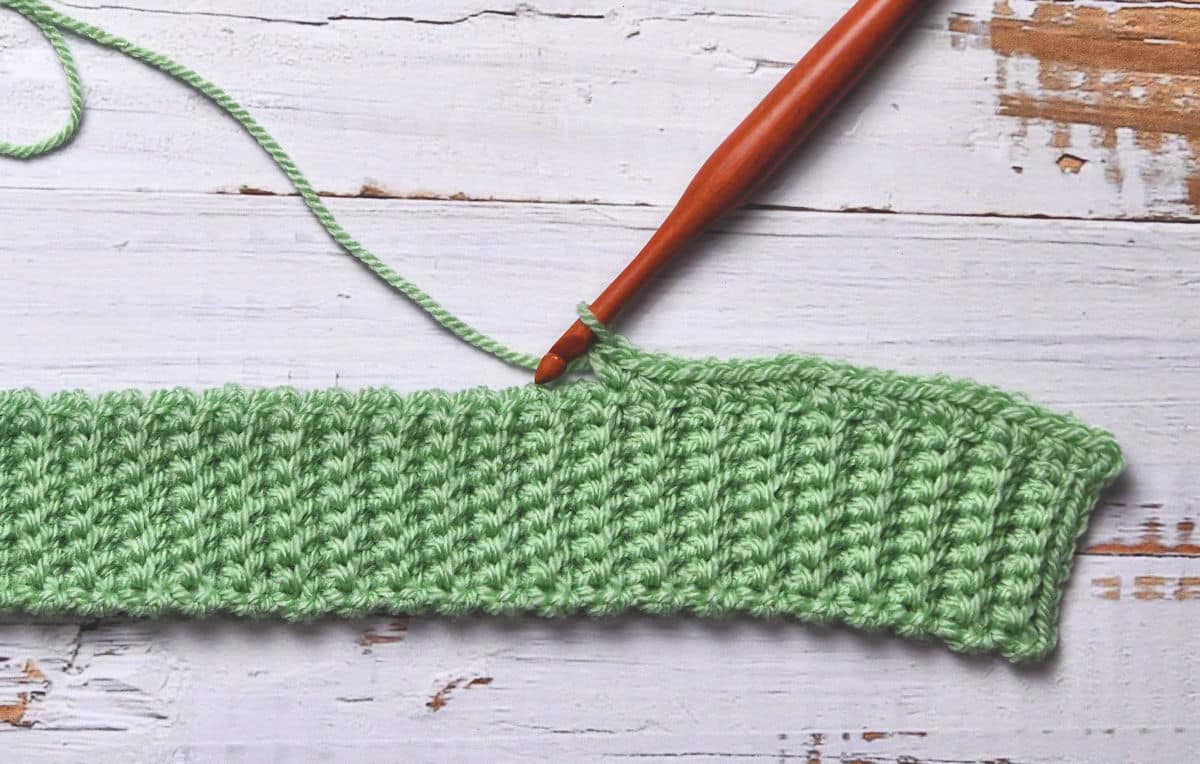
- Work round 1 directly onto the long edge of the Ribbing.
- Work 15 more rounds without decreasing.
- Work 8 rounds with decreasing.
- Using yarn needle, cinch the top and seam the Ribbing. Attach pom pom, if desired.
Full Free Crochet Pattern Below

This is a free crochet pattern and the written instructions are below. If you prefer a printable download, a PDF is also available for purchase.
My Crochet Pattern Notes
This beanie design is worked, starting with the ribbing, then stitches are placed along the sides of the rows and worked to the top of the hat.
I’ve given this pattern a Basic Skill Level which is beginner. It’s not difficult at all. The stitches are easy to work and the hat is made in only single crochet and half double crochet. It’s not exactly a first project but it’s a great learning project so I’ve written it without abbreviations. Full words are used throughout.
If you are very new to crochet and you’re net yet comfortable with changing colors, the hat can be made in one solid color. There will still be an interesting texture.
Reversible Beanie
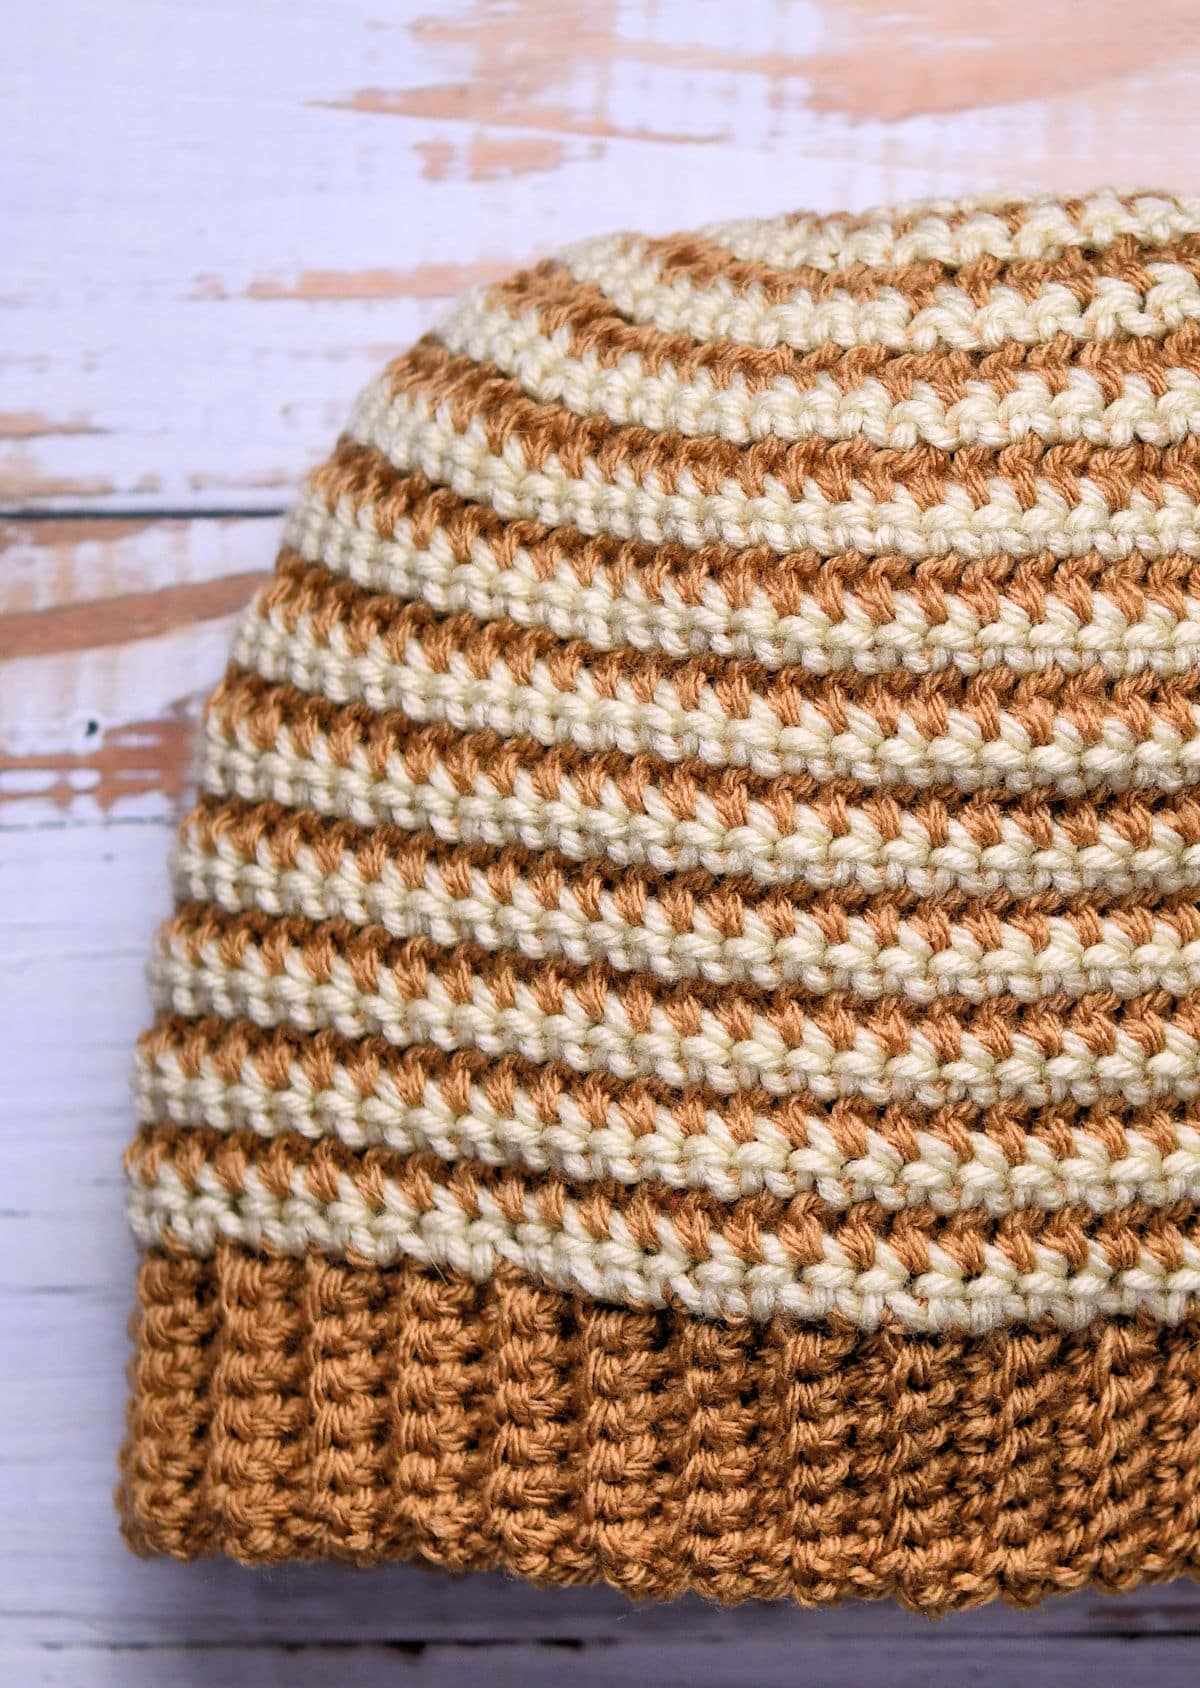
This is a project with an attractive look on both the front and back. You may have a hard time making a choice about which side to use as the public facing side because they’re both so unique.
Pin It For Later
Finished Size
Height: 8.5″, Circumference: 20″.
Yarn
JoAnn “Big Twist Value” yarn, size 4 weight, 100% acrylic, 380 yds/347m per 6 oz/170g skein: 1 skein color Camel, approx. 150 yards used, and 1 skein color Cream, approx. 70 yards used.

The yarn I’ved used in this pattern is Big Twist Value and I purchased it from JoAnn. When JoAnn closed, Michaels purchased the intellectual property. You can now purchase Big Twist Value at Michaels directly. I believe it’s the same weight and yardage.
Other Materials
Suggested Crochet Hook Size I-9 (5.5mm), or size needed to meet gauge.
Yarn Needle for weaving ends and seaming ribbing/top.
Gauge
Ribbing measures about 1.5″ tall and 18″ when finished, or about 16 rows per 4″.
In hat body stitch pattern, 15 stitches for 14 rounds measures 4 x 4″.
Gauge is simply the tension used to make the hat. Your tension and my tension aren’t the same. Everyone has a slight difference. Check your tension as you’re crocheting and use a different size hook, if necessary, to better match the finished measurements. If you don’t match the tension, your hat can be either too big or too small.
Working In Different Parts Of The Stitch
This pattern gets its look by working into different parts of the stitch than you would normally. It doesn’t use any fancy stitches and there are no intricate stitches to learn. There are only half double crochet and single crochet here. You get this look solely by where you place your hook.
Work Stitches Under Both Loops. When a pattern doesn’t indicate, the fallback is to insert your hook under both top loops of a stitch. This will always be the norm and you won’t change it unless specifically instructed in the pattern.
Work Stitches Under Back Loop. When a pattern indicates that you will work under the back loop, of the top two loops, you insert your hook under the loop furthest away from you. It doesn’t necessarily indicate the literal back loop, which is something that I mixed up when I was a beginner. Just look at the top two loops and you insert your hook in the one that is furthest away from you.
Work Stitches In The Third Loop. The third loop is on the actual back of a stitch. Look at your stitch and you’ll see the normal top two loops. When you’re working in the round like this hat, you can bend the stitch toward you a little and the very next strand of yarn below those two loops is the “third loop”. Because I’ve used half double crochet, the third loop is fairly loose and you can easily stitch into it. Insert your hook from top to bottom in that third loop.
For more information on the third loop, you can see this Sweet Pea Beanie crochet pattern.
Abbreviations
Since this is a beginner level hat, I have written the instructions without abbreviations. You can see abbreviations throughout my site, but I wanted this pattern to work as a beginner project. It’s not exactly a “first” project, but it can be made soon after.
This crochet beanie pattern is written in US crochet terminology.
All numbers after the colon at the end of an instruction are stitch counts. Use the stitch count to check your work. Having a stitch count is crucial sometimes when trying to understand new patterns. Some patterns are confusing on the first read and, having the stitch counts will guide you.

Free Crochet Pattern Instructions
Ribbing
Note: The Ribbing is worked in back loop single crochet. The back loop is the top loop furthest away from you.
Row 1: With camel, leaving 10″ strand (a long strand for seaming the ribbing later), chain 8, single crochet in 2nd chain and in each remaining chain, turn.
Rows 2-75: Chain 1, working in back loops only, single crochet in 6 single crochet, single crochet in both loops of last single crochet (for greater stability), turn.
You will begin working in rounds across long edge of Ribbing. Do not fasten off. Ribbing measures 18″ unstretched, 20″ when stretched.
Hat
Note: The primary portion of the hat will be worked by starting the first round of single crochet directly onto the ribbing. The image above shows this in the same color, but this hat will start with the secondary color for that first round.
Round 1: With cream, chain 1 (doesn’t count as a stitch here and throughout), single crochet in side of each row of ribbing: 75 single crochet. Without twisting the ribbing, pull the first row together with the last row so the first and last single crochet are touching. Drop cream and, with camel, pull a loop through both stitches, leaving a 6″ tail, in order to join the two stitches together. This is actually a slip stitch, but it’s not a full stitch because of the tail hanging there.
Note: When changing color like this, be sure to pull the ends taut so there isn’t a lot of extra thread being loopy there. When working with a color, simply drop the unused color until you’re ready to use it again.
Round 2: Now with camel, chain 1 (doesn’t count as a stitch here and throughout), half double crochet in each single crochet around: 75 half double crochet. Drop camel and, with cream, slip stitch to third loop (see instruction above) of the first half double crochet.
Round 3: Now with cream, chain 1, working in third loop only throughout, single crochet in each half double crochet around: 75 single crochet. Drop cream and, with camel, slip stitch to first single crochet.
Rounds 4-15: Repeat rounds 2-3.
Round 16: Repeat round 2.
Round 17: Now with cream, chain 1, working in third loop only throughout, *single crochet in 4 half double crochet, skip next half double crochet, repeat from * around: 60 single crochet. Drop cream and, with camel, slip stitch to first single crochet.
Round 18: Repeat round 2: 60 half double crochet.
Round 19: Now with cream, chain 1, working in third loop only throughout, *single crochet in 3 half double crochet, skip next half double crochet, repeat from * around: 45 single crochet. Drop cream and, with camel, slip stitch to first single crochet.
Round 20: Repeat round 2: 45 half double crochet.
Round 21: Now with cream, chain 1, working in third loop only throughout, *single crochet in 2 half double crochet, skip next half double crochet, repeat from * around: 30 single crochet. Drop cream and, with camel, slip stitch to first single crochet.
Round 22: Repeat round 2: 30 half double crochet.
Round 23: Now with cream, chain 1, working in third loop only throughout, *single crochet in half double crochet, skip next half double crochet, repeat from * around: 15 single crochet. Drop cream and, with camel, slip stitch to first single crochet.
Round 24: Repeat round 2: 15 half double crochet. Fasten off, leaving 15″ strand (to be used for seaming).
Finishing
With yarn needle, weave yarn through the tops of each stitch on the final round. Carefully pull to cinch together the top and secure.
With yarn needle and first long strand, seam the first and last rows of the ribbing together, if you haven’t done so already.
Weave in all ends securely. Attach pom pom, if desired.

Twitter | Facebook | Pinterest
All the patterns at Make It Crochet are free. Since many of you have asked how to help with the costs of running a site like this, I’ve made all the patterns into print-ready PDFs and the cost is about the same as a cup of coffee. Every little bit helps.
TERMS: To my fellow crafters, you have my permission to use my patterns to make and sell your projects* anywhere you like. You cannot use my images to sell your projects, though. You must take photos of your own work. All patterns have been tested but mistakes can happen. If you find a mistake, please let me know. Everything at MakeItCrochet.com is protected by copyright to Kim Guzman. Other than the permissions previously given, no one other than Kim Guzman has permission to: reproduce, copy, publish or distribute this pattern, its parts or photos in any way or form, including, but not limited to, translations into foreign languages & video production.
*Not intended to be blanket permission for mass production.


The coupon code to download a PDF copy will not work for me. I’ve tried all caps & not. Did I miss it somehow?
I’m so sorry, Julie. I always end it at 7am on Tuesday morning but it looks like I accidently ended it on Monday, not Tuesday. Go ahead and try again. It will be working now. Thanks so much for letting me know!