


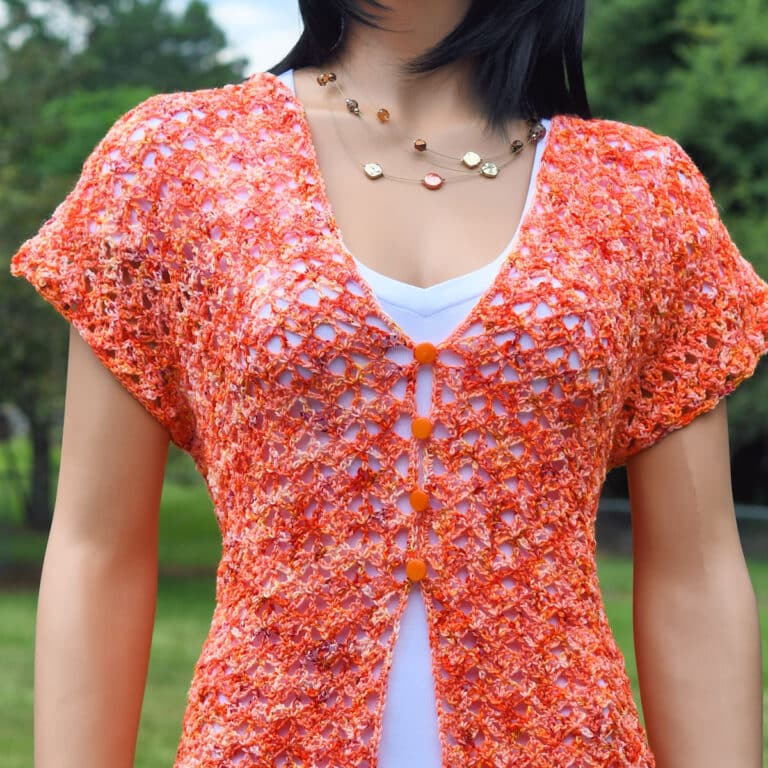
An Easy Tie Front Vest made in one piece and seamed only at the shoulders will become your favorite new layer. Wear it year round, in sizes small through 3X.
This is your chance to make a trendy vest that looks so much like real knit stockinette that your knitting friends will be surprised.

“Easy Tie Front Vest” free crochet pattern by Kim Guzman, © May 2026 All rights reserved.
Technique: Tunisian Crochet
Skill Level: Advanced Beginner

Crochet Pattern At A Glance

Tie Front Vest Knit Look
Designer: Kim Guzman © 2022-2026. All rights reserved.Rate the Pattern
Yarn
- Berroco “Remix Light”, 30% nylon / 27% cotton / 24% acrylic / 10% silk / 9% linen, 432 yds/400m per 3.5 oz/100g per skein: 2 (2, 2, 2, 3, 3) skeins in color Peony. (Approximately 500 (600, 700, 800, 950, 1050) yards.)
Other Materials
- Suggested Tunisian Crochet Hook Size K-10 1/2 (6.5mm), or size needed to meet gauge.
- Suggested Crochet Hook size H-8 (5mm) for trim.
- Yarn Needle for weaving ends and seaming.
Instructions
- Start the first row on a Tunisian crochet hook and work about 1.5"
- Fold under and work the next row through both the stitches and the bottom of the initial foundation chain to form the folded hem.
- Work straight up to the armhole position.
- Work the first front, back and second front separately.
- Seam the shoulders.
- Add regular crochet trim to the armhole.
- Add trim to the inner edges and around the neck, with attached ties.
- Weave in ends and block as desired.
Full Free Crochet Pattern Below

This is a free crochet pattern and the written instructions are below. If you prefer a printable download, a PDF is also available for purchase.
My Crochet Pattern Notes

This entire project is made in one piece. The lower part of the vest starts with folded hem, more often seen in knitted garments. The folded hem is “knit” right in, while working the rows. It’s a feature of the crocheting, not seaming.
If you don’t like the folded hem, you’re going to need something to avoid the curling (unless you like the curling as a design feature). You can add a ribbed hem or other hem as you desire.
Once the project is finished, finishing is only seaming at the shoulders and a little bit of trimming. Very easy.
Pin It For Later

Finished Size
The model size is intended to fit up to 34″ bust (size medium) with 1-2″ positive ease (there is NO horizontal stretch at all with this combination of fiber and Tunisian crochet). The tie front leaves an opening in the front of up to 2 or 3 inches.
If you’re concerned about fit at all, choose the next size. The chain closing of Tunisian doesn’t allow the fluctuation across as you might see with other regular crochet garments. I can usually fit into a medium sweater but I would need to make a large for this one.
The pattern is written for sizes small (up to 32″), medium (up to 36″), large (up to 40″), 1X (up to 44″), 2X (up to 48″) and 3X (up to 52″). The first number in all instructions will be for the smallest size in that section and the rest of the sizes will be in parenthesis. If there is only one number, it’s the same for all sizes.
The sizes for garments are never intended to be perfect for every single body type. Review the schematic showing the measurements to determine whether you will need to make adjustments.
Yarn
Berroco “Remix Light”, 30% nylon / 27% cotton / 24% acrylic / 10% silk / 9% linen, 432 yds/400m per 3.5 oz/100g per skein: 2 (2, 2, 2, 3, 3) skeins in color Peony. (Approximately 500 (600, 700, 800, 950, 1050) yards.)

“Remix Light” is classified as a DK weight (size 3) yarn and is currently available in 21 shades. It’s a standard bullet skein and I was able to find a center pull.
Available at Yarn Crafts & Coffee. Yarn Crafts & Coffee is a US-based yarn shop, located in Florida.

Yarn Substitution
This is a very unique yarn with just a touch of boucle. It’s a lot lighter than other size 3 yarns. It feels more like a sport or fingering weight. It appears to “bloom” with wear and drapes beautifully in this design. Because it’s tiny, it takes a little more patience when using the larger hook.
Because of the unique characteristics and fiber content, I’m not aware of a yarn that will match perfectly. Here is a link to Yarnsub for their recommendations. I really love this yarn, though, and I’ve already placed an order so I can use it again.
Other Materials
Suggested Tunisian Crochet Hook Size K-10 1/2 (6.5mm), or size needed to meet gauge. You will need an extender cord to extend the length of the hook by at least 18″ to be comfortable. But, the yarn is so fine that I’m sure it would squish onto a regular 14″ Tunisian crochet hook, if necessary.
Suggested Crochet Hook size H-8 (5mm) for trim.
Yarn Needle for weaving ends and seaming.
Gauge
In Tunisian Knit Stitch, 15 stitches for 16 rows measures 4″ x 4″.
Working at a different tension may require additional materials.
Special Stitches
Tunisian Knit Stitch (tks): Insert hook, from front of work to back of work, between the front and back vertical bars of the same stitch, yarn over, pull loop through, keeping loop on hook. Right-Handed Video | Left-Handed Video.
Tunisian Reverse Stitch (trs): With hook behind work, insert hook from side to side (right to left if you’re right handed and left to right if your left handed) under back vertical bar, always keeping hook to back of work, yarn over, pull loop through, keeping loop on hook. Right-Handed Video | Left-Handed Video.
Last Stitch of a Row: The last stitch of each row is worked into the outer 2 vertical bars. It’s basically a knit stitch with an extra loop on the outside of the insertion stitch. You don’t want to work under only one vertical bar since it will cause the loop to stretch too much. Working under both loops makes a nice, clean, sturdy edge. Right-Handed Video | Left-Handed Video.
Special Instructions for Decreasing
Both of these decrease methods are shown in this video. Right-Handed Video | Left-Handed Video.
Decreasing at Beginning of Row (beg dec): Working as for Tunisian Knit Stitch, insert hook into two stitches at once, yarn over, pull lp through.
Decreasing at End of Row (end dec): Skip next st, using hook tip, pull front vertical bar of next stitch toward you until it overlaps the skipped stitch, complete Tunisian Knit Stitch through both sts at once.

Other Abbreviations
This crochet pattern is written in US crochet terminology.
ch=chain; lp(s)=loop(s); rem=remaining; rep=repeat; sc=single crochet; sl=slip; st(s)=stitch(es); yo=yarn over.
All numbers after the colon at the end of an instruction are stitch counts. Use the stitch count to check your work.
New Pattern Free PDF Download Weekend

This pattern is made free through ad support below, but the PDF download for the Tie Front Vest pattern is available for free this weekend only. This promotion ends at 11:59pm CST, Sunday, May 31.
This promotion is concluded. Please sign up for the email newsletter to make sure you don’t miss any weekly promotions. Scroll down for the free online pattern.
Free Crochet Pattern Instructions
Notes
1) For each row, skip the first vertical bar (the one with the first loop of the row).
2) For each row, closing is as follows: chain 1, [yarn over, pull through 2 loops on hook] across.
3) See Special Stitches above for information on working the last stitch of a row. It’s important to go under two loops of that last stitch to maintain stability. The instructions here will indicate that it’s a Tunisian Knit Stitch since that is the actual designation; just make sure to go under those two loops at the end.
Row 1: Ch 108 (125, 137, 151, 167, 181), insert hook in second ch from hook, yo, pull lp through, [insert hook in next ch, yo, pull lp through] across, close: 108 (125, 137, 151, 167, 181) lps.
Rows 2-4: Tks (see Special Stitches above) across, close: 108 (125, 137, 151, 167, 181) lps.
Row 5: Trs (see Special Stitches above) across, close: 108 (125, 137, 151, 167, 181) lps.
Rows 6-7: Tks across, close: 108 (125, 137, 151, 167, 181) lps.

Row 8: This row will be worked together with the initial chain to form a folded hem. Fold the hem back so that the fold is at the Reverse stitch row. Skip the first vertical bar as normal. Make Tks across, except, when you insert your hook into the stitch normally, also insert your hook in the corresponding chain from Row 1, yarn over and pull a loop through. The Reverse stitch row will give a natural look to the fold.
Row 9: Tks across, close: 108 (125, 137, 151, 167, 181) lps.
Rep row 9 until 43 (45, 47, 51, 53, 53) rows completed from beg. Remember to count the rows that are tucked under. You can make sure you’re on the right track at this point by confirming with the measurements on the schematic drawing below.
First Front
Row 1: Work beg dec (see Special Stitches above), 18 (21, 24, 27, 30, 33) tks, work end dec (see Special Stitches above), tks in next st, close, leaving rem sts unworked: 22 (25, 28, 31, 34, 37) lps.
Row 2: Work beg dec, tks to last 3 sts, work end dec, tks in last st, close: 20 (23, 26, 29, 32, 35) lps.
Rep row 2 until 3 (4, 5, 6, 7, 9) rows completed for First Front: 18 (19, 20, 21, 22, 21) lps.
Next 2 rows: Tks across, close: 18 (19, 20, 21, 22, 21) lps.
Next row: Work beg dec, tks across, close: 17 (18, 19, 20, 21, 20) lps.
Rep prev 3 rows until 27 (25, 29, 33, 34, 33) total rows completed for First Front: 10 (12, 12, 12, 13, 13) lps.
Next 3 (7, 3, 1, 2, 3) rows: Tks across, close: 10 (12, 12, 12, 13, 13) lps. Fasten off after final row. Note that I didn’t bind off at the top of the shoulders. I found that it made a nicer seam when working without the bind off. See seaming instructions below, when complete.
Back

Row 1: Returning to the last row before the First Front, join yarn with sl st in first unworked st. Bind off with sl st across the next 6 (9, 10, 12, 14, 14) sts (1 lp remains on hook), work beg dec, 42 (47, 51, 55, 61, 61) tks, work end dec, tks in next st, close, leaving rem sts unworked: 46 (51, 55, 59, 65, 65) lps.
Note: Stop here briefly and count the unworked stitches remaining on the other side to make sure you have 30 (36, 40, 45, 50, 53). You don’t want to get the entire Back finished only to find out your count is off.
Next 1 (1, 2, 2, 4, 4) rows: Work beg dec, tks to last 3 sts, work end dec, tks in last st, close: 44 (49, 51, 55, 57, 57) lps.
Next row: Tks across, close: 44 (49, 51, 55, 57, 57) lps.
Rep prev row until 26 (28, 28, 30, 32, 34) total rows completed for Back: 44 (49, 51, 55, 57, 57) lps. Do not fasten off.
First Shoulder
Row 1: 11 (13, 13, 13, 14, 14) tks, close, leaving rem sts unworked: 12 (14, 14, 14, 15, 15) lps.
Row 2: Tks to last 3 sts, work end dec, tks in last st, close: 11 (13, 13, 13, 14, 14) lps.
Row 3: Rep row 2: 10 (12, 12, 12, 13, 13) lps.
Row 4: Tks across, close: 10 (12, 12, 12, 13, 13) lps, fasten off.
Second Shoulder
Row 1: Returning to the last row before the First Shoulder, join yarn with sl st in first unworked st. Bind off with sl st across the next 20 (21, 23, 27, 27, 27) sts (1 lp remains on hook), 11 (13, 13, 13, 14, 14) tks, close: 12 (14, 14, 14, 15, 15) lps.
Row 2: Work beg dec, tks across, close: 11 (13, 13, 13, 14, 14) lps.
Row 3: Rep row 2: 10 (12, 12, 12, 13, 13) lps.
Row 4: Tks across, close: 10 (12, 12, 12, 13, 13) lps, fasten off.
Second Front
Row 1: Returning to the last row before the Back, join yarn with sl st in first unworked st. Bind off with sl st across the next 6 (9, 10, 12, 14, 14) sts (1 lp remains on hook), work beg dec, tks to last 3 sts, work end dec, tks in last st, close: 22 (25, 28, 31, 34, 37) lps.
Row 2: Work beg dec, tks to last 3 sts, work end dec, tks in last st, close: 20 (23, 26, 29, 32, 35) lps.
Rep row 2 until 3 (4, 5, 6, 7, 9) rows completed for Second Front: 18 (19, 20, 21, 22, 21) lps.
Next 2 rows: Tks across, close: 18 (19, 20, 21, 22, 21) lps.
Next row: Tks to last 3 sts, work end dec, tks in last st, close: 17 (18, 19, 20, 21, 20) lps.
Rep prev 3 rows until 27 (25, 29, 33, 34, 33) total rows completed for Second Front: 10 (12, 12, 12, 13, 13) lps.
Next 3 (7, 3, 1, 2, 3) rows: Tks across, close: 10 (12, 12, 12, 13, 13) lps. Fasten off after final row.
Seaming
With yarn needle, seam shoulders, matching st for st. I preferred to use an adaptation of the Kitchener Stitch in knitting.
With the RS of your work facing you and the work flat and last rows touching, insert hook under the vertical bars of one stitch then insert your hook under the vertical bars of the corresponding stitch on the other side. Repeat across. It’s not exactly Kitchener Stitch, but it’s fairly close and produces a nice seam.
Armhole Trim
With RS facing you and regular crochet hook, join yarn with sl st at bottom of armhole, ch 1, sc evenly around, sl st to first sc, fasten off.
Rep for opposite Armhole.
Tie Front
Mark two positions for placement of the tie. With regular crochet, join with sl st at bottom, inside hem to begin working around the entire inside fronts and neck. Ch 1, sc evenly around, except at positions of ties, work: 60 foundation sc then slip stitch in each sc back to the base and continue around.
If you don’t like working in foundation sc, you can simply work a chain out and slip stitch back on the chain. I found that the foundation sc provided a more substantial tie that I preferred. Use your preference.
Finishing
Weave in all ends. Block as desired. I didn’t find that there was a lot of size difference with blocking. It just helped to shape it a little and remove any wrinkles.
Schematic Measurements

All measurements are approximate and taken after blocking.
Twitter | Facebook | Pinterest
All the patterns at Make It Crochet are free. Since many of you have asked how to help with the costs of running a site like this, I’ve made all the patterns into print-ready PDFs and the cost is about the same as a cup of coffee. Every little bit helps.
TERMS: To my fellow crafters, you have my permission to use my patterns to make and sell your projects* anywhere you like. You cannot use my images to sell your projects, though. You must take photos of your own work. All patterns have been tested but mistakes can happen. If you find a mistake, please let me know. Everything at MakeItCrochet.com is protected by copyright to Kim Guzman. Other than the permissions previously given, no one other than Kim Guzman has permission to: reproduce, copy, publish or distribute this pattern, its parts or photos in any way or form, including, but not limited to, translations into foreign languages & video production.
*Not intended to be blanket permission for mass production.

I hope you enjoy this new free crochet pattern! Please let me know if you have any questions.