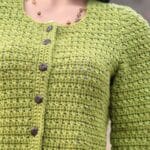
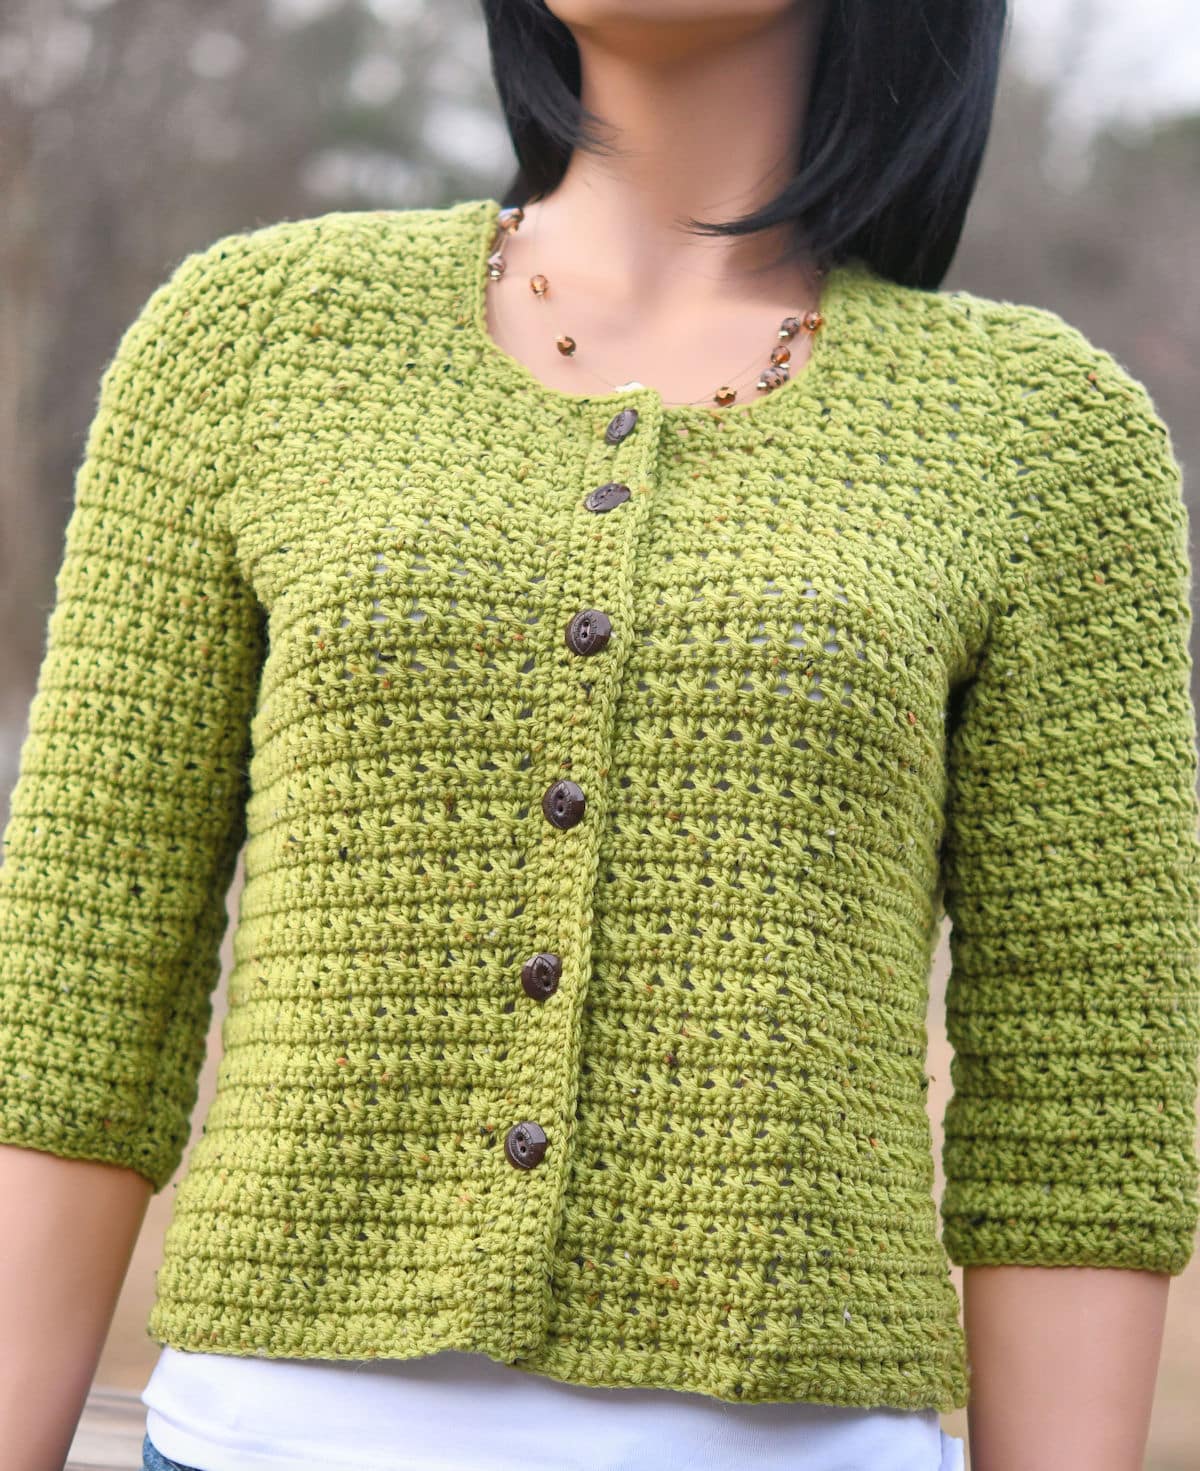
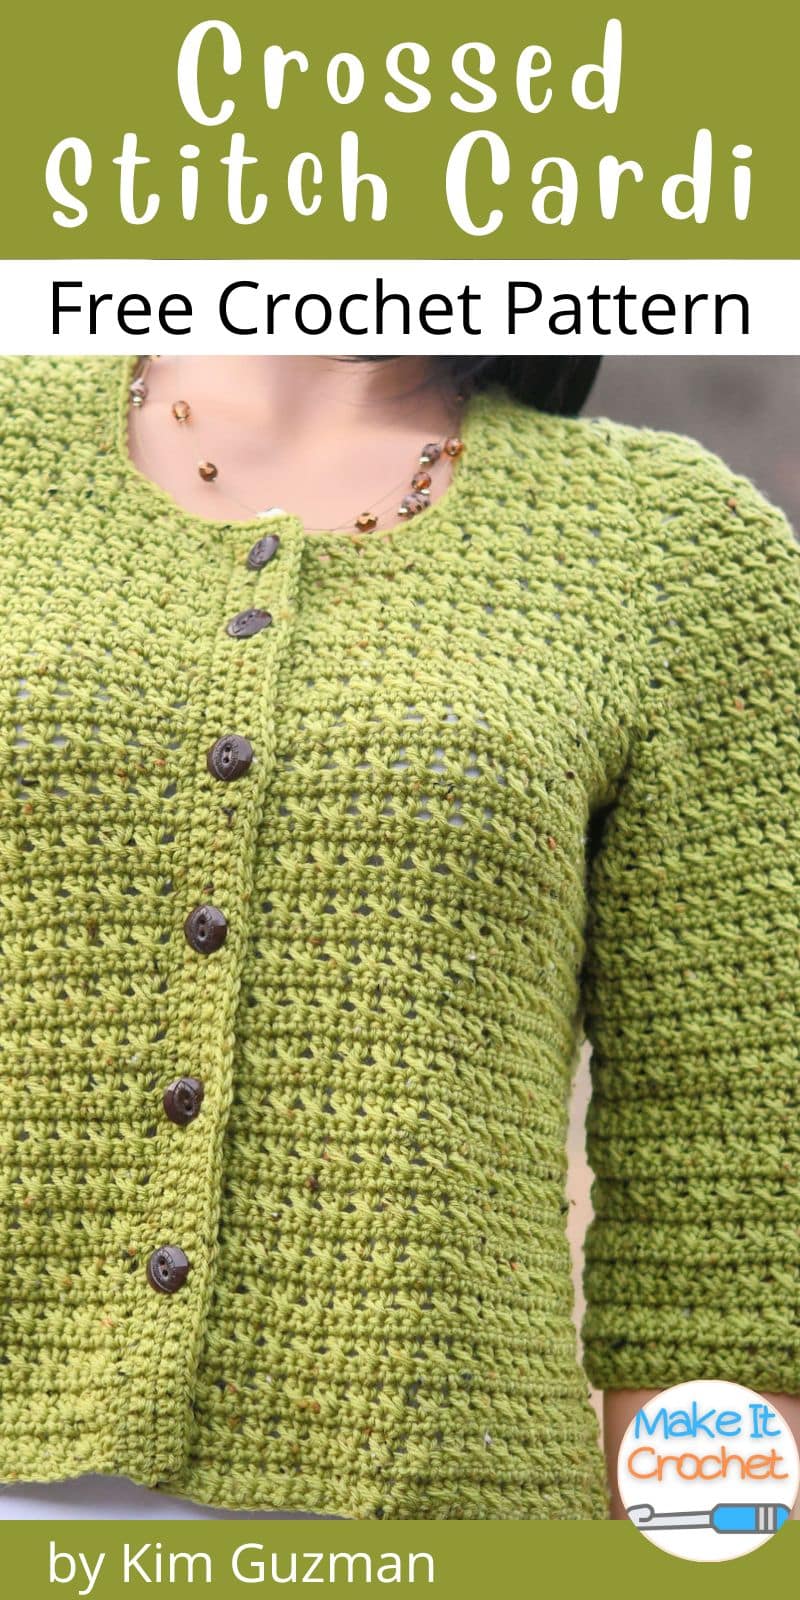
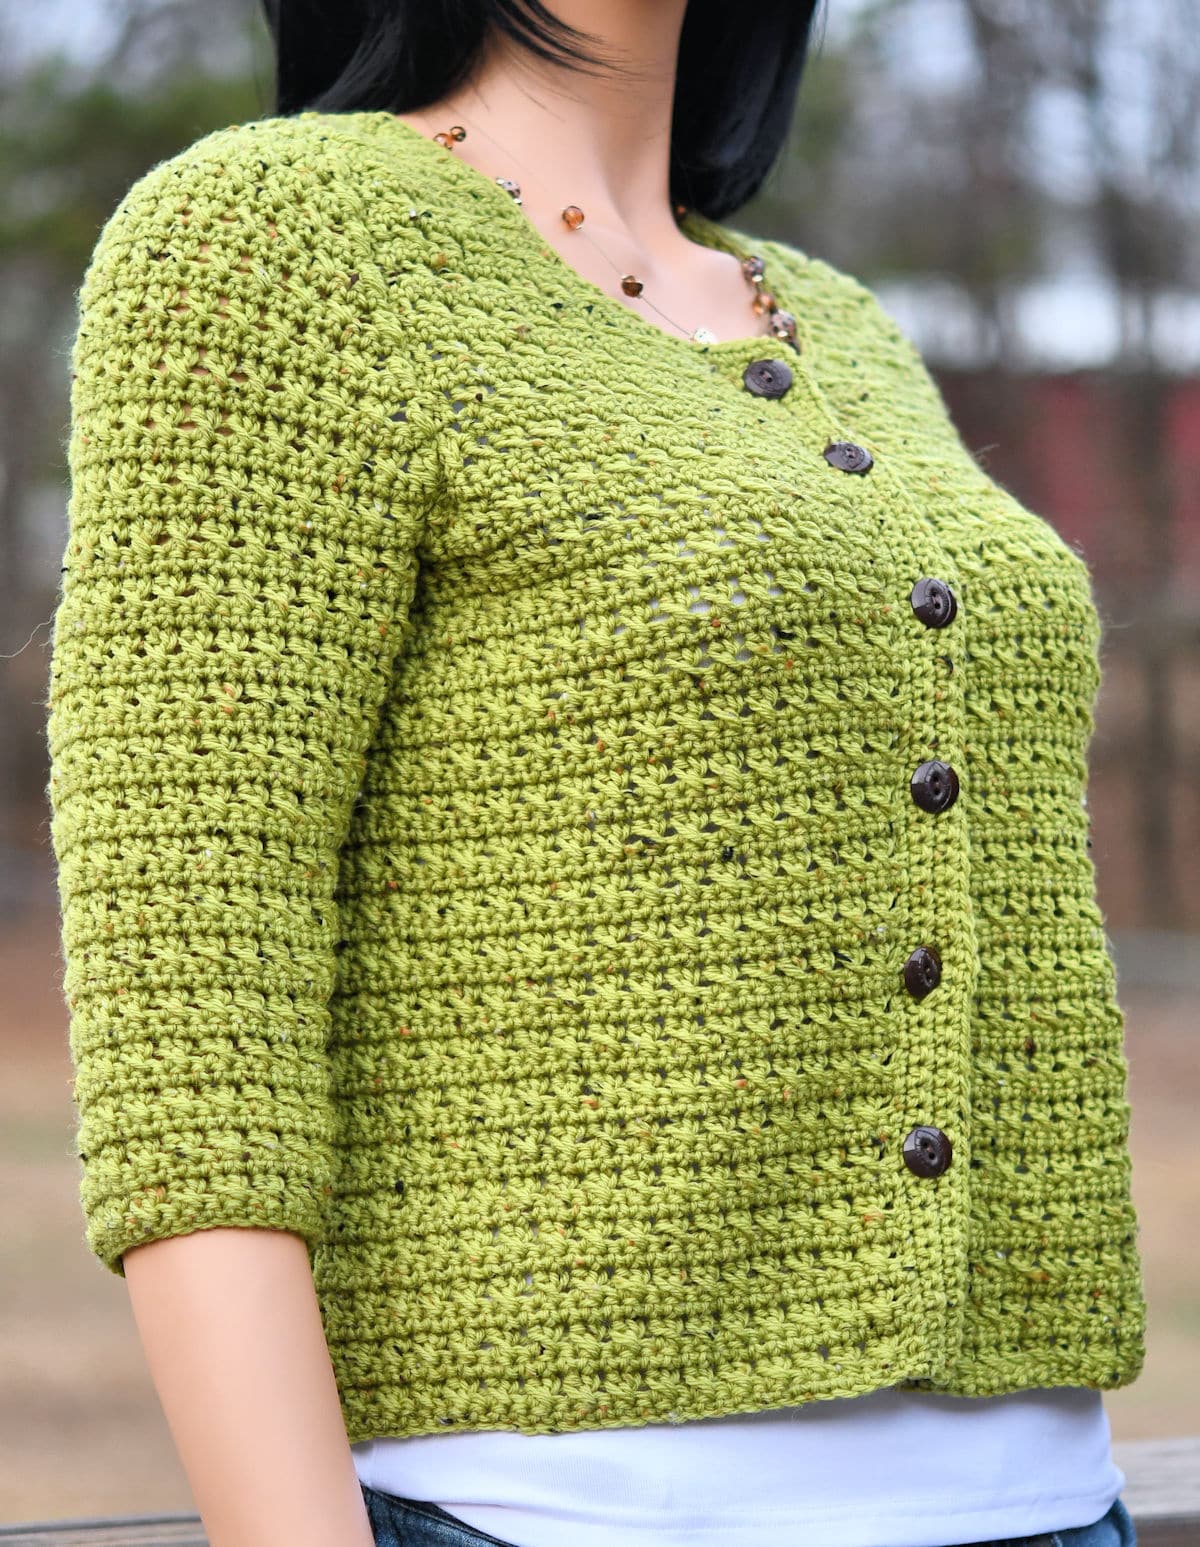
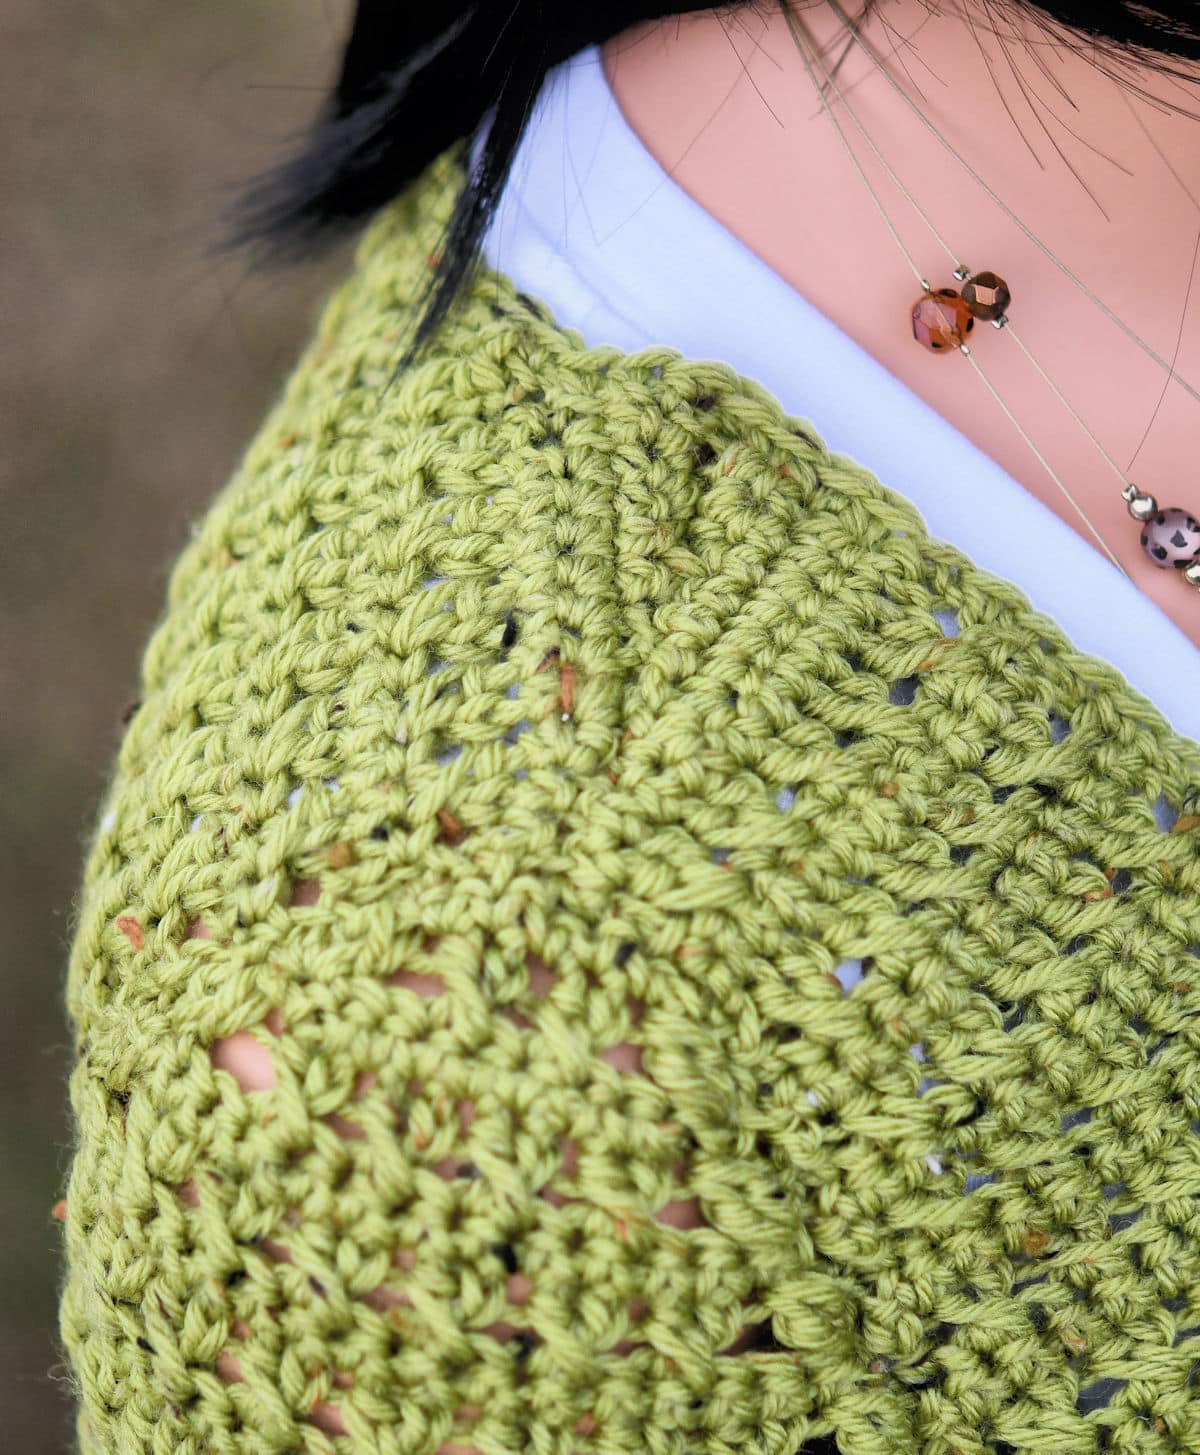
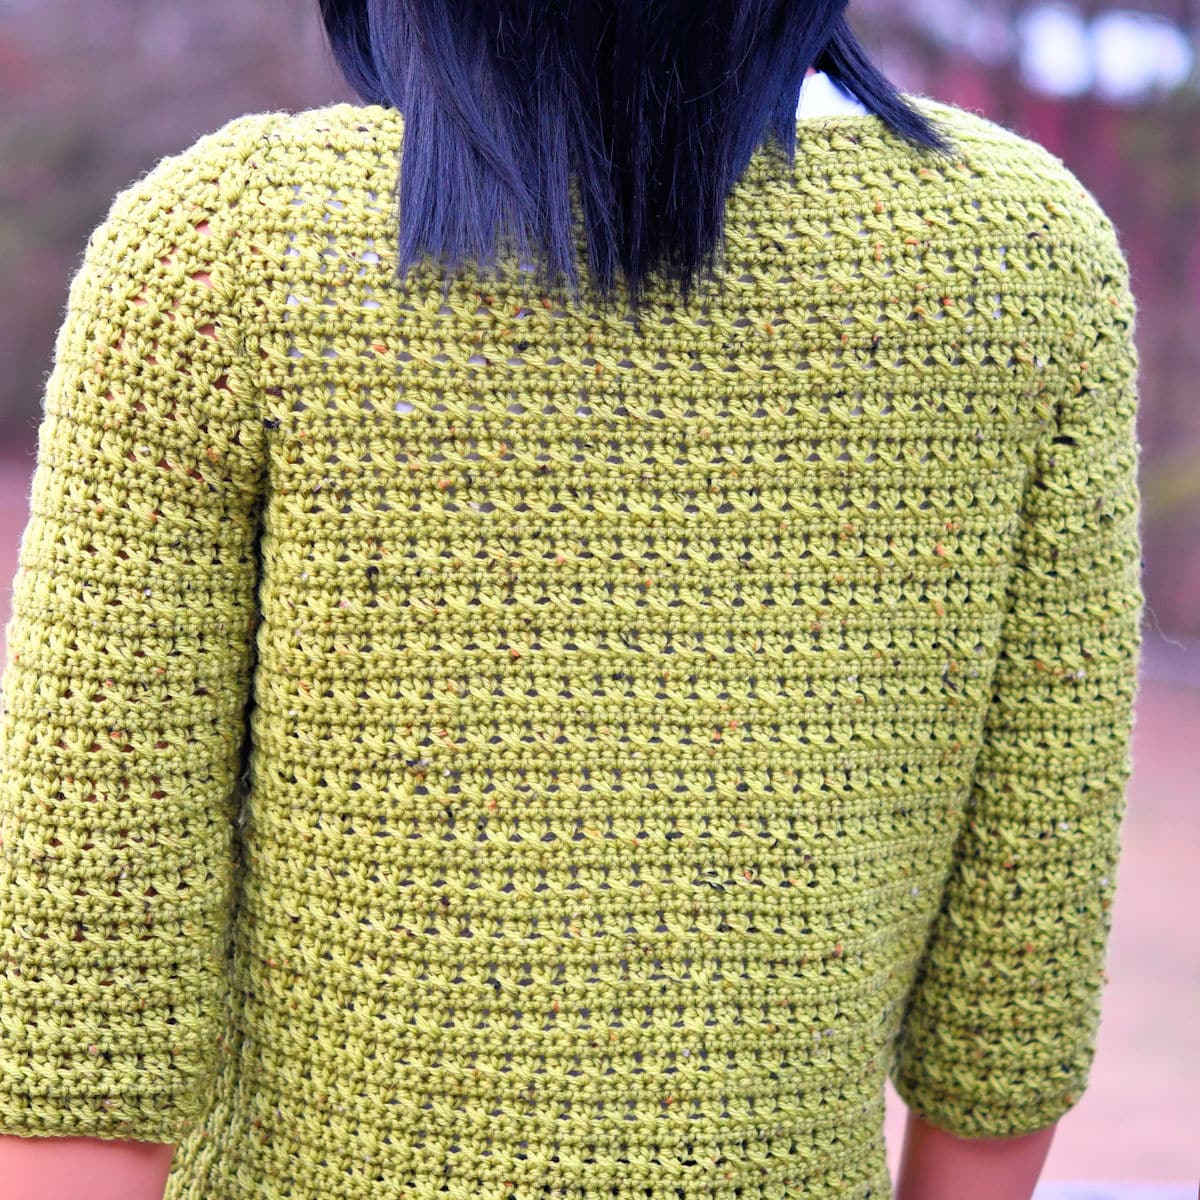
This Crossed Stitch Cardigan crochet pattern is my answer to trying to make a tailored cardi that I will actually wear. It has set-in sleeves, high hip length and most importantly, three-quarter sleeves!
“Crossed Stitch Button Front Cardigan” free crochet pattern by Kim Guzman, © Mar. 2026 All rights reserved.
Technique: Regular Crochet
Skill Level: Intermediate to Challenging

Crochet Pattern At A Glance
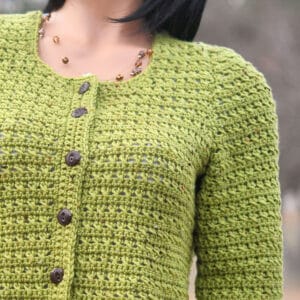
Crossed Stitch Cardigan
Designer: Kim Guzman © 2022-2026. All rights reserved.Rate the Pattern
Yarn
- Universal Yarn’s “Deluxe DK Tweed Superwash”, 90% superwash wool/7% acrylic/3% viscose, 284 yds/259m per 3.5 oz/100g per skein: 5 (5, 6, 7, 8, 9) balls of color Olive, or approximately 1220 (1420, 1650, 1900, 2200, 2550) yds
Other Materials
- Suggested Crochet Hook Size J-10 (6mm) or hook needed to meet gauge.
- Suggested Crochet Hook Size I-9 (5.5mm) for buttonband and trim.
- Yarn Needle for weaving ends.
- 6 (6, 6, 7, 7, 7) Round Buttons, size 3/4″, matching sewing thread and sewing needle.
Instructions
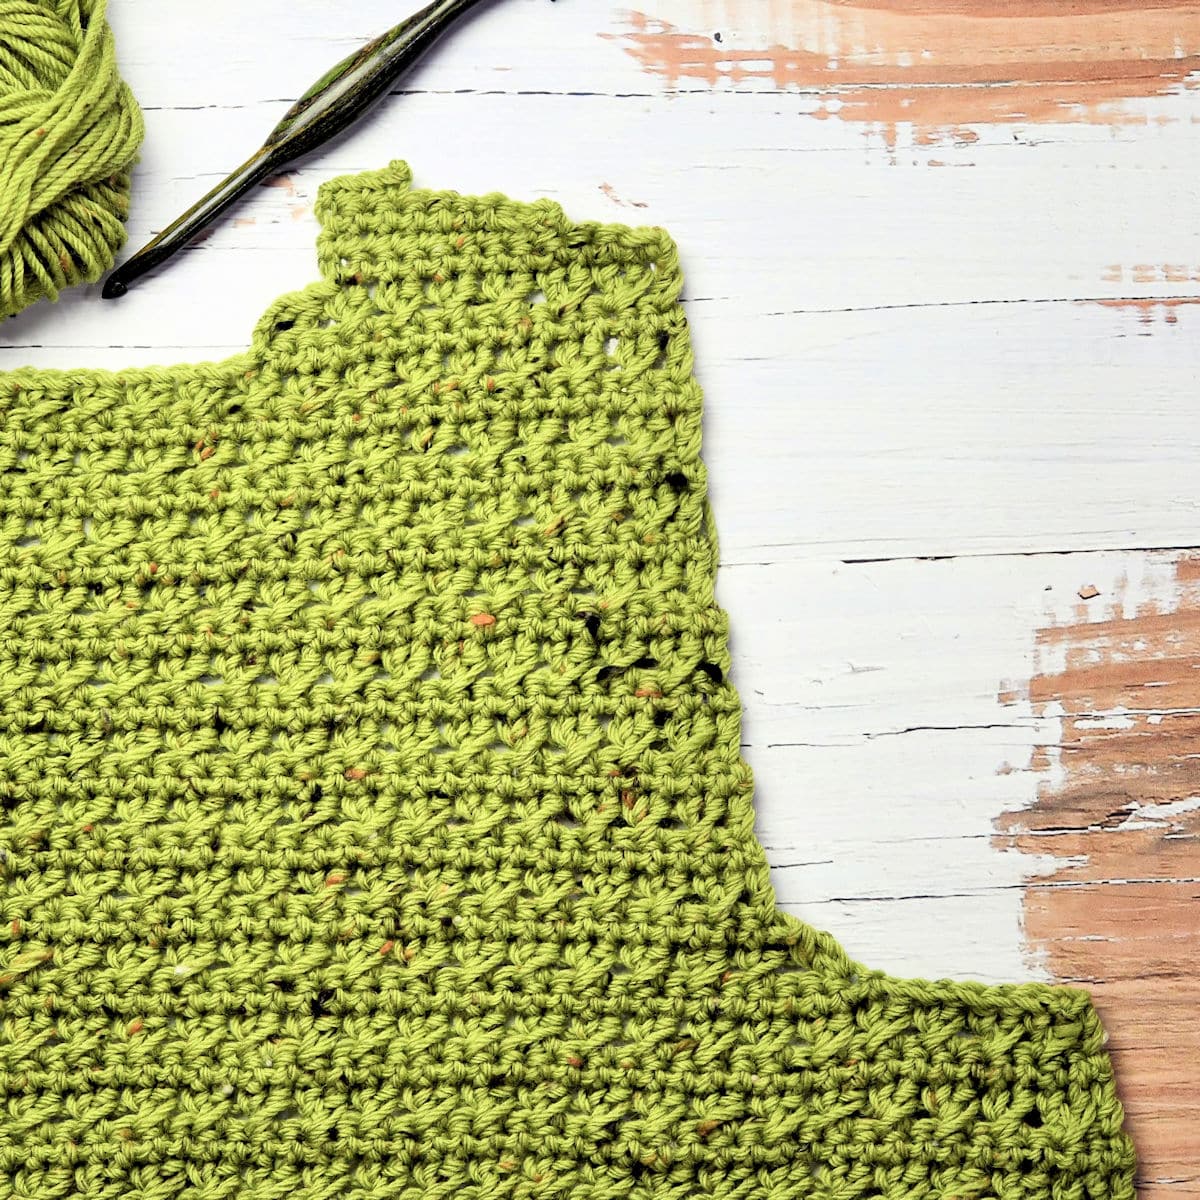
- Each piece of the garment is made separately. There are five total pieces: back, two fronts and two sleeves.
- Working from bottom up, make all pieces according to the instructions.
- Lightly block, as desired.
- With yarn needle, seam the shoulders, matching stitch for stitch. Set in the sleeves and place pins, if you like. Seam the sleeves into the armhole positions and seam the bottom of the sleeves. Seam the sides of the cardigan.
- Work the trim and button band along the inner edges.
- Work a light round of single crochet to even out the stitches around the neck.
- Attach buttons adjacent to the buttonholes. Weave in all ends securely.
Full Free Crochet Pattern Below

This is a free crochet pattern and the written instructions are below. If you prefer a printable download, a PDF is also available for purchase.
My Crochet Pattern Notes
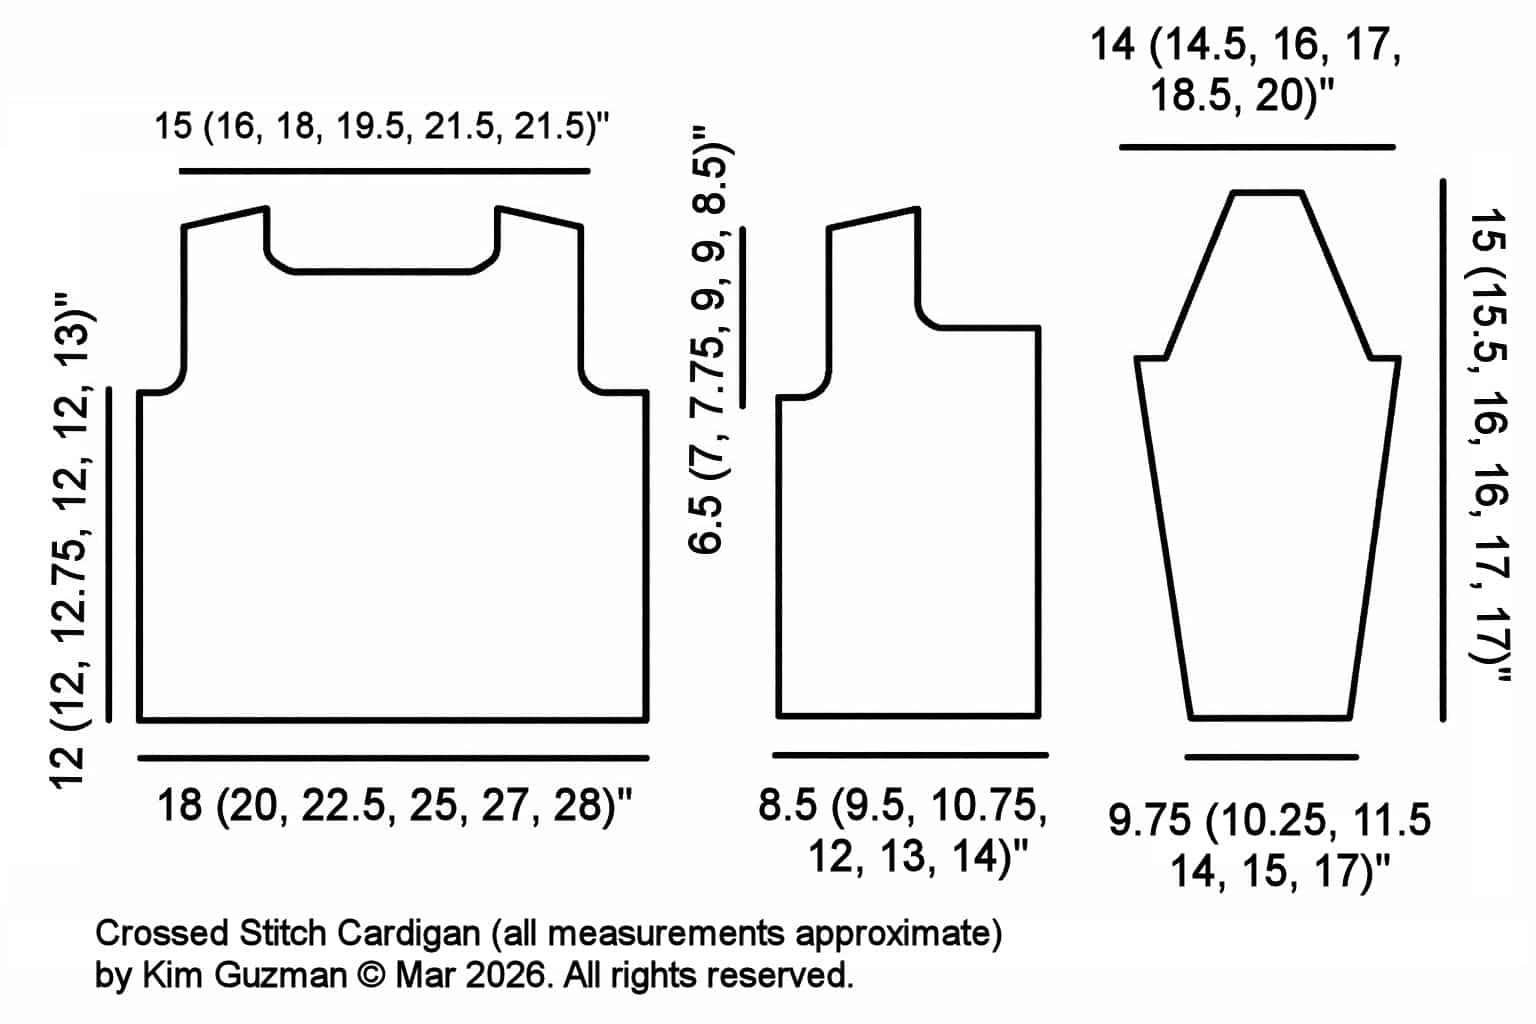
This garment is made in 5 separate pieces then seamed, hem to shoulder. You can view the schematics and compare to your own body measurements or a similar garment to ensure that everything will fit properly. There is approximately 3-4″ positive ease, meaning the cardigan is about 3-4″ more than the actual chest body measurement.
Although I’ve followed industry standards for the sizing, I still think I design on the petite side. So, when the measurement at Yarn Standards says a measurement can be 16-17.5″, for example, I usually focus on the smaller measurement. Each designer is different, even designers of ready-to-wear. It’s the reason I can buy one thing in a size large, another in a size medium and another in a size extra large. I always have to review the finished garment measurements before making an online purchase.
Like all my other garment designs, I provide a schematic with the finished measurements. You can review this against clothing you own already to see where you may need to make some tweaks.
I know that I give a lot of extra information in my pattern, but why not? When I’ve written patterns for Annie’s Attic or Leisure Arts, I had to consciously keep everything as short as possible. There was no room for extra notes or help. With the internet, I can be as helpful as possible, right from the start.
I made that mistake with my first website. Everything was short and to-the-point, just like my traditionally published patterns. But, now, I realize that no one is stopping me from giving you every bit of help I can, right in the pattern.
Fashion Design In Crochet History
I have purposely gone “old school” in providing construction to this garment that you may not be accustomed to seeing much in the crochet pattern industry. Over the decades, a lot has been omitted.
Due to space constraints, things like shoulder sloping was omitted. Upper front and back width was averaged to make it the same. Then, more recently, set-in sleeves have almost disappeared, with raglan, drop shoulder and modified drop shoulder leading the way.
I don’t really like the fit of these styles on me. I wish I did. They’re certainly easier to make. But, if you also find that these styles aren’t right for you either, welcome to the world of set-in sleeves!
Review the schematics with measurements against the measurements of a similar item in your closet. This will allow you to know beforehand simple things like, for example, do you prefer more length? You can add more in the beginning.
Is the pattern long? Yes, yes it is. No one said this was going to be easy. Just take it step by step. If you think crocheting it is a challenge, imagine how much of a challenge it was to write it! 🙂
But, even with the challenge, I find designing crochet clothing with this kind of shaping is my favorite thing to design. It’s the challenge of making something that feels more tailored that really appeals to me. This is the reason I’ve chosen this design for International Crochet Month. I wanted to contribute something to crochet that wasn’t the usual design.
Pin It For Later
Finished Sizes
Size Small (32″) with Sizes M (36″), L (40″), 1X (44″), 2X (48″) and 3X (52″) in parenthesis. Save yourself time and confusion by circling the number for the size you’re making. When a number is marked as “na”, nothing is done for that size.
Yarn
Universal Yarn’s “Deluxe DK Tweed Superwash”, 90% superwash wool/7% acrylic/3% viscose, 284 yds/259m per 3.5 oz/100g per skein: 5 (5, 6, 7, 8, 9) balls of color Olive, or approximately 1220 (1420, 1650, 1900, 2200, 2550) yds.

“Deluxe DK Tweed” is classified as a DK weight (size 3) yarn and is available in 18 shades.
At the time of publishing this pattern, there were put-ups of 5 balls of Deluxe DK Tweed available at Premier Yarns at a significant value. When purchasing at other vendors, make sure to get the DK weight, not the worsted.
Yarn Weight
This yarn is marked as a superwash DK weight. It’s definitely more “floofy” than Stylecraft Special DK which is the one I use the most. There are about 50 more yards in a skein of Special DK per 100 grams. I needed to go up in hook size from what I normally use in order to get the fabric I wanted. You may even be able to use a worsted weight if it’s on the smaller end of the scale. There’s such a big scale between worsted and aran.
This yarn didn’t really behave like other superwash wools I’ve tried. It must be that little bit of acrylic that’s holding it back. It didn’t get all loose and flimsy like I’ve seen before. It really did act like acrylic and I’ll bet a fool acrylic would substitute well.
I have quite a bit of this yarn to use for future projects because I was able to get some incredible end of year deals. Hopefully that doesn’t mean that they’re discontinuing the yarn. I’m such a sucker for tweed yarns.
Other Materials
Suggested Crochet Hook Size J-10 (6mm) or hook needed to meet gauge.
Suggested Crochet Hook Size I-9 (5.5mm) for buttonband and trim.
Yarn Needle for weaving ends.
6 (6, 6, 7, 7, 7) Round Buttons, size 3/4″, matching sewing thread and sewing needle.
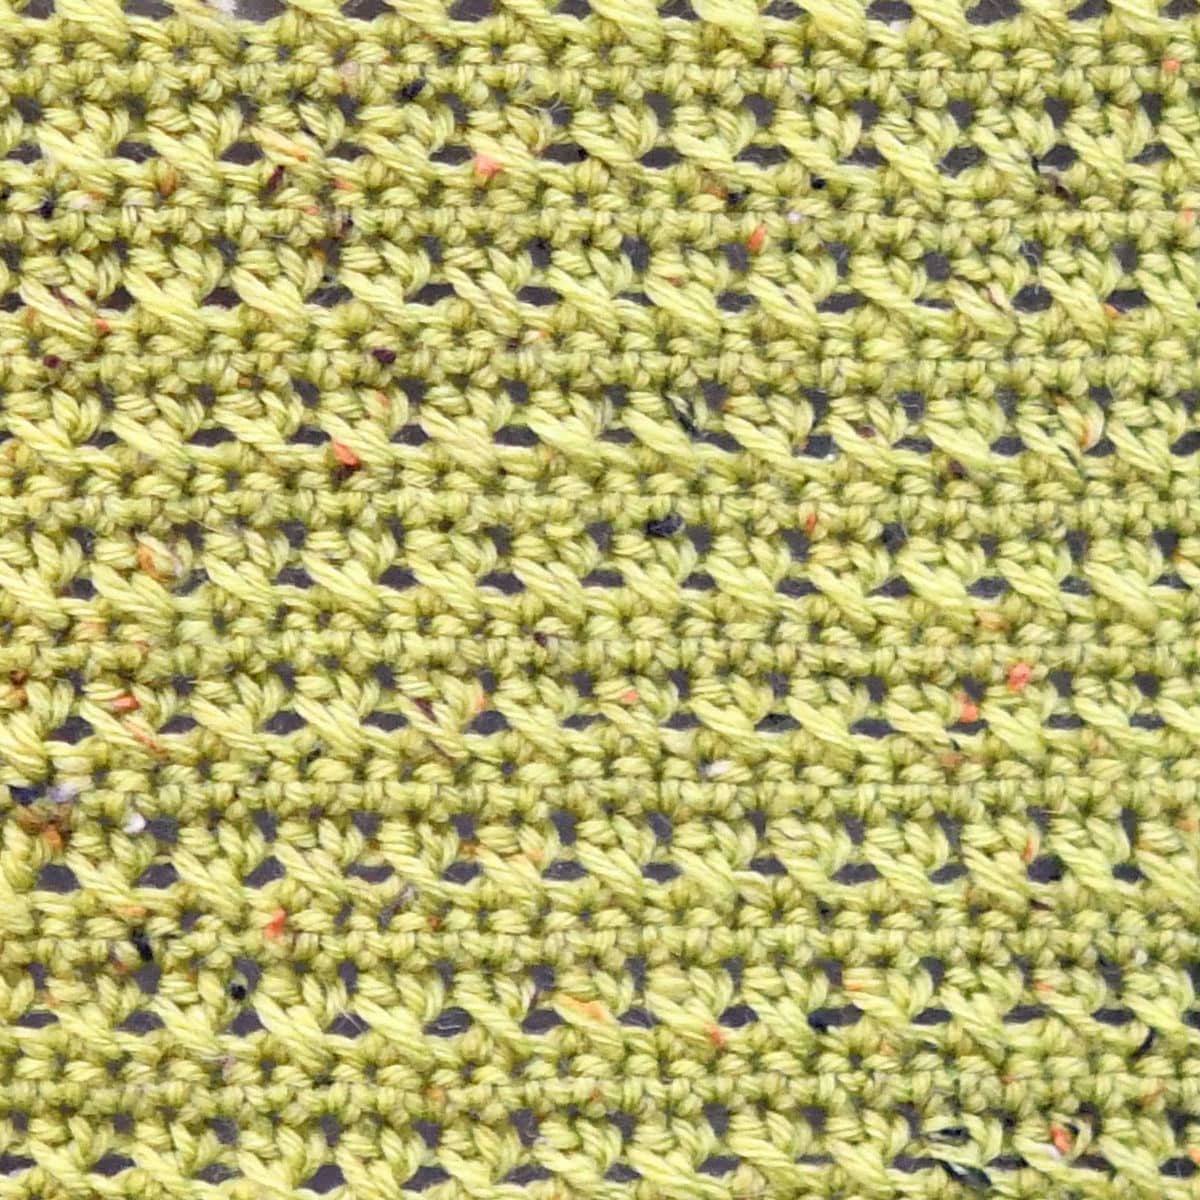
Gauge
Working in stitch pattern, 15 sts for 12 rows measures 4″ x 4″. Working at a different tension may require additional materials.
Even if you insist on never making a gauge swatch, in this instance, I highly recommend that you at least start with one of the fronts to make sure that you get the hang of working in the crossed half double without it biasing. If your gauge is perfect, according to the measurements of the schematic, at least you won’t feel like it’s been a total loss. You’ll have a front piece made!
Important Note About Half Double Crochet
The stitch pattern used here is a double crochet with a half double crochet crossed over it. Every other row is a single crochet. Anytime you have a half double crochet on alternating rows, it typically biases, which means that the fabric shifts diagonally.
The look I was after was a “longer” half double crochet. So, when I pulled up the half double crochet, I pulled up an extra time in order to pull those 3 loops up to the height of the row instead of just letting it sit there as a sort of diagonal. So, pull through the third loop on the hook and then consciously pull up again.
Bringing the loops up to the height of the row helps to alleviate the natural biasing of half double crochet. But, it’s a little difficult to get it “just right”. I wet block all pieces in order to straighten out what little biasing remained.
If you absolutely don’t want to worry about this, you may want to do either an extended half double crochet or a double crochet instead. It may be a little more bulky and could require more yarn. I felt that the longish half double crochet was the least bulky and what lead to my decision to use it here.
Special Stitches
Double Crochet Cluster (dc-cl): Yarn over, insert hook in stitch indicated, yarn over, pull loop through, yarn over, pull through 2 loops on hook, yarn over, insert hook in same stitch, yarn over, pull loop through, yarn over, pull through 2 loops on hook, yarn over, pull through 3 loops on hook.
Other Abbreviations
This crochet pattern is written in US crochet terminology.
ch=chain; dc=double crochet; hdc=half double crochet; na=not applicable; RS=right side; rep=repeat; sc=single crochet; sk=skip; sl=slip; sp(s)=space(s); st(s)=stitch(es).
All numbers after the colon at the end of an instruction are stitch counts. Use the stitch count to check your work.
2026 International Crochet Month Blog Hop
Every day during March, a new, permanently free crochet pattern will be released. The PDF version of the pattern will also be available for free download through 10am Eastern on the day after it is featured. You can make these projects to keep, for gifts, or to donate to charity while chatting with other crocheters and sharing your projects to win giveaway prizes!
We’ve partnered with Denise, Forbidden Fiber Co., Fox Chapel Publishing, Furls, GlassEyesOnline, Guild of Master Craftsman Publications, KnitPal, Knitter’s Relief Balm, LennyMudPottery, MBT Creates, Unicorn, and WalnutFarmDesigns to bring you great prizes in our giveaway. Don’t forget to enter the giveaway in this post on Underground Crafter by April 5, 2026 at 11:59pm Eastern.
How To Join the 2026 International Crochet Month Blog Hop
- Visit this post on Underground Crafter daily to get the latest pattern and the daily featured free PDF.
- Join in by crocheting the patterns as you have time.
- Share your progress and post pictures of your finished projects. Tag your projects and posts #undergroundcrafter on all social media.
- If you’d like to chat with other crocheters, join the Underground Crafters Facebook group or or visit this thread in the Underground Crafter Ravelry group.
- By the end of the Blog Hop, you’ll have up to 31 awesome projects.
Visit Underground Crafter to learn more about the prizes, enter the giveaway, and to get links to each International Crochet Month Blog Hop pattern as it is released.
New Pattern Free PDF Download Weekend
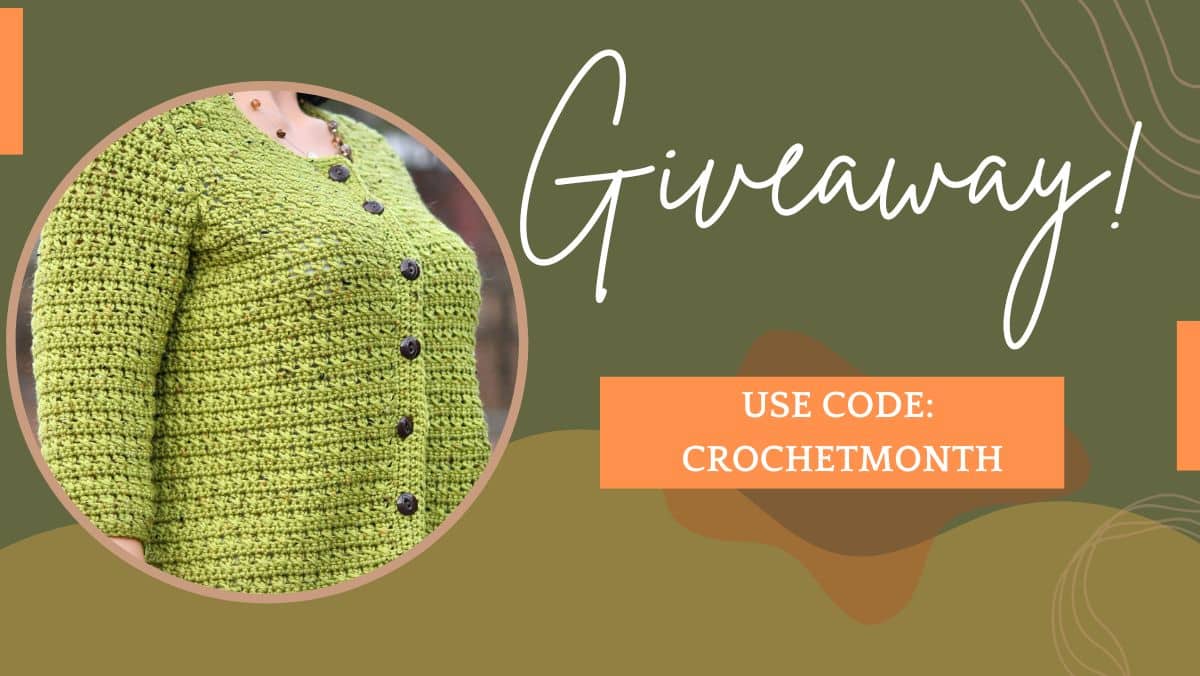
This pattern is made free through ad support below, but the PDF download for the Crossed Stitch Cardigan pattern is available for free this weekend only. This promotion ends at 11:59pm CST, Monday, March 16.
Click on the link near the top of this post to Ravelry, place the PDF in your cart. Do not click Buy Now. Put it in your cart. Add the code CROCHETMONTH, then check out once your total changes to $ZERO. There are no refunds so please do not click checkout unless your total is $ZERO. Enjoy your free pattern!
Free Crochet Pattern Instructions
Please read the full Notes above, especially about the Half Double Crochet used in this pattern.
BACK
Row 1: With larger hook (see Materials List) until specified otherwise, ch 69 (75, 85, 93, 101, 105), sc in second ch from hook and sc in each remaining ch, turn: 68 (74, 84, 92, 100, 104) sc.
Note: The first chain 2 counts as a double crochet so you skip the first sc before you make the first crossed stitches. Because you skip a stitch in order to make a crossed stitch, you will actually be skipping 2 stitches on that first cross.
Row 2 (RS): Ch 2 (counts as first dc here and throughout), sk first sc (see Note), [sk 1 sc, dc in next sc, hdc in skipped sc] to last sc, dc in last sc, turn: 33 (36, 41, 45, 49, 51) crossed stitches.
Row 3: Ch 1, sc in each st across, turn: 68 (74, 84, 92, 100, 104) sc.
Rep rows 2-3 until 35 (35, 37, 35, 35, 39) total rows worked from beginning.
Tip for counting: Even rows are crossed stitches and odd rows are single crochet.
Next Row: Rep row 2.
Decreasing Row 1: Sl st across first 6 (8, 8, 10, 10, 12) sts, ch 1, sc across to last 6 (8, 8, 10, 10, 12) sts, turn, leaving remaining sts unworked: 56 (58, 68, 72, 80, 80) sc.
Note: When you skip stitches at the beginning of a row, always remember to skip another when you make the crossed stitches. The pattern will indicate how many stitches to skip. It’s not a typo.
Decreasing Row 2: Ch 1 (doesn’t count as a st), dc-cl (see Special Stitches above) in same st, sk 2 sc, [sk 1 sc, dc in next sc, hdc in skipped sc] to last 3 sc, sk 2 sc, dc-cl in last sc, turn: 25 (26, 31, 33, 37, 37) crossed stitches.
Decreasing Row 3: Ch 1, sk first st, sc across to last 2 sts, sk 1 st, sc in last st, turn: 50 (52, 62, 66, 74, 74) sc.
Rep Decreasing Rows 2-3 a total of 0 (0, 1, 1, 1, 1) times more: na (na, 56, 60, 68, 68) sc on final row.
Next Row: Ch 2, sk first sc, [sk 1 sc, dc in next sc, hdc in skipped sc] to last sc, dc in last sc, turn: 24 (25, 27, 29, 33, 33) crossed stitches.
Continue in original established stitch pattern until 52 (54, 58, 58, 58, 60) total rows worked from beginning.
First Shoulder
Row 1: Ch 1, sc across 16 (16, 20, 26, 30, 30) sts, turn, leaving remaining 34 (36, 36, 34, 38, 38) sts unworked: 16 (16, 20, 26, 30, 30) sc.
Row 2: Ch 1 (doesn’t count as a st), dc-cl in same st, sk 2 sc, [sk 1 sc, dc in next sc, hdc in skipped sc] to last sc, dc in last sc, turn: 6 (6, 8, 11, 13, 13) crossed stitches.
Row 3: Ch 1, sc across to last 2 sts, turn, leaving remaining sts unworked: 12 (12, 16, 22, 26, 26) sc.
For sizes 1X, 2X and 3X only: Rep previous 2 rows. On final row: na (na, na, 18, 22, 22) sc.
Shoulder Slope
Note: As you can see in the schematics, the shoulders are sloped. Your shoulders aren’t straight across; they are slightly sloped downward from the neck to the tip of the shoulder. This is common in ready-to-wear clothing but it’s been omitted in most crochet patterns to make patterns shorter. I wanted this cardigan to be as tailored and as comfortable as possible so I’m including shoulder sloping. After you complete the neckline shaping, the shoulder sloping immediately follows. It will seem unintuitive, but compare it to the schematics so you can make sure you are duplicating the shaping.
Row 1: Ch 1, sc across to last 3 (3, 4, 5, 6, 3) sc, turn, leaving remaining sc unworked: 9 (9, 12, 13, 16, 19) sc.
Row 2: Sl st across first 3 (3, 4, 5, 6, 3) sts, ch 1, sc across, turn: 6 (6, 8, 8, 10, 16) sc.
Row 3: Ch 1, sc across 3 (3, 4, 5, 6, 3) sc, fasten off: 3 (3, 4, 3, 4, 13) sc.
For size 3X only: Rep previous 2 rows. On final row: na (na, na, na, na, 7) sc.
Opposite Shoulder
Row 1: Counting from opposite armhole, count 16 (16, 20, 26, 30, 30) sts then join with sl st, ch 1, sc across, turn: 16 (16, 20, 26, 30, 30) sc.
Row 2: Ch 2, sk first sc, [sk 1 sc, dc in next sc, hdc in skipped sc] to last 3 sc, sk 2 sc, dc-cl in last sc, turn: 6 (6, 8, 11, 13, 13) crossed stitches.
Row 3: Sl st across first 2 sts, ch 1, sc across, turn: 12 (12, 16, 22, 26, 26) sc.
For sizes 1X, 2X and 3X only: Rep previous 2 rows. On final row: na (na, na, 18, 22, 22) sc.
Shoulder Slope
Row 1: Sl st across first 3 (3, 4, 5, 6, 3) sts, ch 1, sc across, turn: 9 (9, 12, 13, 16, 19) sc.
Row 2: Ch 1, sc across to last 3 (3, 4, 5, 6, 3) sc, turn, leaving remaining sc unworked: 6 (6, 8, 8, 10, 16) sc.
Row 3: Sl st across first 3 (3, 4, 5, 6, 3) sts, ch 1, sc across, fasten off: 3 (3, 4, 3, 4, 13) sc.
For size 3X only: Rep previous 2 rows. On final row: na (na, na, na, na, 7) sc.
FIRST FRONT
Row 1: Ch 33 (37, 41, 45, 49, 53), sc in second ch from hook and sc in each remaining ch, turn: 32 (36, 40, 44, 48, 52) sc.
Row 2 (RS): Ch 2, sk first sc, [sk 1 sc, dc in next sc, hdc in skipped sc] to last sc, dc in last sc, turn: 15 (17, 19, 21, 23, 25) crossed stitches.
Row 3: Ch 1, sc in each st across, turn: 32 (36, 40, 44, 48, 52) sc.
Rep rows 2-3 until 35 (35, 37, 35, 35, 39) total rows worked from beginning.
Next Row: Rep row 2.
Decreasing Row 1: Sl st across first 6 (8, 8, 10, 10, 12) sts, ch 1, sc across: 26 (28, 32, 34, 38, 40) sc.
Decreasing Row 2: Ch 2, sk first sc, [sk 1 sc, dc in next sc, hdc in skipped sc] to last 3 sc, sk 2 sc, dc-cl in last sc, turn: 11 (12, 14, 15, 17, 18) crossed stitches.
Decreasing Row 3: Ch 1, sk 2 sts, sc across, turn: 22 (24, 28, 30, 34, 36) sc.
Rep Decreasing Rows 2-3 a total of 1 (1, 1, 1, 1, 2) times more. On final row, 18 (20, 24, 26, 30, 28) sc.
Next Row: Ch 2, sk first sc, [sk 1 sc, dc in next sc, hdc in skipped sc] to last sc, dc in last sc, turn: 8 (9, 11, 12, 14, 13) crossed stitches on final row.
Continue in original established stitch pattern until 46 (46, 48, 50, 48, 50) total rows worked from beginning.
Neckline
Decreasing Row 1: Ch 1, sc across 14 (16, 20, 22, 26, 24) sts, turn, leaving remaining 4 (4, 4, 4, 4, 4) sts unworked: 14 (16, 20, 22, 26, 24) sc.
Decreasing Row 2: Ch 1 (doesn’t count as a st), dc-cl in same st, sk 2 sc, [sk 1 sc, dc in next sc, hdc in skipped sc] to last sc, dc in last sc, turn: 5 (6, 8, 9, 11, 10) crossed stitches.
For sizes M through 2X only: Ch 1, sc across to last 2 sts, turn, leaving remaining sts unworked: na (12, 16, 18, 22, na) sc.
For sizes S and 3X only: Ch 1, sc in each st across, turn: 12 (na, na, na, na, 22) sc.
Next Row: Ch 2, sk first sc, [sk 1 sc, dc in next sc, hdc in skipped sc] to last sc, dc in last sc, turn: 5 (5, 7, 8, 10, 10) crossed stitches.
Continue in original established stitch pattern until 55 (57, 61, 63, 63, 65) total rows worked from beginning. Remember that odd rows are single crochet rows.
Shoulder Slope
Row 1: Ch 1, sc across to last 3 (3, 4, 5, 6, 3) sc, turn, leaving remaining sc unworked: 9 (9, 12, 13, 16, 19) sc.
Row 2: Sl st across first 3 (3, 4, 5, 6, 3) sts, ch 1, sc across, turn: 6 (6, 8, 8, 10, 16) sc.
Row 3: Ch 1, sc to last 3 (3, 4, 5, 6, 3) sc, fasten off: 3 (3, 4, 3, 4, 13) sc.
For size 3X only: Rep previous 2 rows. On final row: na (na, na, na, na, 7) sc.
SECOND FRONT
Rep as for First Front until 36 (36, 38, 36, 36, 40) total rows worked from beginning.
Decreasing Row 1: Ch 1, sc to last 6 (8, 8, 10, 10, 12) sts, turn, leaving remaining sts unworked: 26 (28, 32, 34, 38, 40) sc.
Decreasing Row 2: Ch 1 (doesn’t count as a st), dc-cl in same st, sk 2 sc, [sk 1 sc, dc in next sc, hdc in skipped sc] to last sc, dc in last sc, turn: 11 (12, 14, 15, 17, 18) crossed stitches.
Decreasing Row 3: Ch 1, sc across to last 2 sc, turn, leaving remaining sts unworked: 22 (24, 28, 30, 34, 36) sc.
Rep Decreasing Rows 2-3 a total of 1 (1, 1, 1, 1, 2) times more. On final row, 18 (20, 24, 26, 30, 28) sc.
Next Row: Ch 2, sk first sc, [sk 1 sc, dc in next sc, hdc in skipped sc] to last sc, dc in last sc, turn: 8 (9, 11, 12, 14, 13) crossed stitches.
Continue in original established stitch pattern until 46 (46, 48, 50, 48, 50) total rows worked from beginning.
Neckline
Row 1: Sl st across first 4 sts, ch 1, sc across, turn: 14 (16, 20, 22, 26, 24) sc.
Row 2: Ch 2, sk first sc, [sk 1 sc, dc in next sc, hdc in skipped sc] to last 3 sc, sk 2 sc, dc-cl in last sc, turn: 5 (6, 8, 9, 11, 10) crossed stitches.
For sizes M through 2X only: Ch 1, sk 2 sts, sc across, turn: na (12, 16, 18, 22, na) sc.
For sizes S and 3X only: Ch 1, sc in each st across, turn: 12 (na, na, na, na, 22) sc.
Next Row: Ch 2, sk first sc, [sk 1 sc, dc in next sc, hdc in skipped sc] to last sc, dc in last sc, turn: 5 (5, 7, 8, 10, 10) crossed stitches.
Continue in original established stitch pattern until 55 (57, 61, 63, 63, 65) total rows worked from beginning. Odd rows are single crochet rows.
Shoulder Slope
Row 1: Sl st across first 3 (3, 4, 5, 6, 3) sts, ch 1, sc across, turn: 9 (9, 12, 13, 16, 19) sc.
Row 2: Ch 1, sc across to last 3 (3, 4, 5, 6, 3) sc, turn, leaving remaining sc unworked: 6 (6, 8, 8, 10, 16) sc.
Row 3: Sl st across first 3 (3, 4, 5, 6, 3) sts, ch 1, sc across, fasten off: 3 (3, 4, 3, 4, 13) sc.
For size 3X only: Rep previous 2 rows. On final row: na (na, na, na, na, 7) sc.
SLEEVES (MAKE 2)
Row 1: Ch 37 (39, 43, 53, 57, 65) sc in second ch from hook and sc in each remaining ch, turn: 36 (38, 42, 52, 56, 64) sc.
Row 2 (RS): Ch 2, sk first sc, [sk 1 sc, dc in next sc, hdc in skipped sc] to last sc, dc in last sc, turn: 17 (18, 20, 25, 27, 31) crossed stitches.
Row 3: Ch 1, sc in each st across, turn: 36 (38, 42, 52, 56, 64) sc.
Increasing Row 4: Ch 2, dc in first sc, [sk 1 sc, dc in next sc, hdc in skipped sc] to last sc, 2 dc in last sc, turn: 17 (18, 20, 25, 27, 31) crossed stitches with 1 extra dc at each end.
Increasing Row 5: Ch 1, 2 sc in first st, sc across to last st, 2 sc in last st, turn: 40 (42, 46, 56, 60, 68) sc.
Rows 6-9 (9, 9, 11, 11, 11): Rep rows 2-3 (no increasing).
Rep prev 6 (6, 6, 8, 8, 8) rows until a total of 21 (27, 27, 19, 19, 19) rows have been completed from beginning of Sleeve. 48 (54, 58, 60, 64, 72) sc on final row.
For sizes S, 1X, 2X and 3X only: Rep Increasing Rows 4-5 once more: 52 (na, na, 64, 68, 76) sc.
For sizes S, 1X, 2X and 3X only: Rep rows 2-3 a total of 1 (na, na, 1, 2, 1) more: 52 (na, na, 64, 68, 76) sc.
Next Row: Ch 2, sk first sc, [sk 1 sc, dc in next sc, hdc in skipped sc] to last sc, dc in last sc, turn: 25 (26, 28, 31, 33, 37) crossed stitches.
For double checking, total row count for sleeve is now: 26 (28, 28, 24, 26, 24) rows.
Sleeve Cap
Decreasing Row 1: Sl st across first 6 (8, 8, 10, 10, 12) sts, ch 1, sc across to last 6 (8, 8, 10, 10, 12) sts, turn, leaving remaining sts unworked: 40 (38, 42, 44, 48, 52) sc.
Row 2: Ch 2, sk first sc, [sk 1 sc, dc in next sc, hdc in skipped sc] to last sc, dc in last sc, turn: 19 (18, 20, 21, 23, 25) crossed stitches.
Row 3: Ch 1, sc in each st across, turn: 40 (38, 42, 44, 48, 52) sc.
For sizes 1X, 2X and 3X only: Work 2 rows in original established stitch pattern with no decreasing.
Decreasing Row: Ch 1 (doesn’t count as a st), dc-cl in same st, sk 1 sc, [sk 1 sc, dc in next sc, hdc in skipped sc] to last 2 sc, sk 1 sc, dc-cl in last sc, turn: 18 (17, 19, 20, 22, 24) crossed stitches.
Decreasing Row: Ch 1, sk first st, sc across to last 2 sts, sk 1 st, sc in last st, turn: 36 (34, 38, 40, 44, 48) sc.
Rep previous 2 rows until a total of 45 (47, 49, 47, 51, 51) rows have been completed from beginning of Sleeve, fasten off. On final row, 8 (6, 6, 8, 8, 8) sc.
For size 1X only: Work 2 rows in original established stitch pattern with no decreasing.
Fasten off for all sizes.
Blocking
I wet down each piece and removed the excess water with a dry towel. Then, I shaped each piece and allowed to dry overnight. I didn’t pin anything and I didn’t excessively stretch it. I simply shaped it so all the edges were straight and easier to assemble.
Assembly
Seam shoulders. Set in and seam sleeves. Seam bottom of sleeves and sides of body. Weave in all ends securely.
Left Front Buttonband
Row 1: With smaller hook (see Materials List) and Right Side facing you, join with sl st to begin working along inner front straight edge. Ch 1, work sc evenly along straight edge, turn.
Tip: When I work along the sides, I usually worked 2 single crochet in the side of a double and 1 single crochet in the side of a single. At the same time, since a single crochet is wider than it is tall, I also have to skip stitches in order to keep it from ruffling. For this project, I found that working a repeat of 2 in a double, 1 in a single, 2 in a double, then skipping the next single worked well for me.
Rows 2-5: Ch 1, sc across, turn. Fasten off after row 5.
Right Front Buttonband
Note: Repeat as for Left Front Buttonband except as instructed below.
Rows 1-2: Rep rows 1-2 as for Left Front Buttonband. With stitch markers or small pieces of yarn mark 6 (6, 6, 7, 7, 7) positions for the buttonholes. Mark the top button at the very top and the bottom button at 3″ from the hem, then evenly space the remaining buttons.
Row 3: Rep row 3 except at button hole positions: [ch 2, sk 2 sc].
Row 4: Rep row 4 except at ch-2 sps, work 2 sc in each ch-2 sp.
Row 5: Rep row 5.
Finishing
With Right Side Facing and smaller hook, join yarn with sl st to top of buttonband to work around the neckline, ch 1, sc evenly around neckline, fasten off. Weave in all ends securely.
With sewing needle and matching sewing thread, attach buttons along the Left Front Buttonband, adjacent to the button hole positions.
Schematics
All measurements are approximate.

Twitter | Facebook | Pinterest
All the patterns at Make It Crochet are free. Since many of you have asked how to help with the costs of running a site like this, I’ve made all the patterns into print-ready PDFs and the cost is about the same as a cup of coffee. Every little bit helps.
TERMS: To my fellow crafters, you have my permission to use my patterns to make and sell your projects* anywhere you like. You cannot use my images to sell your projects, though. You must take photos of your own work. All patterns have been tested but mistakes can happen. If you find a mistake, please let me know. Everything at MakeItCrochet.com is protected by copyright to Kim Guzman. Other than the permissions previously given, no one other than Kim Guzman has permission to: reproduce, copy, publish or distribute this pattern, its parts or photos in any way or form, including, but not limited to, translations into foreign languages & video production.
*Not intended to be blanket permission for mass production.


I hope you enjoy this pattern. If you have any questions, please contact me.
Lovely design & very nice colour
Would love to crochet this
Thanks so much! I hope you enjoy it. Thank you for writing! 🙂