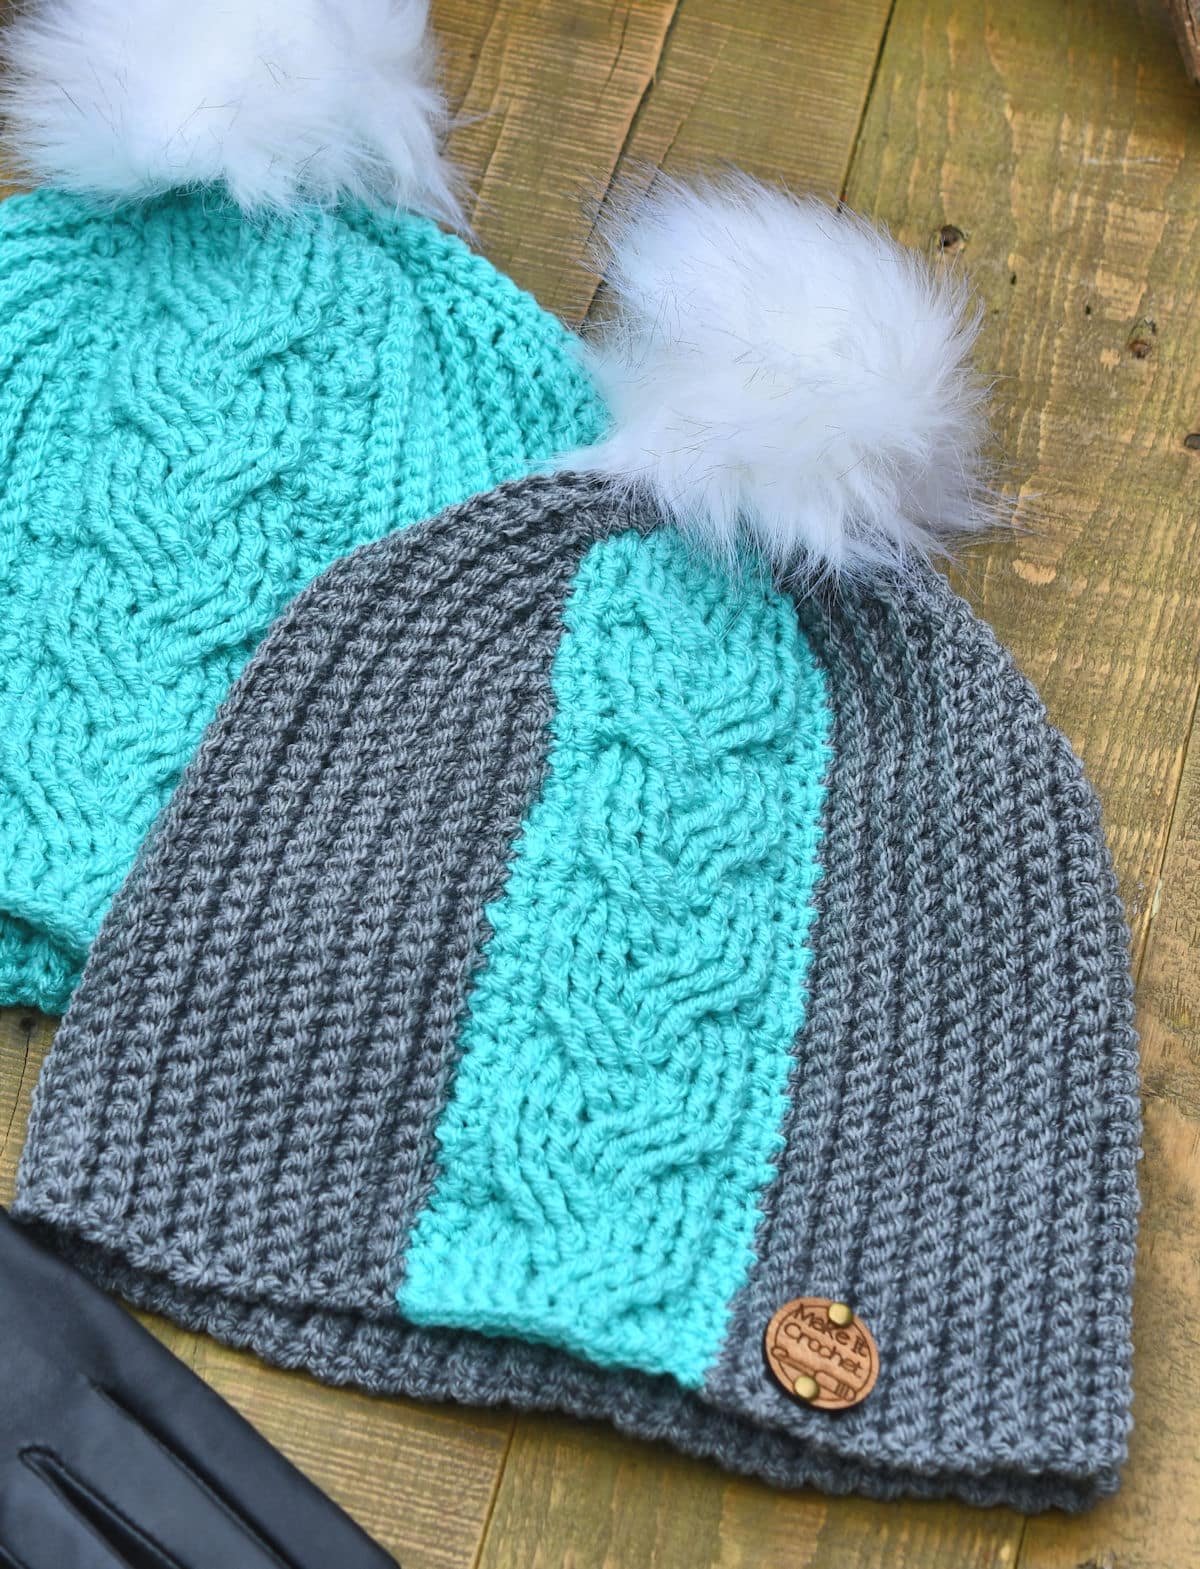
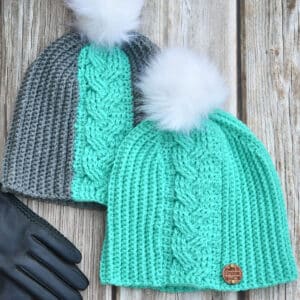
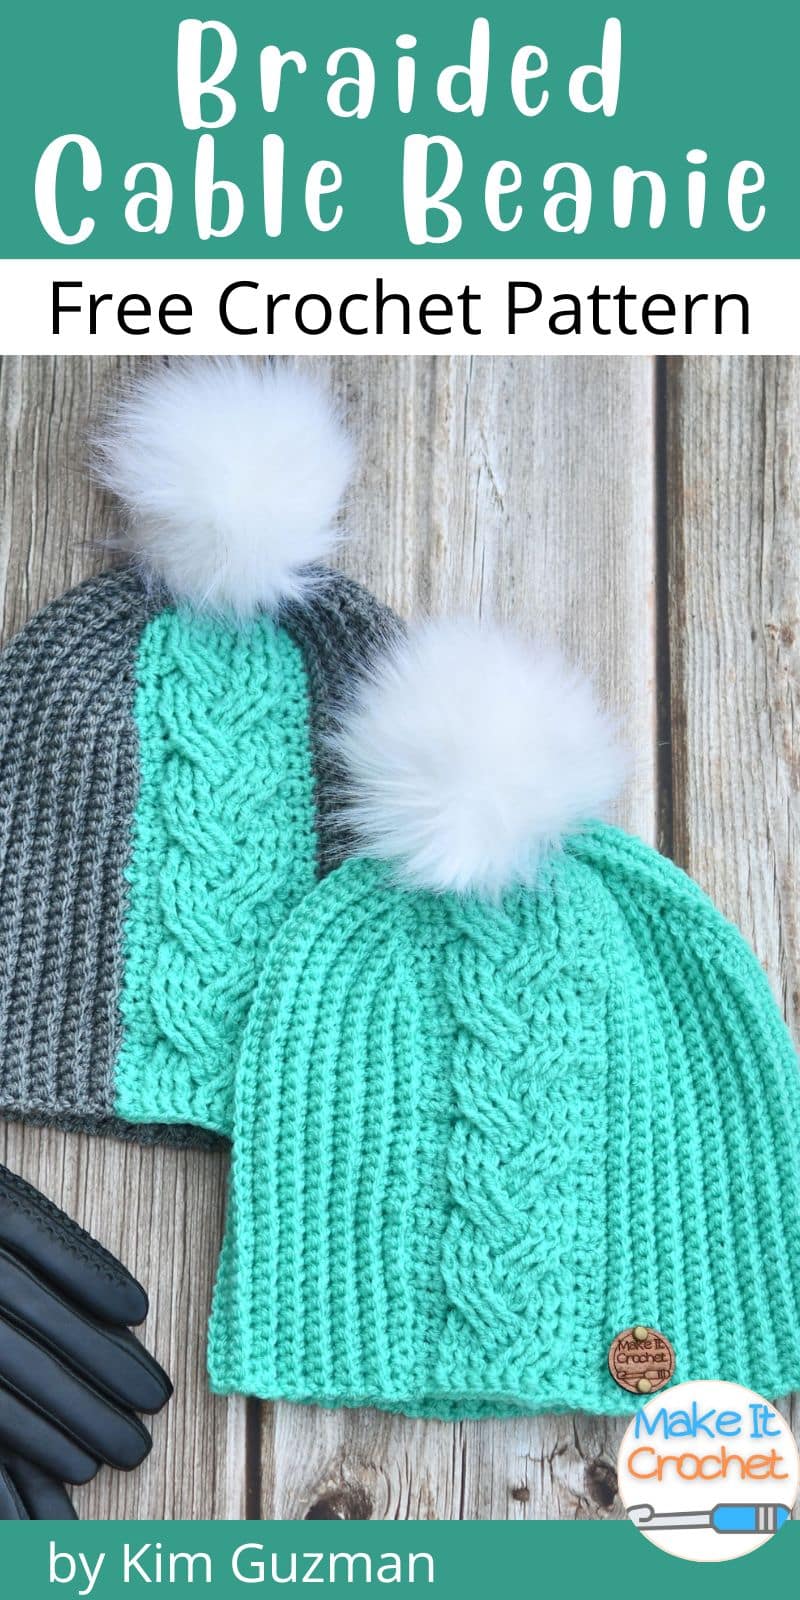
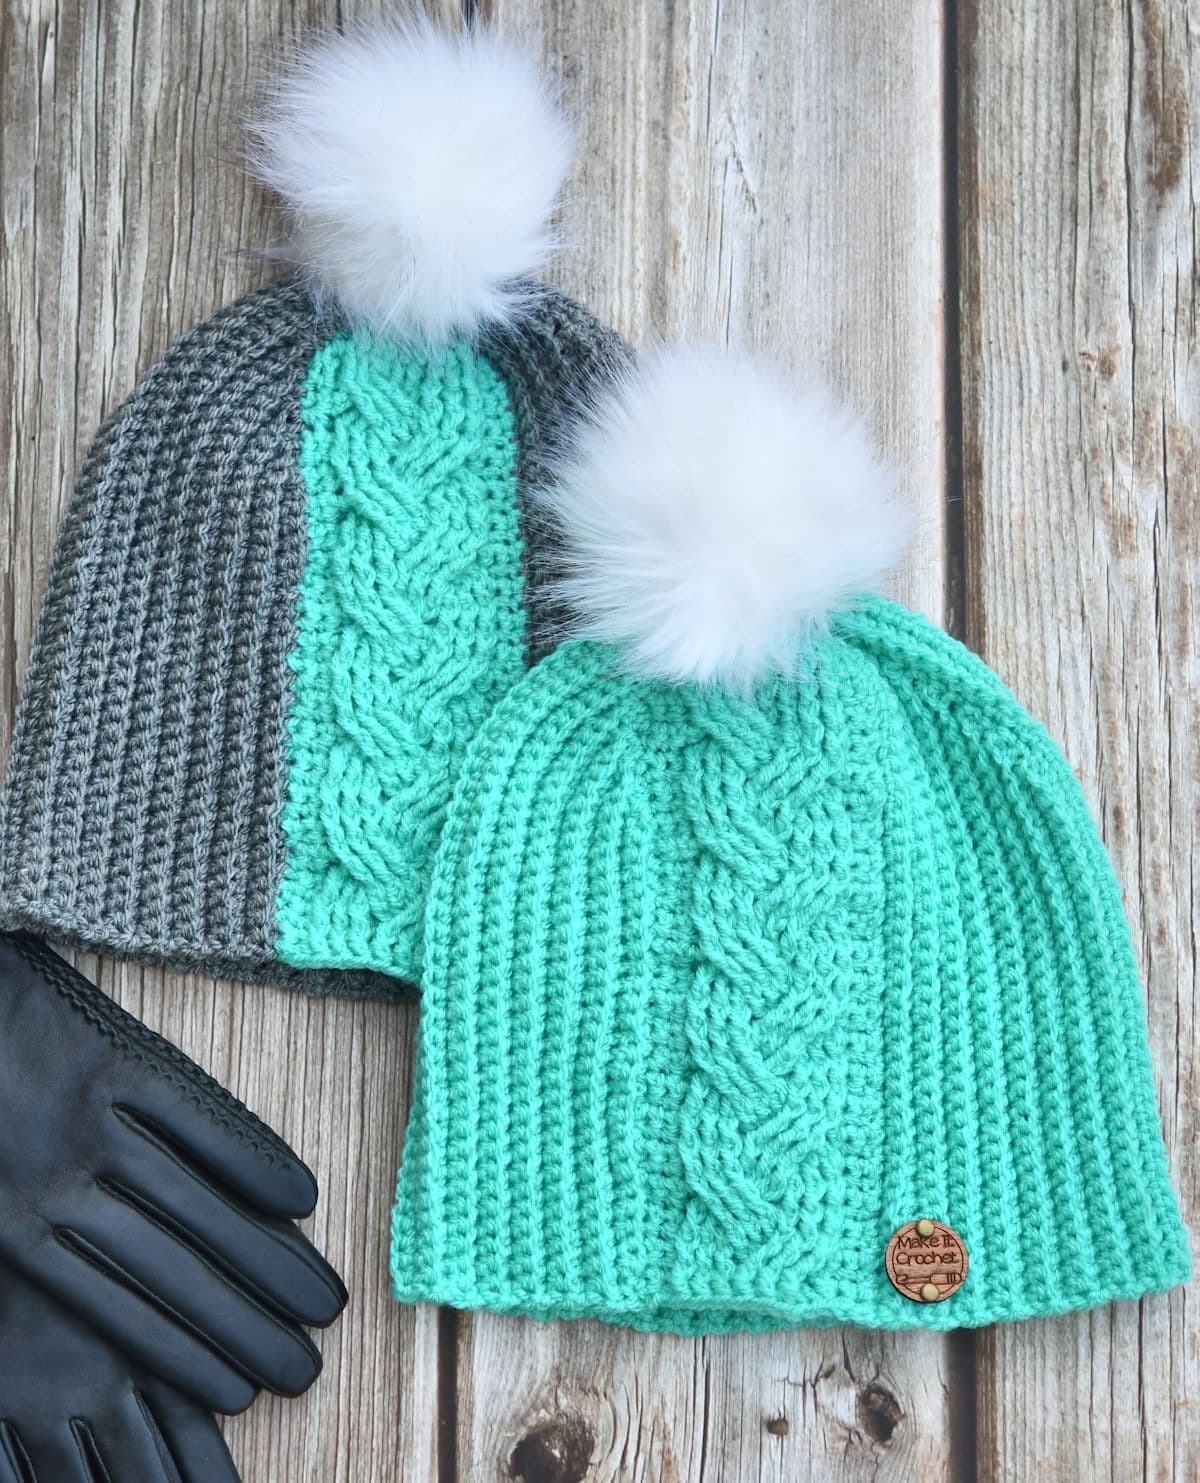
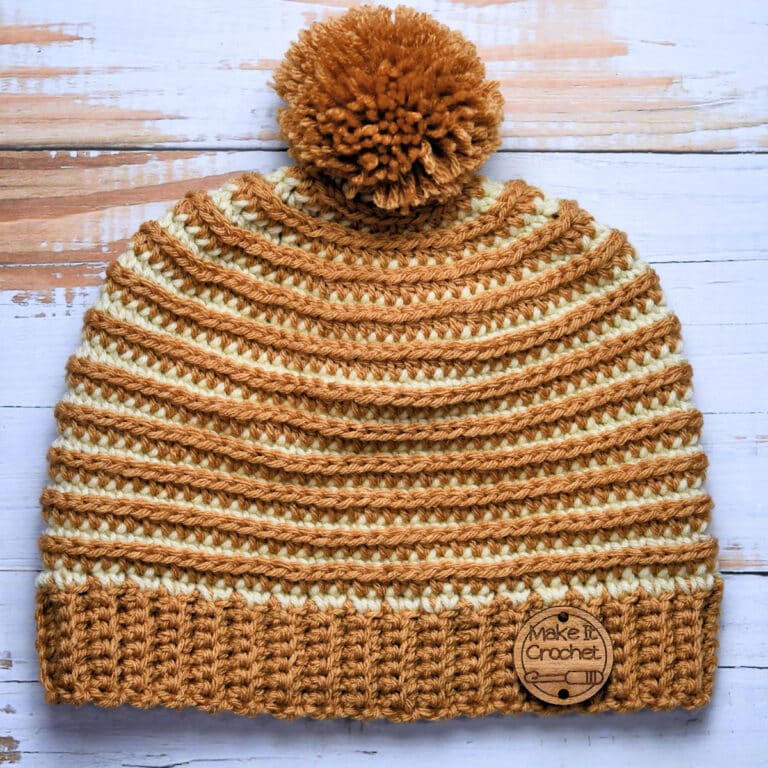
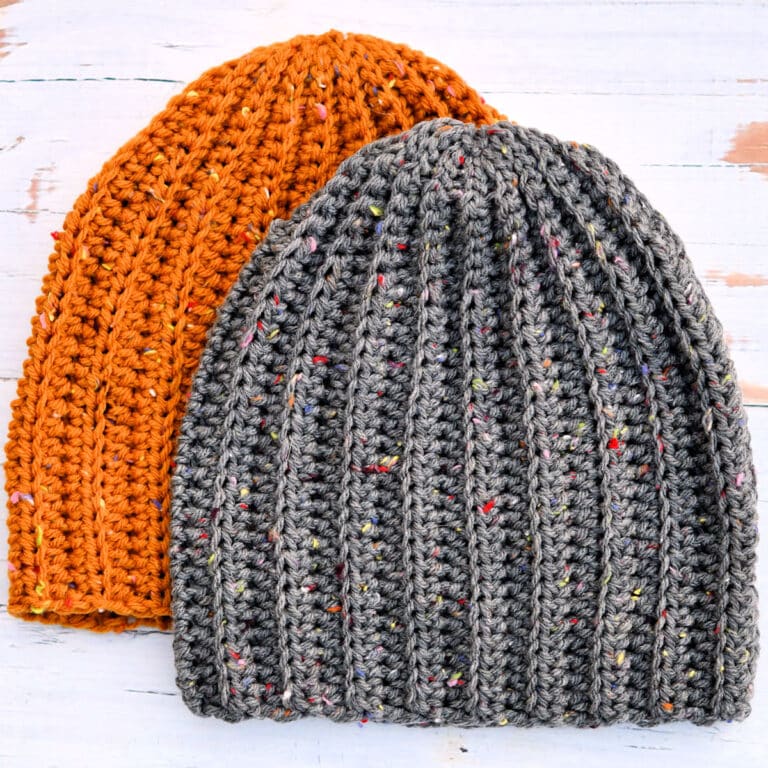
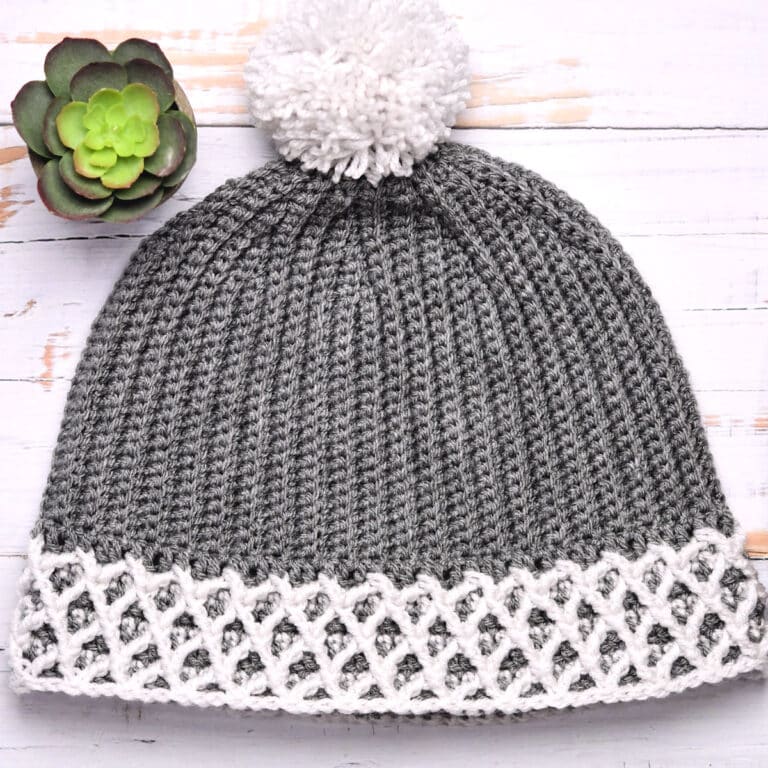
This slightly slouchy Braided Cable Beanie includes all the elegance of a traditional cable with casual, stretchy ribbing. Make it in one color or two colors and add a faux pom to complete the look.
“Braided Cable Beanie” free crochet pattern by Kim Guzman, © Nov. 2025 All rights reserved.
Technique: Regular Crochet
Skill Level: Intermediate

Crochet Pattern At A Glance
Braided Cable Beanie Free Crochet Pattern
Designer: Kim Guzman © 2022-2026. All rights reserved.Rate the Pattern
Yarn
- Stylecraft “Special Double Knit”, 100% acrylic, 322 yds/295m per 3.5 oz/100g per skein. For solid color beanie, about 225 yds color Aspen. For two-color beanie, about 175 yds color Aspen and 50 yds color Grey.
Other Materials
- Suggested Crochet Hook Size H-8 (5mm) or hook needed to meet gauge
- Yarn Needle for seaming and weaving ends
- Faux Pom (optional)
Instructions
- Begin by making the Cable Insert separately.
- Working along the sides, pick up stitches to begin working in a side to side direction.
- Five "wedges" are made in the side to side direction, working in back loop only single crochet.
- Seam the last row to the opposite side of the Cable Insert.
- Finish by drawing the top of the hat together, weaving in the ends and adding the optional faux pom.
Full Free Crochet Pattern Below

This is a free crochet pattern and the written instructions are below. If you prefer a printable download, a PDF is also available for purchase.
My Crochet Pattern Notes
This project starts with a double braided cable motif insert made separately. Stitches are then picked up along the side edge and rows are worked vertically to complete the hat. The last row will be stitched to the opposite long side of the cable piece.
More Designs With Cable Insert
I did a design like this for Caron yarns called Kansas City Cowl in 2011, published in 2012. It’s a knit pattern, but it follows the same construction of making the center piece, working the stitches along the side then seaming closed on the opposite side.

If you knit as well, you can still pick up this free crochet pattern in my Ravelry designer pages.
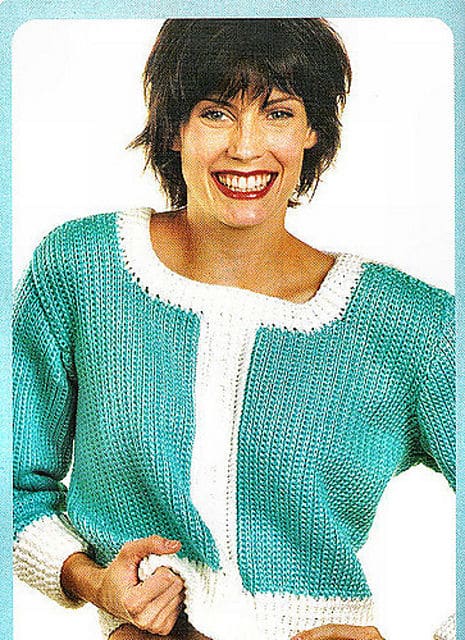
Another design I did with a center cable insert is this Side to Side Sweater that was published in Crochet! magazine. I believe it was the very first issue of the magazine when it was first introduced, in March 2002.
You can find more information about the magazine issue on Ravelry, but I’ve never seen a digital copy of it available online.
It was my first time designing a sweater with saddle shoulder sleeves, and I love them! The white cable section goes all up along the sleeves to the neck opening.
2025 Holiday Stashdown Crochet Along
This Braided Cable Beanie is part of the 2025 Holiday Stashdown, now in its 11th year.
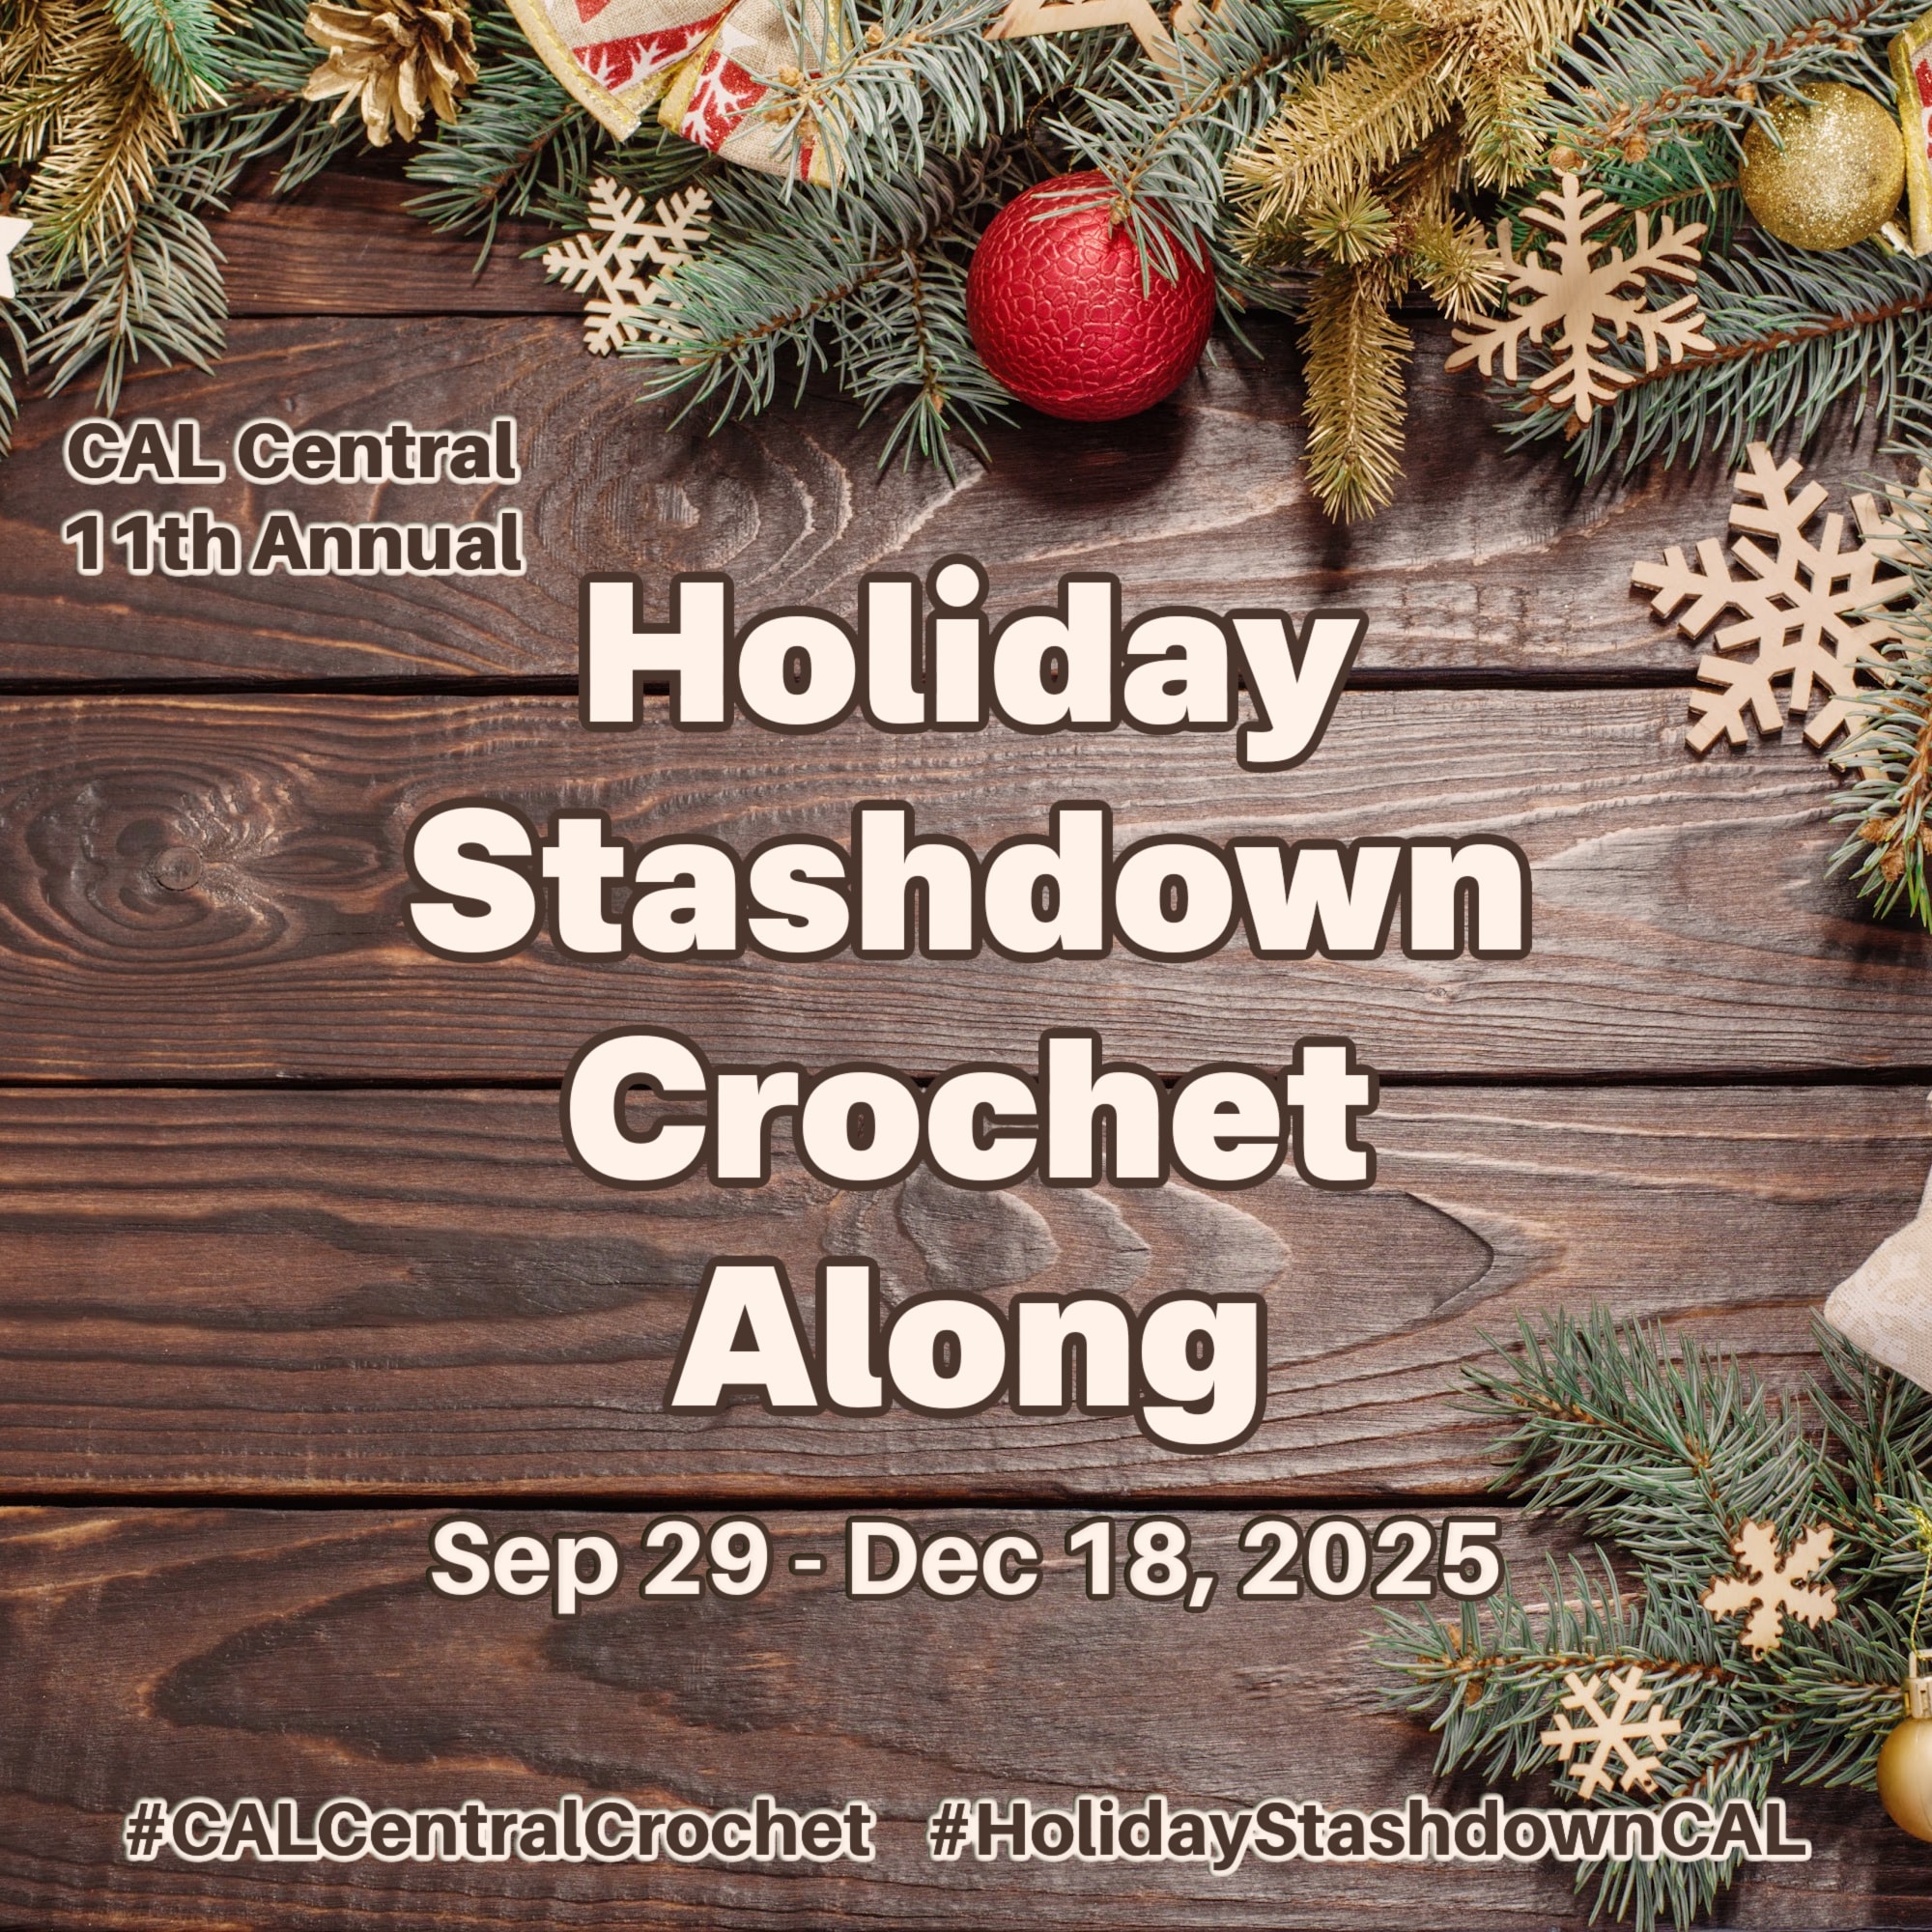
This crochet along is specifically to help with your holiday gift giving and you can join in the fun and be a part of the Facebook community, if you like. There is also a drawing for free prizes!
Pin It For Later
Finished Size
9.5″ tall, 21″ circumference.
Adjusting For More Of A Non Slouchy Style
This beanie is about 1.5″ longer than a non-slouchy style beanie. If you prefer a regular length beanie, you are shooting for 8″. Stop after 8″ on the Cable Insert and start with 36 single crochet along the sides, working down to 28 single before working back. Complete the same number of short row triangle/wedge repeats.
Yarn
Stylecraft “Special Double Knit”, 100% acrylic, 322 yds/295m per 3.5 oz/100g per skein. For solid color beanie, about 225 yds color Aspen. For two-color beanie, about 175 yds color Aspen and 50 yds color Grey.

“Special Double Knit” is classified as a DK weight (size 3) yarn and is currently available in over 120 shades.
Available at LoveCrafts (aff link).
See more projects in Stylecraft Special DK yarn.

Yarn Substitution
I’ve used DK weight yarn (size 3) because I love this size. There’s a lot of yardage on a 100g skein of Stylecraft Special DK at a low pricepoint. Any size 3 DK weight yarn should work for you.
Other Materials
Suggested Crochet Hook Size H-8 (5mm) or hook needed to meet gauge.
Yarn Needle for seaming and weaving ends.
Faux Pom (optional).
Gauge
The Cable Insert measures 3″ wide by 9.5″ tall. The ribbed portion for the rest of the beanie measures 18″ wide by 9.5″ tall. This equates to a swatch of about 18 back loop only single crochet stitches for 18 rows measures 4×4″.
Working at a different tension may require additional materials and adjustments for size.
Making Crochet Cables When You’re Left Handed
If you are left handed, your cables will lean in the opposite direction so it won’t look exactly like the photo. Everything will be mirrored. It won’t affect anything otherwise. If you really wanted the cables to go in the same direction, you could swap the instructions, but it’s really not necessary.
Special Stitches
The Cable Insert requires fairly intensive cabling. It always happens that cables in one direction are easier to make than in the other direction. If you’re new to cables, you will be happy to know that it’s only this one small section and then you can move on to easier single crochet stitches. It’s a great introduction to cables without being too overwhelming.
Front Post Double Crochet (fpdc): Yarn over, insert hook to the side of the indicated stitch, move hook around the back of the stitch and out the other side of same stitch, yarn over, pull loop through, [yarn over, pull through 2 loops on hook] twice.
Front Post Treble Crochet (fptr): Yarn over twice, insert hook to the side of the indicated stitch, move hook around the back of the stitch and out the other side of same stitch, yarn over, pull loop through, [yarn over, pull through 2 loops on hook] 3 times.
My Starlight Cable Shawl uses these stitches as well, if you’re looking for more cable projects.

Other Abbreviations
This crochet pattern is written in US crochet terminology.
ch=chain; lp(s)=loop(s); RS=right side; rep=repeat; sc=single crochet; sk=skip; st(s)=stitch(es); WS=wrong side.
All numbers after the colon at the end of an instruction are stitch counts. Use the stitch count to check your work.
New Pattern Free PDF Download

This pattern is made free through ad support below, but the PDF download for the Braided Cable Beanie pattern is available during the first couple of days of this event only. This promotion ends at 11:59pm CST, Tuesday, November 4.
This promotion is concluded. Please sign up for the email newsletter to make sure you don’t miss any weekly promotions. Scroll down for the free online pattern.
Free Crochet Pattern Instructions
Crochet Cable Insert
Note: Since the Cable Insert is worked from a point to the wide end, it is upside down in the hat.
Row 1: With Aspen (or Grey, if making two color version), ch 2, 3 sc in second ch from hook, turn: 3 sc.
Row 2: Ch 1, 2 sc in first sc, sc in next sc, 2 sc in last sc, turn: 5 sc.
Row 3: Ch 1, 2 sc in first sc, sc in each sc to the last sc, 2 sc in last sc, turn: 7 sc.
Rows 4-6: Rep row 3. On final row, 13 sc.
Row 7 (RS): Ch 1, sc in first 2 sc, [fpdc (see Special Stitches above) around corresponding sc 2 rows below] 9 times, sc in last 2 sc, turn: 13 sts.
Note: The back will start looking like you’re working 2 layers of stitches due to the post stitches. Make sure that you’re making the WS stitches in the correct row instead of dipping down into one of the prior rows.
Row 8: Ch 1, sc in each st across, turn: 13 sc.
Row 9: Ch 1, sc in first 2 sc, fpdc around next 9 fpdc, sc in last 2 sc, turn.
Row 10: Ch 1, sc in each st across, turn.
Row 11: Ch 1, sc in first 2 sc, sk 3 fpdc, fptr (see Special Stitches above) around next 3 fpdc, working in front of the 3 fptr just worked, fptr around 3 skipped fpdc, fpdc around last 3 fpdc, sc in last 2 sc, turn.
Row 12: Ch 1, sc in each st across, turn: 13 sc.
Note: You have worked stitches out of order, by crossing them. When you make the new post stitches, maintain the crossed stitches and don’t switch them back. Work in the new order you have established.
Row 13: Ch 1, sc in first 2 sc, fpdc around next 9 fpdc/tr, sc in last 2 sc, turn.
Row 14: Rep row 12.
Note: For the next row, you will be working behind the post stitches. You’ll need to pull the 3 fptr toward you and stretch things out a little to find the skipped stitches, then reach back there and work the three skipped stitches. I know you’ll be performing acrobats for this, but trust the process.
Row 15: Ch 1, sc in first 2 sc, fpdc around first 3 fpdc, sk 3 fpdc, fptr around next 3 fpdc, working in back of the 3 fptr just worked, fptr around 3 skipped fpdc, sc in last 2 sc, turn.
Row 16: Rep row 12.
Row 17: Ch 1, sc in first 2 sc, fpdc/tr around next 9 fpdc, sc in last 2 sc, turn.
Row 18: Rep row 12.
Rows 19-42: Rep rows 11-18.
Rows 43-49: Rep rows 11-17. If you’re making a solid color beanie, do not fasten off. For a two color beanie, fasten off.
Remainder of Hat
Turn Cable Insert to begin working along sides of rows. (Or, join second color with sl st.) This portion of the hat makes 5 total triangle wedges, worked in short rows.
Row 1: Ch 1, with RS facing, work 43 sc evenly along the long side of Cable Insert, turn.
Row 2: Ch 1, sk first sc, working in back lps, sc across to last sc, working in both lps, sc in last sc, turn: 42 sc.
Row 3: Ch 1, working in back lps, sc across to last sc, turn, leaving the last sc unworked: 41 sc.
Rows 4-15: Rep rows 2-3. On final row, 29 sc.
Row 16: Rep row 2: 28 sc.
Row 17: Ch 1, working in back lps, sc across each sc, including dipping down for each sc skipped sc in previous rows, all the way back to the beginning, turn: 43 sc.
Rows 18-81: Rep rows 2-17. Fasten off after final row, leaving about a 15″ tail for seaming.
Finishing
With RS facing each other, seam the last row made to the opposite side of the Cable Insert and seam together the top. Weave in all ends securely. Attach faux pom, if desired.

Twitter | Facebook | Pinterest
All the patterns at Make It Crochet are free. Since many of you have asked how to help with the costs of running a site like this, I’ve made all the patterns into print-ready PDFs and the cost is about the same as a cup of coffee. Every little bit helps.
TERMS: To my fellow crafters, you have my permission to use my patterns to make and sell your projects* anywhere you like. You cannot use my images to sell your projects, though. You must take photos of your own work. All patterns have been tested but mistakes can happen. If you find a mistake, please let me know. Everything at MakeItCrochet.com is protected by copyright to Kim Guzman. Other than the permissions previously given, no one other than Kim Guzman has permission to: reproduce, copy, publish or distribute this pattern, its parts or photos in any way or form, including, but not limited to, translations into foreign languages & video production.
*Not intended to be blanket permission for mass production.
I hope you enjoy the pattern. Please write if you have any problems.
Thanks so much for making this available – and as a bonus, the Caron knit shawl is lovely! I really appreciate you bringing it to our attention (and making it available for free on Ravelry). I’m looking forward to making the beanie, and if I get adventurous, the shawl (I’m primarily a crocheter).
I’m so glad you like it and hope you’ll enjoy making it. Thanks so much for writing!