
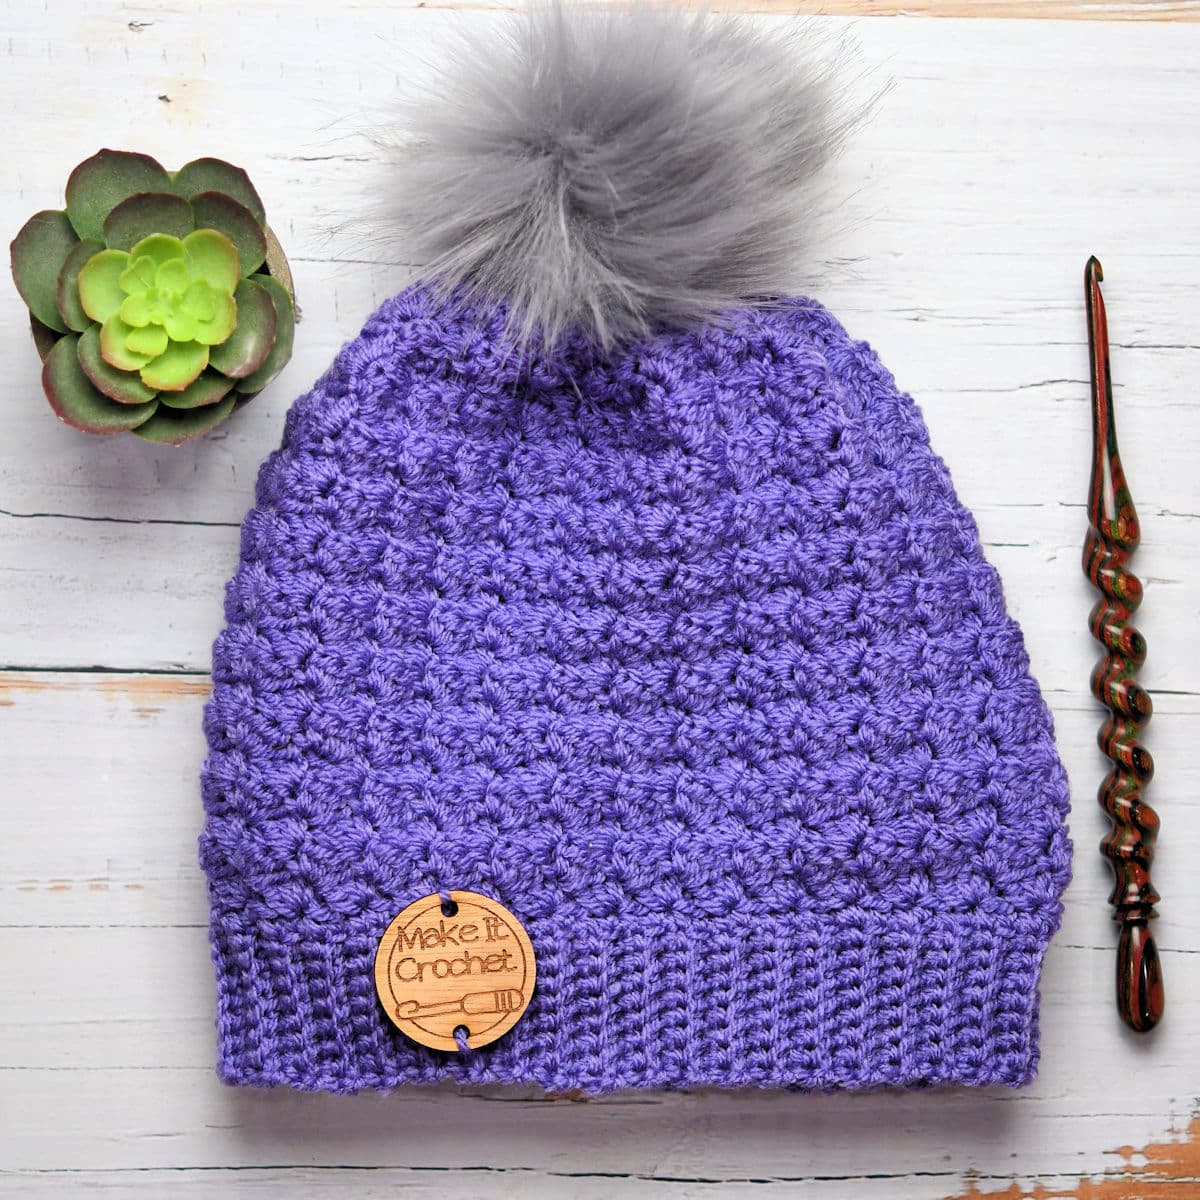
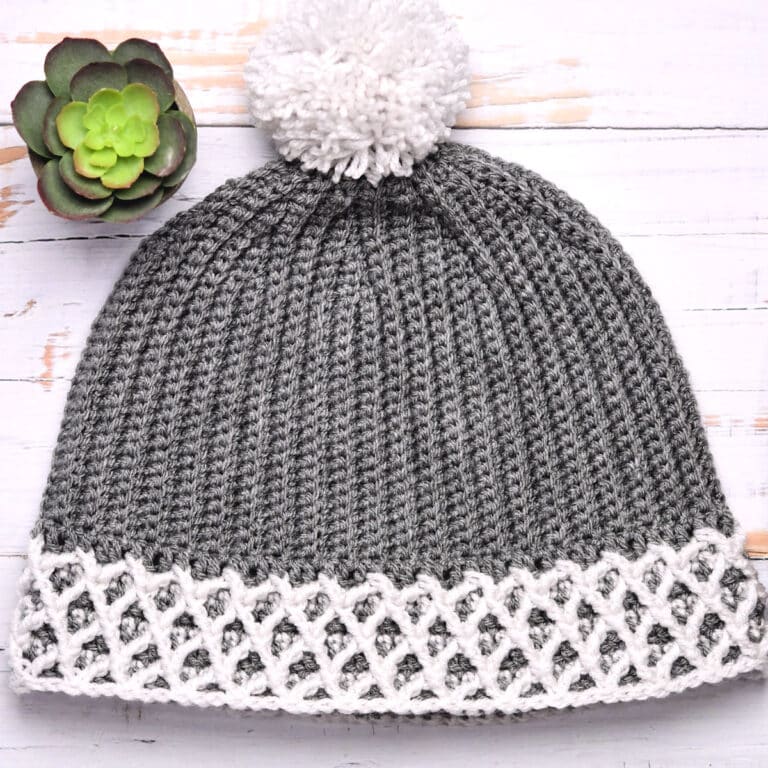
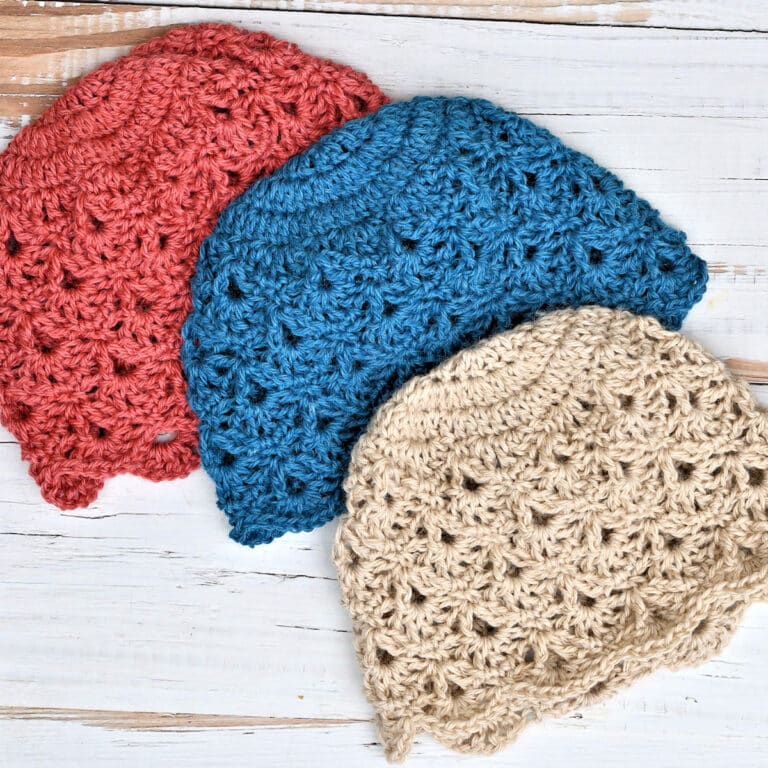
Create this beautifully textured Brambles Beanie with an easily memorized Sedge Stitch. The dense stitches create warmth and elegance in a hat just as fun to make as to wear.
“Brambles Beanie” free crochet pattern by Kim Guzman © Nov. 2023. All rights reserved.
Technique: Regular Crochet.
Skill Level: Easy.

Crochet Pattern At A Glance
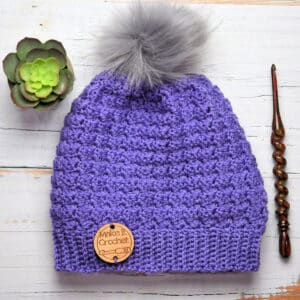
Brambles Beanie Free Crochet Pattern
Designer: Kim Guzman © 2022-2026. All rights reserved.Rate the Pattern
Yarn
- Stylecraft “Special DK”, size 3, 100% acrylic, 322 yds/295m per 3.5 oz/100g per skein: 1 skein, 230 yards used, color Violet
Other Materials
- Suggested Crochet Hook Size G-7 (4.5mm) or hook needed to meet gauge
- Yarn Needle for weaving ends
- Pom Pom, optional
Instructions
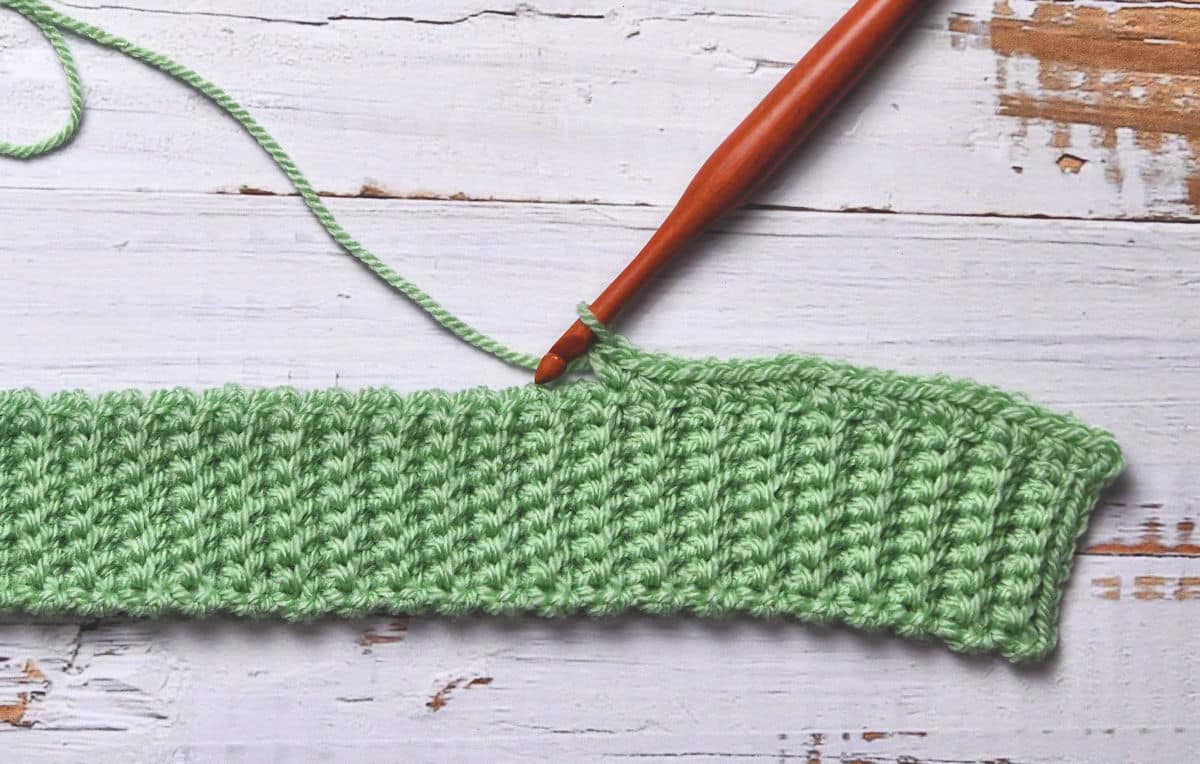
- Ribbing is made in back loop only single crochet.
- Work round 1 directly onto the long edge of the Ribbing.
- Work 18 more rounds without decreasing.
- Work 6 rounds with decreasing.
- Using yarn needle, cinch the top and seam the Ribbing. Attach pom pom, if desired.
Full Free Crochet Pattern Below

This is a free crochet pattern and the written instructions are below. If you prefer a printable download, a PDF is also available for purchase.
My Crochet Pattern Notes
This crochet hat pattern starts by working the ribbing in back loop only single crochet. Once complete, the ribbing is turned on its side and the hat is worked to the top, with decreasing near the top to make a cleaner join.
I have used a faux pom because I love them. But, there is enough yarn remaining in the skein to make your own yarn pom pom, if you like.
Because the fabric of this hat is more dense than my lacier hats, it takes a little longer, at about 3 to 4 hours.
What Is A Sedge Stitch?
I can think of three different stitch patterns called Sedge Stitch. There may be more. And, you may find them named things other than Sedge Stitch too.
You will find what this generally means is a group of stitches made in one spot, short stitches to taller stitches. Skipping stitches causes this group to bend over slightly and create a little poof. The poof will be different sizes depending on the number of stitches made in each group.
Pin It For Later

Finished Size
Height: 8″, Circumference: 20″.
Yarn
Stylecraft “Special DK”, size 3, 100% acrylic, 322 yds/295m per 3.5 oz/100g per skein: 1 skein, 230 yards used, color Violet.

“Special Double Knit” is classified as a DK weight (size 3) yarn and is currently available in over 120 shades.
Available at LoveCrafts (aff link).
See more projects in Stylecraft Special DK yarn.
About The Yarn
If you are unable to use Stylecraft Special DK, any acrylic or acrylic blend in size 3 lightweight yarn will be close enough.
I’ve seen a few crocheters use a size 4 yarn with some of my size 3 yarn hats. This has caused some issues with the hat being too big or too stiff. I believe the hats were usable when making the lacier styles, but I want to warn you that you may not be able to do that with the already dense nature of the fabric of this hat.
Other Materials
Suggested Crochet Hook Size G-7 (4.5mm) or hook needed to meet gauge.
Yarn Needle for weaving ends.
Pom Pom, optional.

Special Stitches
Cluster (cl): Work [sc, hdc, dc] in sc indicated.
Decrease (dec): Work [sc, hdc] in sc indicated, sk 2 sts, work dc in next sc. (This makes a Cluster across 2 Clusters to make one decrease. The first two stitches of the cluster are in one single crochet then the double crochet is in the next single crochet. Try to keep your stitches at the same tension throughout.
Other Abbreviations
This crochet beanie pattern is written in US crochet terminology.
ch=chain; dc=double crochet; hdc=half double crochet; rep=repeat; sc=single crochet; sk=skip; sl=slip; st(s)=stitch(es).
All numbers after the colon at the end of an instruction are stitch counts. Use the stitch count to check your work.
Gauge
When completed, ribbing is 1.5″ wide and the length is about 18″ unstretched, 20″ stretched. For hat body, in stitch pattern, 20 stitches=4″, 15 rounds=4″.
Turning While Working In Rounds
This hat pattern is a bit unusual because you will work in joined rounds, but you will turn after each round. That doesn’t mean it’s difficult, though.
This stitch pattern simply looks better when worked with turns. It’s the Sedge Stitch itself. It really needs to be worked on both sides for the best results.

Free Crochet Pattern Instructions
Ribbing
Row 1: Leaving 10″ strand (for seaming the Ribbing later), ch 9, sc in 2nd ch and in each remaining ch, turn: 8 sc.
Rows 2-90: Ch 1, working in back loops only, sc in 7 sc, sc in both loops of last sc (for greater stability), turn: 8 sc.
Begin working in rounds across long edge of Ribbing. Do not fasten off.
Ribbing measures about 18″ unstretched, 20″ when stretched.
Hat
Round 1: Ch 1, sc in side of first row, sc in side of next 8 rows, *2 sc in side of next row, sc in side of next 8 rows, rep from * across long edge of Ribbing, without twisting the Ribbing, pull the first and last row of the Ribbing together and sl st to first sc, turn: 99 sc.
Note: You can seam the first row of Ribbing to the last row of Ribbing now or wait until the hat is finished.
Round 2: Ch 1, cl (see Special Stitches above) in same sc as joining, *sk 2 sc, cl in next sc, rep from * to last 2 sc, sk last 2 sc, sl st to first sc, turn: 33 cl.
Rounds 3-19: Ch 1, cl in same sc as joining, *sk 2 sts, cl in next sc, rep from * around, sk last 2 sts, sl st to first sc, turn: 33 cl.
Round 20: Ch 1, cl in same sc as joining, sk 2 sts, cl in next sc, sk 2 sts, dec (see Special Stitches above), *[sk 2 sts, cl in next sc] 2 times, sk 2 sts, dec, rep from * to last cl, cl in last sc, sk last 2 sts, sl st to first sc, turn.
Round 21: Ch 1, cl in same sc as joining, *sk 2 sts, cl in next sc, rep from * around, sk 2 sts, sl st to first sc, turn: 25 cl.
Round 22: Ch 1, cl in same sc as joining, sk 2 sts, dec , *sk 2 sts, cl in next sc, sk 2 sts, dec, rep from * to last cl, sk 2 sts, cl in last sc, sk last 2 sts, sl st to first sc, turn.
Round 23: Ch 1, cl in same sc as joining, *sk 2 sts, cl in next sc, rep from * around, sk last 2 sts, sl st to first sc, turn: 17 cl.
Round 24: Ch 1, cl in same sc as joining, [sk 2 sts, dec] around, sk last 2 sts, sl st to first sc, turn.
Round 25: Ch 1, cl in same sc as joining, *sk 2 sts, cl in next sc, rep from * around, sk last 2 sts, sl st to first sc, fasten off: 9 cl.
Finishing
With yarn needle, weave yarn through the tops of each stitch on the final round. Carefully pull to cinch together the top and secure.
With yarn needle and first strand, seam the first and last rows of the ribbing together, if you haven’t done so already.
Weave in all ends securely. Attach pom pom, if desired.
Twitter | Facebook | Pinterest
All the patterns at Make It Crochet are free. Since many of you have asked how to help with the costs of running a site like this, I’ve made all the patterns into print-ready PDFs and the cost is about the same as a cup of coffee. Every little bit helps.
TERMS: To my fellow crafters, you have my permission to use my patterns to make and sell your projects* anywhere you like. You cannot use my images to sell your projects, though. You must take photos of your own work. All patterns have been tested but mistakes can happen. If you find a mistake, please let me know. Everything at MakeItCrochet.com is protected by copyright to Kim Guzman. Other than the permissions previously given, no one other than Kim Guzman has permission to: reproduce, copy, publish or distribute this pattern, its parts or photos in any way or form, including, but not limited to, translations into foreign languages & video production.
*Not intended to be blanket permission for mass production.

I love the hat but I hate turning at the beginning of each new row. I kinda lose track of what stitch to go into or else I set it down and when I get back to it I forget if I’ve already turned or need to turn to restart
I wonder if you could use a stitch marker when you set it down? If you place a stitch marker in the next stitch you’re supposed to use or maybe work one or two stitches in the round before you set it down so you have a starting point. I hope that helps. Thank you for writing!
this is exactly what I need for the hats I donate. They need to be denser and warm so this will be perfect. I don’t have much #3 yarn though so I’m planning on using worsted weight yarn and a larger hook and making the ribbing band to suit the sizes I want to make. Thank you. I love this hat.
That’s great! I look forward to hearing how it works out with your worsted weight adjustments. Thank you for writing!